Review: Rhino's ROV slider adds epic cinematic motion to your iPhone and DSLR footage

Rhino's ROV mobile slider is an easy way to up your photography game by adding cinematic motion to videos, time lapses, or long exposure shots, and AppleInsider's got one.
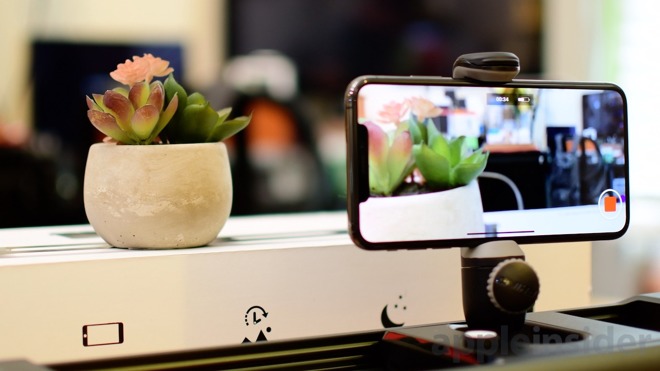
iPhone XS Max recording on Rhino ROV Mobile
Motorized sliders are often quite cost prohibitive, making them generally limited to the professional crowd, whatever that word implies anymore. ROV is a departure from that old adage and instead offers a powerful, Bluetooth app-connected, portable slider at an affordable price point.
The idea is simple -- attach either your iPhone or a DSLR to ROV, set the slider to move in the direction and speed you'd like, and start recording.
This takes already great shots, and makes them more amazing. Instead of a time-lapse with the camera frozen in place, it can now pan across the subject while the shot is ongoing. Panning video shots are now silky smooth.

We took a look at the smaller Everyday Pro model, and tested it with our iPhone, as well as the new Nikon Z7.
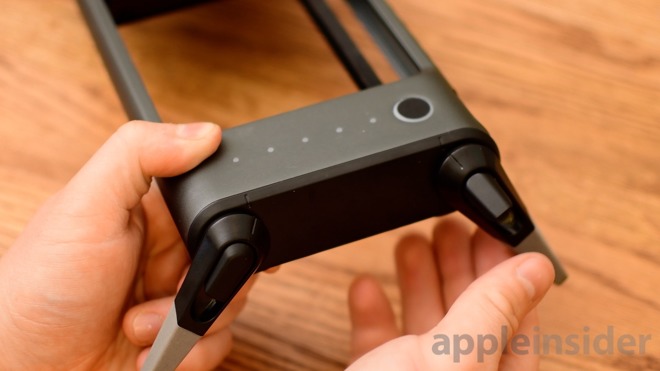
Adjustable legs on ROV Pro
The body feels solid and premium, largely made of metal. On each end are a pair of rotary legs that can lock into nearly any angle needed. These legs are crucial when outside and trying to attain stability in rugged terrain.
We had this angled up against the side of a tree, on a rocky beach, all without sacrificing stability.
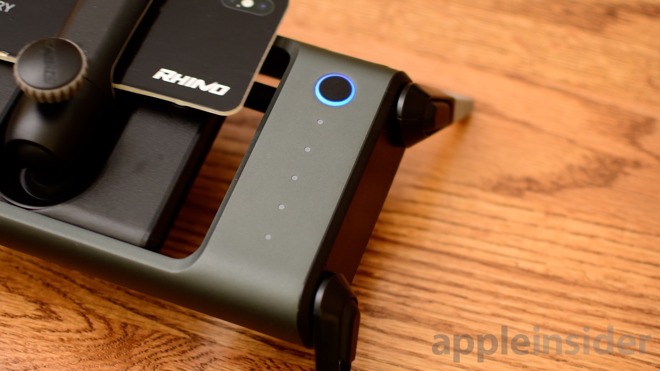
Power button and battery status lights on the ROV Pro
On one side of the unit is a series of LEDs representing battery life just below a rubberized power button. Pressing it for a couple seconds will cause it to flash blue, entering pairing mode. Pressing again will turn it off.
In the center of ROV is the actual slider tray that holds your iPhone or DSLR. There is a standard-sized thread to attach either the phone mount or ball head. Whichever mount is attached, it is able to fold down into a recess on the slider for travel.
We often have issues with Bluetooth-connected hardware. We've historically seen issues with pairing or connecting reliably -- but not in the case of ROV. It automatically connected to our phone within seconds each time we powered it on and had the app open.
When the app is launched each time, it asks a question of whether you are shooting with an phone or a DSLR affixed to the top of the slider.
If you are shooting with your DSLR attached on the ROV Pro, then you get shown all the controls for the slider. On the other hand, if you shoot with your iPhone, you get a camera interface with full manual controls, as well as the settings for the slider.
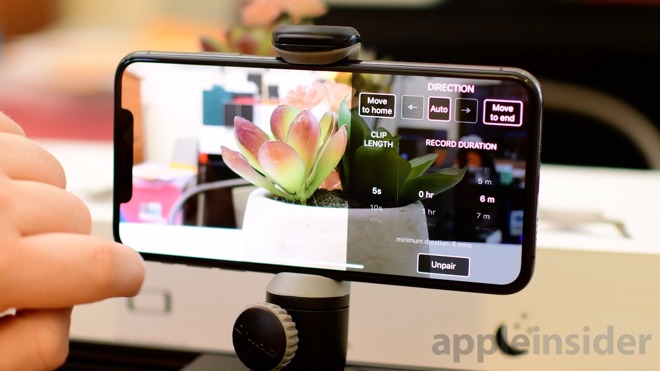
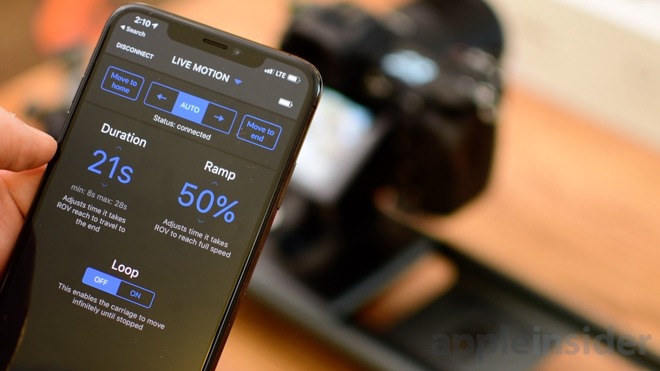
ROV slider settings on iPhone
There are three modes to choose between when you've got the iPhone attached -- standard video, time-lapse, or slow motion. Each of these gives you different options as far as the slider controls. When shooting a time-lapse, you get options such as the overall time of the shot.
There are all the manual controls you need for perfecting the shot including ISO, white balance, shutter speed, and focus. As soon as you tap the record button, the slider will automatically move into position and start the animation.
ROV Pro slider settings for a DSLR
Moving to the DSLR option, you have two modes to choose between. Time-lapse and straight video. You have all the same animation options that we saw before when using the camera interface on our iPhone, but without the actual camera options.
You have several different options when actually programming the slider, though none of them are complicated. There are buttons to move the slider to one end or the other, direction arrows to control which way the animation is carried out, a timer for how long the entire transition should take, then a percentage to control how fast the speed is ramped up.
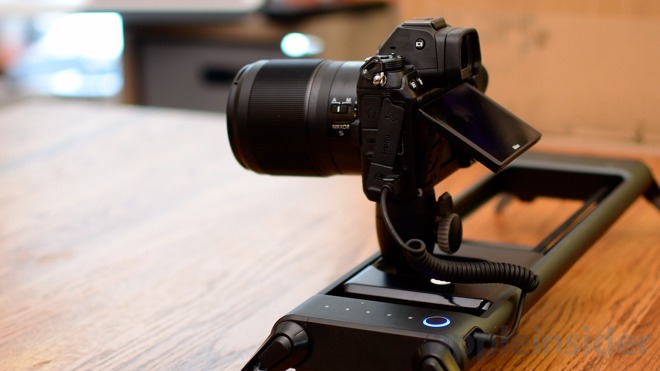
ROV Pro with Nikon Z7 attached
If you have the pro model for your DSLR, you can attach your camera to ROV so it is able to control the shutter for time-lapses. You program long the time-lapse will be, how long the shutter should stay open, and how frequently it should snap a picture. ROV figures out the rest and brings it all together.
If you have a high-resolution DSLR like the Nikon Z7, these images can be combined into an 8K time-lapse, which looks amazing.
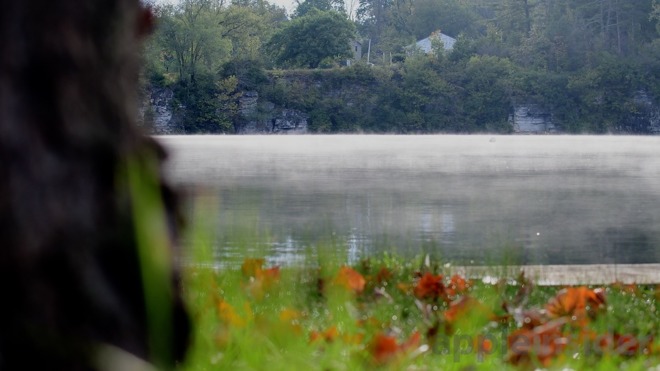
ROV Pro slider sample shot
We tried out several different locations with ROV and were most impressed by how quickly and easily we were able to go from in the bag, to up and shooting.
Sometimes we felt limited by the range on the Everyday slider, but that is why there is the Traveler for those more epic shots.
The only issue we had was while shooting in taller grass. The legs weren't large enough to keep the ROV elevated enough, so blades were getting caught up in the belt. Luckily, ROV was powerful enough to power through and showed no issues dealing with it. This is obviously surmountable by a little creativity on the part of the photographer, though.
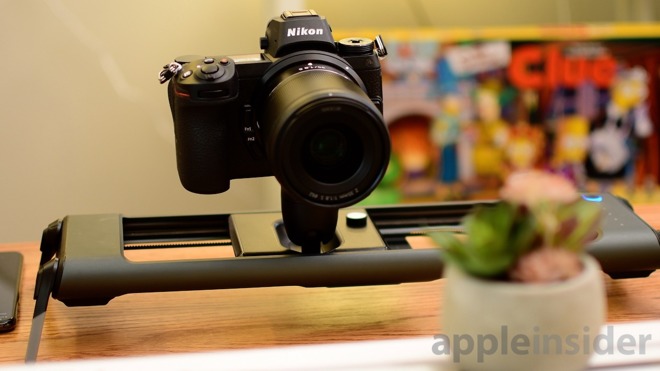
ROV Pro with Nikon Z7
We are going to continue shooting on ROV, and plan to try getting some fantastic night time-lapses that would be otherwise much more difficult to get.
If you are shooting on your iPhone, the ROV is very affordable for this kind of gear. The degree of options between the two sizes and pro models also gives a great degree of choice and range when picking one out.
iPhone XS Max recording on Rhino ROV Mobile
Motorized sliders are often quite cost prohibitive, making them generally limited to the professional crowd, whatever that word implies anymore. ROV is a departure from that old adage and instead offers a powerful, Bluetooth app-connected, portable slider at an affordable price point.
The idea is simple -- attach either your iPhone or a DSLR to ROV, set the slider to move in the direction and speed you'd like, and start recording.
This takes already great shots, and makes them more amazing. Instead of a time-lapse with the camera frozen in place, it can now pan across the subject while the shot is ongoing. Panning video shots are now silky smooth.

The basics
ROV offers the slider in Everyday and Traveler sizes which have eight inches and 16 inches of travel, respectively, and then standard and pro versions of both. Going for the pro gives you a machined aluminum ball head for attaching a DSLR as well as an iPhone, a premium metal finish, and support for DSLR-connected time-lapses.We took a look at the smaller Everyday Pro model, and tested it with our iPhone, as well as the new Nikon Z7.
Adjustable legs on ROV Pro
The body feels solid and premium, largely made of metal. On each end are a pair of rotary legs that can lock into nearly any angle needed. These legs are crucial when outside and trying to attain stability in rugged terrain.
We had this angled up against the side of a tree, on a rocky beach, all without sacrificing stability.
Power button and battery status lights on the ROV Pro
On one side of the unit is a series of LEDs representing battery life just below a rubberized power button. Pressing it for a couple seconds will cause it to flash blue, entering pairing mode. Pressing again will turn it off.
In the center of ROV is the actual slider tray that holds your iPhone or DSLR. There is a standard-sized thread to attach either the phone mount or ball head. Whichever mount is attached, it is able to fold down into a recess on the slider for travel.
App connectivity
There are no actual controls on the slider itself. Instead, all the controls are in the partner application.We often have issues with Bluetooth-connected hardware. We've historically seen issues with pairing or connecting reliably -- but not in the case of ROV. It automatically connected to our phone within seconds each time we powered it on and had the app open.
When the app is launched each time, it asks a question of whether you are shooting with an phone or a DSLR affixed to the top of the slider.
If you are shooting with your DSLR attached on the ROV Pro, then you get shown all the controls for the slider. On the other hand, if you shoot with your iPhone, you get a camera interface with full manual controls, as well as the settings for the slider.
ROV slider settings on iPhone
There are three modes to choose between when you've got the iPhone attached -- standard video, time-lapse, or slow motion. Each of these gives you different options as far as the slider controls. When shooting a time-lapse, you get options such as the overall time of the shot.
There are all the manual controls you need for perfecting the shot including ISO, white balance, shutter speed, and focus. As soon as you tap the record button, the slider will automatically move into position and start the animation.
ROV Pro slider settings for a DSLR
Moving to the DSLR option, you have two modes to choose between. Time-lapse and straight video. You have all the same animation options that we saw before when using the camera interface on our iPhone, but without the actual camera options.
You have several different options when actually programming the slider, though none of them are complicated. There are buttons to move the slider to one end or the other, direction arrows to control which way the animation is carried out, a timer for how long the entire transition should take, then a percentage to control how fast the speed is ramped up.
ROV Pro with Nikon Z7 attached
If you have the pro model for your DSLR, you can attach your camera to ROV so it is able to control the shutter for time-lapses. You program long the time-lapse will be, how long the shutter should stay open, and how frequently it should snap a picture. ROV figures out the rest and brings it all together.
If you have a high-resolution DSLR like the Nikon Z7, these images can be combined into an 8K time-lapse, which looks amazing.
Portability
ROV is designed for portability. It is compact, tough, and fits easily into most camera bags. Rhino even has a specifically designed bag just for ROV to make it even easier to take with you.ROV Pro slider sample shot
We tried out several different locations with ROV and were most impressed by how quickly and easily we were able to go from in the bag, to up and shooting.
Sometimes we felt limited by the range on the Everyday slider, but that is why there is the Traveler for those more epic shots.
Shooting in the real world
Versatility is key when trying to shoot out in the real world. You never know what you will be shooting on or where your camera needs to reside. We had great success keeping the ROV stable, especially with the movable legs.The only issue we had was while shooting in taller grass. The legs weren't large enough to keep the ROV elevated enough, so blades were getting caught up in the belt. Luckily, ROV was powerful enough to power through and showed no issues dealing with it. This is obviously surmountable by a little creativity on the part of the photographer, though.
ROV Pro with Nikon Z7
We are going to continue shooting on ROV, and plan to try getting some fantastic night time-lapses that would be otherwise much more difficult to get.
If you are shooting on your iPhone, the ROV is very affordable for this kind of gear. The degree of options between the two sizes and pro models also gives a great degree of choice and range when picking one out.
Comments