Here's how to get started with your new Apple Watch

If you've just a new Apple Watch -- especially if you're upgrading from an older one -- start here. This is what you need to know, what steps you'll go through, and what choices you have to make as you set up a new Apple Watch.
There were times when it used to take hours to just update the software. That's over now. The only thing faster than upgrading to an Apple Watch Series 4 is setting one up from scratch.
The process is fast in part because the Series 4 watch is itself faster but Apple has also streamlined the job. As long as your iPhone is nearby, Apple has boiled the steps down to a few questions. You can even choose to answer some of those later and with that plus the work Apple has done to speed up your setup, you can be using your Watch in a few minutes.
Each Watch you own has to be set up separately. Credit cards you add on Apple Pay to one Watch won't appear on the other, for example. And while you can wear as many at the same time as fashion allows, only one is considered active at a time.
So phone calls will only ring on one of your Watches, for instance. Siri will only listen on that one, notifications will only appear on it and so on.
If you do want to have two Watches, then once you've got both paired to your iPhone then switching between them is a matter of physically taking one off and putting the other on. When the new Watch is against your skin and you've entered its passcode, that Watch is the active one. Nicely, any exercise you've taken wearing the first Watch today will show up on the new Watch.
Still, even if it's this easy to switch, unless you really have a desire to wear an aluminium Apple Watch for work and swap to a stainless steel one for evenings at the gym, get rid of your old Watch.
It's obviously up to you whether you sell or gift it. What we're concerned about most is how you tell your old Watch that you're splitting up.
Unpairing your old Apple Watch
Before you add your new Watch, unpair the old one from your iPhone. You also need to backup the data on that old Watch but fortunately that's automatically done for you as soon as you unpair.
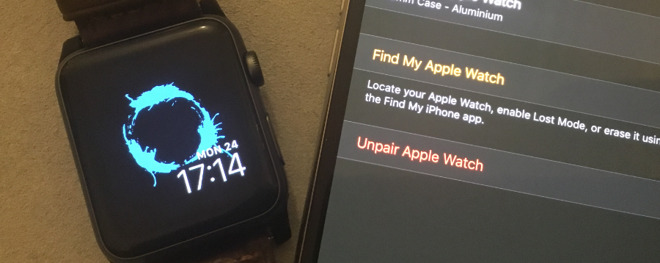
To unpair that old watch, then on your Phone go to the Apple Watch app and choose My Watch. Tap just underneath that heading and on the line where it says your name next to a thumbnail image of your watch face.
You'll go to a detail screen that again shows the face of your current watch. It's larger, though, and opposite it there is an i for information button. Tap on that. A list of options appears and it includes Unpair Apple Watch. This is the last option and it's in red but press it.
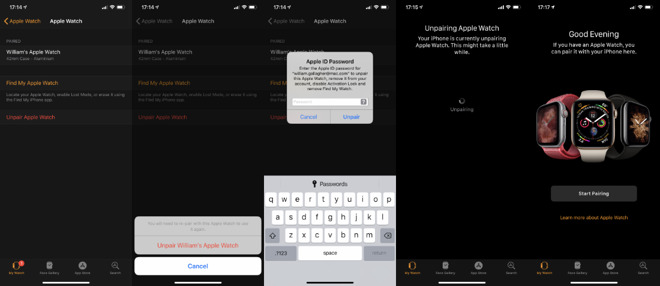
The steps you go through confirming you want to unpair from your old Watch
Even after you've tapped on the red Unpair Apple Watch, there are several further steps to go through. You must confirm that you really meant to press that unpair button, then you have to enter your Apple ID as a last confirmation that it's really you who wants this.
Then you're unpairing and it can take a few minutes and that's in part because the Apple Watch is backing up its data to the iPhone.
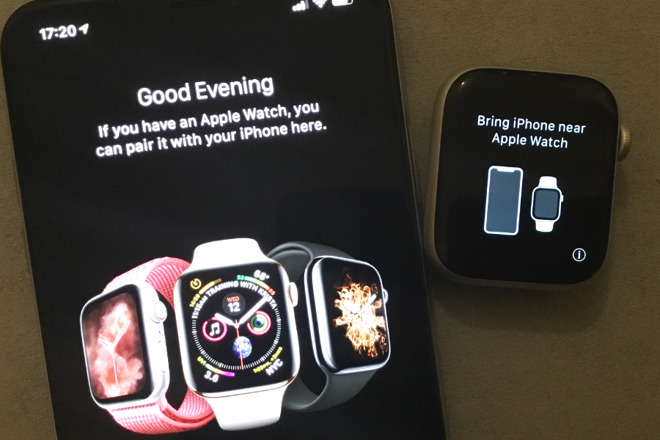
Then just place the Watch next to your iPhone.
Place your Apple Watch next to your iPhone and a huge amount of the setup work is automatically done for you
That proximity tells the Watch and the iPhone to start talking. The Watch switches to displaying an utterly beautiful, and constantly changing nebulous image. And the iPhone asks you to center its camera on that.
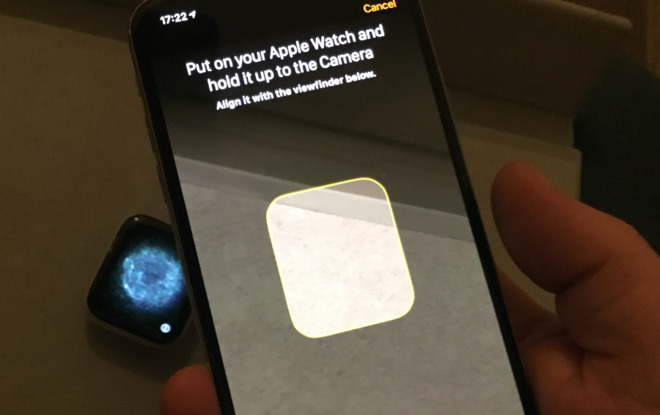
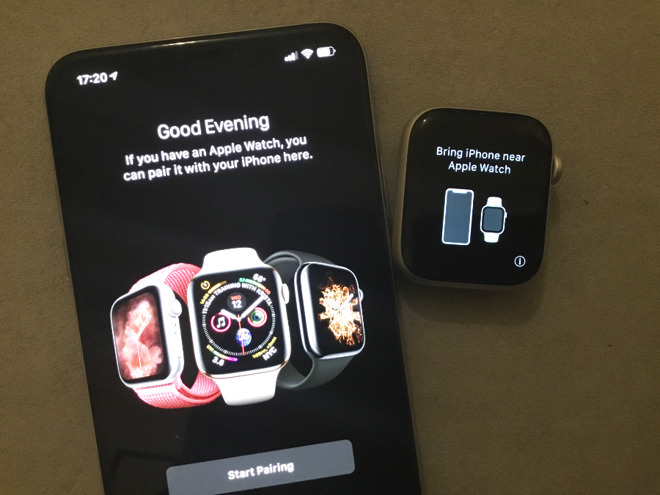
How to pair your Apple Watch to your iPhone
That scan you do of the Watch's image is enough to complete the pairing process. This Watch and your iPhone are now paired and it's time to make a choice about how you want to proceed. The choices and most of the next setup steps are shown on your iPhone, but the very first choice is the sort that is really no choice at all.
If you've never had a Watch before, tap that second option, and get going. If you have an existing Watch that you've just unpaired, choose Restore. There's no disadvantage to restoring from a backup, and hardly any difference to how long all this takes.
Plus you spent a lot of time arranging your old Watch to look just the way you want with the faces and the apps. Restoring from backup will mean your new Watch keeps all of those.
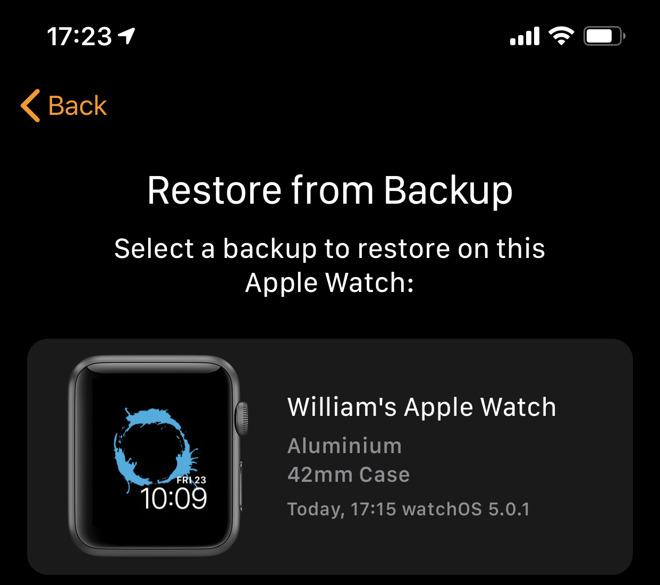
If you had a previous Apple Watch, restore the latest backup to the new one
When you choose Restore from Backup, then you'll be shown a list of different backups from your old Apple Watch. The most recent will be at the top of the list so just tap on that.
What may give you a little more pause is what happens next. You're asked to enter the password for your Apple ID. Your iPhone knows your Apple ID user name and now, because of the pairing, so does your Watch. You just now have to enter the password to confirm that it's your Apple ID.
If you do, this will let your Watch connect to the iTunes Store.
You could, instead, just ignore this part and tap the Next button to move on. That would mean setting up your Watch to use the iTunes Store and Apple Music later and you can do that. Yet, do it now. With iOS 12, the iPhone is even going to enter the password for you -- so long as you pass the Face ID or Touch ID test first.
When you have and when your Apple ID is entered, the iPhone will report that it's verifying this information. It says "this may take a few minutes" and it's hard to understand why. It's seemingly only comparing the username and password you entered here to a username and password on iCloud, yet it's true, this step can take a little while.
When it's done, however, you go onto a bit that has been actively arranged to make setting up faster.
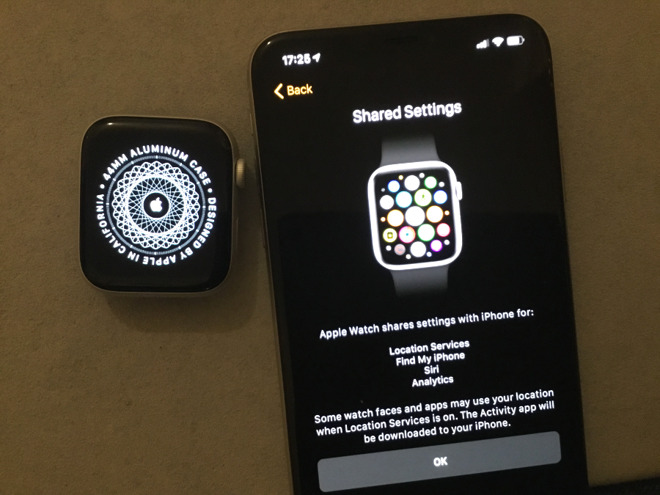
Apple Watch setup's Shared Settings information screen
All you can do is tap on OK but that's all we'd recommend doing anyway. You want Siri, you may well be grateful you had Find my iPhone on some day, and Location Services are needed for so many features of the Watch.
We're less concerned about the Analytics part but that just means if something goes wrong, if an Apple Watch app crashes on you, then the developer will be emailed some details. That's helpful to them, and we need app developers, so if we had a choice then we'd let that one stand too.
When you're using your Apple Watch, it is a route to your emails, your texts and to Apple Pay. Or rather, it is so long as the Watch can be sure that it's you who is wearing it.
So after you've set your Watch up, then whenever you put it on, you'll be asked for the passcode, if you have one. If you have and you enter it then from the moment you enter that to when you take the Watch off, it knows you are you.
That gets you all of the Watch's functions and it's hard to imagine why you'd spend all this money but then choose to disable some of its best features.
Any time you break the contact between the Watch and the skin of your wrist then you have to re-enter the passcode. That can be a pain if you wear the Watch very loosely, but the answer there is that you shouldn't.
There's no need to cut off blood to your hand, but put the Watch on so that it fits snugly and doesn't slip. Then you'll only get the passcode request first thing in the morning and you'll also get more accurate health tracking.
You'll even get better battery life as the Watch won't spend the whole day trying to get heart rate readings from a wrist it's not properly connected to.
So whether to use all the Watch's features or just to make us shut up about it, create a passcode. You'll be asked to enter on the Watch itself.
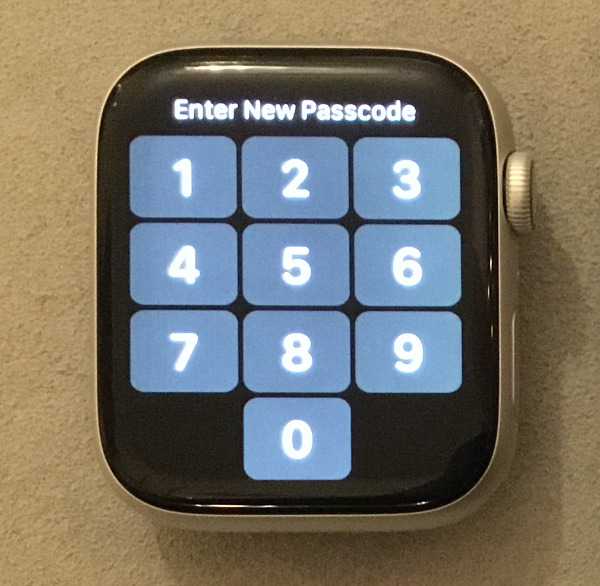
You'll need a passcode
You're told that your Watch will warn you if it detects an unusually low or high heart rate. The way this screen is worded, you'll expect that it means the Watch will do all this if you first enable the feature. Perhaps this varies by region, but for us these settings were automatically switched on.
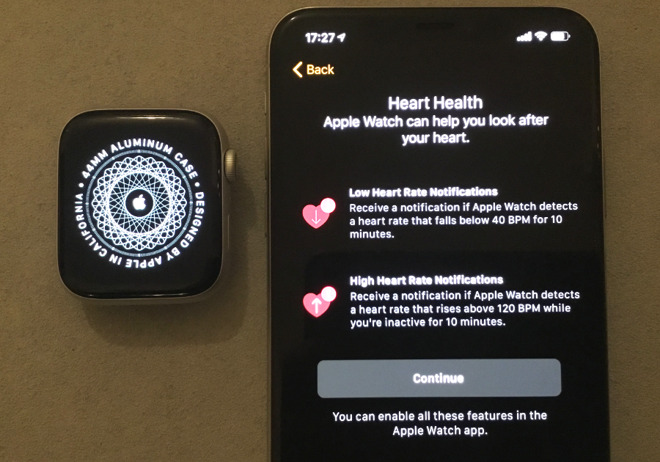
Apple Watch setup's Heart Health information screen
If you want to check that for yourself or change just how high or low your heart rate can get without a warning, you can open the Apple Watch app on your iPhone later.
For now, once more, all you can do is tap Continue.
It's the same with the next screen which is about emergency phone calls -- except this time you can do something later and perhaps will have to. This is about the Emergency SOS features of your Apple Watch and most significantly Fall Detection.
This is deservedly much-promoted feature whereby if you fall over, your Watch will sense that. It'll tap you on the wrist and offer to call emergency services. If you don't tap an I'm OK button or if you don't respond at all within about a minute, your Watch will send a message to your emergency contacts.
Or rather, it will if you have emergency contacts listed in your Medical ID information on your iPhone. And it will if you have Fall Detection switched on.
At some point when you set up an Apple ID, you had to enter your date of birth so that Apple knows whether you can buy anything more than PG-rated movies. Having that date of birth obviously means Apple knows your age and now it uses that fact in a new way. If you're over 65 then Fall Detection will automatically be switched on for you.
If you're not, then it's more likely that sports or other strenuous activities you do could be misinterpreted as a sudden fall. So Apple keeps Fall Detection switched off for you.
This all makes sense but if you want it, then it would be good to be able to switch it on right here during the setup. Unfortunately, you can't. You have to go to the Apple Watch app later and switch it on there. It's under My Watch, Emergency SOS.
The screen will have a circle made up of dashes like the seconds-markers on some clock faces. As the sync progresses, more of these dashes turn from gray to white.
Rather than watch those, however, you can also scroll down to get some guidance on how to use your Watch.
Though a short series of screens, this Apple Watch Basics feature will show you how to move around the Watch and what the Digital Crown does.
The text on these screens is remarkably well done. It's an example of very precise, concise and yet completely clear explanations that are particularly worth reading.
It just won't take you very long. So whether you read them all or just skip by, you're going to be finished before your Apple Watch is.
You can't do anything with your Watch until this process is over but you can do anything you need with your iPhone. Work on that or just walk away from them both.

Everything's done
When the syncing is done, your Watch will report that it's ready. The iPhone's setup app has done its job and passes you over to the regular Apple Watch app.
This is where you can adjust those settings such as Fall Detection.
That iPhone app is also where you could set up Watch faces or buy apps for the Watch. In practice, you're going to use it chiefly when you want to install an app.
Whatever it is, though, you buy the iPhone app through the App Store. Then you go into the Apple Watch app on your phone, choose My Watch and scroll down what could be a very, very long list.
Apps that are already installed on your Watch appear first. Then there is a complete list of all the other apps you have which can be run on the Watch. Tap to install any you want.
Over time, you will end up adding and removing apps as you find which do or don't have decent Apple Watch versions.
You're going to be using these and Apple's own apps as straight applications that you launch and use, and you're going to be using them as complications.
So a complication on Apple Watch is an extra function but it's also one that takes up some space on your Watch face. They'll usually display some useful information such as the temperature, but if you tap on them, they take you into a fuller Apple Watch app with more details.
Complications are not the only way to launch apps. You can ask Siri or you can press the Digital Crown.
Pressing that brings you out of the Watch face and to a honeycomb home screen of all the apps on your watch. Some people loathe this, others see it as a familiar part of the Watch. If you don't like it, you can change to a simple menu listing apps.
Press the Digital Crown to go to the honeycomb home screen and then press harder. This force press brings up a menu with two buttons, one saying Grid View and the other List View.
Take your pick and the Watch will remember your preference.
You're still most likely to launch apps from their complications, though.
The way you add complications is the same as the way you adjust anything to do with the Watch face.
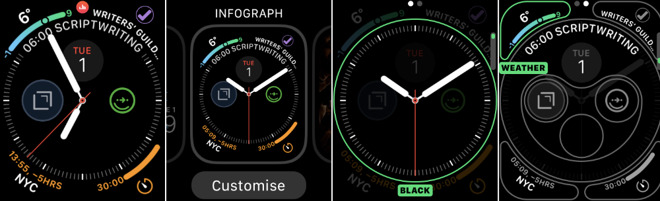
Four steps to adjusting a Watch face to suit you
Swipe left and right to see what you can adjust -- it varies depending on the face -- and at some point you will see spaces for where complications go. Tap on one and then you can scroll the Digital Crown through a list of apps that will fit that complication.
Not all apps fit all complications and not all faces support every complication.
You're going to end up experimenting but if it always begins with that Force Press to start it off, it also always ends the same way. Make the adjustments you want and then Force Press on the Face editor screen. You'll again get the shrunken face and Customize button.
This time just tap lightly on the face itself and this face will spring back to filling the screen.
When you get that Customize button, you can also swipe to left and right to move along through any number of different faces. Swipe far enough to the right and you get to a plus symbol. Tap that and you can add another face entirely.
So experiment with different faces, different apps and complications. And also with Apple Pay.
Instead, imagine the convenience of being able to run through a Metro train system like London's and just waving your Watch at the ticket barrier.
Once you've got Apple Pay set up on your Watch, you won't bother setting it up anywhere else.
However, you do have to use your iPhone to set it up the first time. These steps may vary depending upon your bank, but broadly they are all about saying which card you want and then verifying that it's yours.
So on the iPhone's Apple Watch app, choose Apple Pay and scroll down to Wallet & Apple Pay. Then tap Add Card.
Once you confirm that you want to add a card to Apple Pay, you place the card in front of the iPhone's camera and it reads the details.
You then have to step through verification processes which will typically involve your bank sending you a code number via text message.
Enter that and your card is now on your Apple Watch, ready to be used. To use it, wait until you're at a ticket barrier, supermarket checkout or any kind of pay point. Then double-tap the side button on your Watch. Normally it will show you an image of your card and say that it's ready. Just occasionally, it will instead say that the card isn't ready and that you should try again in a few minutes. Just press the side button once to return to the Watch face and then double-tap it again to go back into the card.
When the Watch confirms the card is ready, you just hold the Watch close over the reader and the payment is made. You'll get a tickle-like sensation from the haptic feedback to tell you that it's been successful.

However, these are all things you can explore later. For now, you've got your Apple Watch on your wrist and you've got Apple Pay set up on it.
There were times when it used to take hours to just update the software. That's over now. The only thing faster than upgrading to an Apple Watch Series 4 is setting one up from scratch.
The process is fast in part because the Series 4 watch is itself faster but Apple has also streamlined the job. As long as your iPhone is nearby, Apple has boiled the steps down to a few questions. You can even choose to answer some of those later and with that plus the work Apple has done to speed up your setup, you can be using your Watch in a few minutes.
But first
If you're upgrading from an older Apple Watch, you could choose to keep and continue to use that. There is no reason other than sense to get rid of the old one. Apple would be very happy if everybody bought multiple watches to color-coordinate with their clothes, for instance, and the company has taken steps to make it possible.Each Watch you own has to be set up separately. Credit cards you add on Apple Pay to one Watch won't appear on the other, for example. And while you can wear as many at the same time as fashion allows, only one is considered active at a time.
So phone calls will only ring on one of your Watches, for instance. Siri will only listen on that one, notifications will only appear on it and so on.
If you do want to have two Watches, then once you've got both paired to your iPhone then switching between them is a matter of physically taking one off and putting the other on. When the new Watch is against your skin and you've entered its passcode, that Watch is the active one. Nicely, any exercise you've taken wearing the first Watch today will show up on the new Watch.
Still, even if it's this easy to switch, unless you really have a desire to wear an aluminium Apple Watch for work and swap to a stainless steel one for evenings at the gym, get rid of your old Watch.
It's obviously up to you whether you sell or gift it. What we're concerned about most is how you tell your old Watch that you're splitting up.
Unpairing your old Apple Watch
Before you add your new Watch, unpair the old one from your iPhone. You also need to backup the data on that old Watch but fortunately that's automatically done for you as soon as you unpair.
To unpair that old watch, then on your Phone go to the Apple Watch app and choose My Watch. Tap just underneath that heading and on the line where it says your name next to a thumbnail image of your watch face.
You'll go to a detail screen that again shows the face of your current watch. It's larger, though, and opposite it there is an i for information button. Tap on that. A list of options appears and it includes Unpair Apple Watch. This is the last option and it's in red but press it.
The steps you go through confirming you want to unpair from your old Watch
Even after you've tapped on the red Unpair Apple Watch, there are several further steps to go through. You must confirm that you really meant to press that unpair button, then you have to enter your Apple ID as a last confirmation that it's really you who wants this.
Then you're unpairing and it can take a few minutes and that's in part because the Apple Watch is backing up its data to the iPhone.
Get out your new Apple Watch
Unbox your new Apple Watch. To switch it on, press and hold both the Digital Crown on the top right side and the button just below it.Then just place the Watch next to your iPhone.
Place your Apple Watch next to your iPhone and a huge amount of the setup work is automatically done for you
That proximity tells the Watch and the iPhone to start talking. The Watch switches to displaying an utterly beautiful, and constantly changing nebulous image. And the iPhone asks you to center its camera on that.
How to pair your Apple Watch to your iPhone
That scan you do of the Watch's image is enough to complete the pairing process. This Watch and your iPhone are now paired and it's time to make a choice about how you want to proceed. The choices and most of the next setup steps are shown on your iPhone, but the very first choice is the sort that is really no choice at all.
To restore or not
You're given the option of Restore from Backup or Set Up as New Apple Watch.If you've never had a Watch before, tap that second option, and get going. If you have an existing Watch that you've just unpaired, choose Restore. There's no disadvantage to restoring from a backup, and hardly any difference to how long all this takes.
Plus you spent a lot of time arranging your old Watch to look just the way you want with the faces and the apps. Restoring from backup will mean your new Watch keeps all of those.
If you had a previous Apple Watch, restore the latest backup to the new one
When you choose Restore from Backup, then you'll be shown a list of different backups from your old Apple Watch. The most recent will be at the top of the list so just tap on that.
Terms and conditions
You've looked forward to this bit from the moment Apple announced the Series 4 Watch. It's time to skip through the Terms and Conditions while vowing to read them some day.What may give you a little more pause is what happens next. You're asked to enter the password for your Apple ID. Your iPhone knows your Apple ID user name and now, because of the pairing, so does your Watch. You just now have to enter the password to confirm that it's your Apple ID.
If you do, this will let your Watch connect to the iTunes Store.
You could, instead, just ignore this part and tap the Next button to move on. That would mean setting up your Watch to use the iTunes Store and Apple Music later and you can do that. Yet, do it now. With iOS 12, the iPhone is even going to enter the password for you -- so long as you pass the Face ID or Touch ID test first.
When you have and when your Apple ID is entered, the iPhone will report that it's verifying this information. It says "this may take a few minutes" and it's hard to understand why. It's seemingly only comparing the username and password you entered here to a username and password on iCloud, yet it's true, this step can take a little while.
When it's done, however, you go onto a bit that has been actively arranged to make setting up faster.
Shared settings
This is less about settings and more just telling you what they are. Your iPhone will simply report the fact that your Watch will automatically have the same settings as your phone does for Location Services, Find my iPhone, Siri and Analytics.Apple Watch setup's Shared Settings information screen
All you can do is tap on OK but that's all we'd recommend doing anyway. You want Siri, you may well be grateful you had Find my iPhone on some day, and Location Services are needed for so many features of the Watch.
We're less concerned about the Analytics part but that just means if something goes wrong, if an Apple Watch app crashes on you, then the developer will be emailed some details. That's helpful to them, and we need app developers, so if we had a choice then we'd let that one stand too.
Passcodes are your friend
Next you're asked to create a passcode -- or a Long Passcode. The former is four digits and the latter is six. It's up to you but choose one or the other. There is an option to Don't Add Passcode and that's just wrong.When you're using your Apple Watch, it is a route to your emails, your texts and to Apple Pay. Or rather, it is so long as the Watch can be sure that it's you who is wearing it.
So after you've set your Watch up, then whenever you put it on, you'll be asked for the passcode, if you have one. If you have and you enter it then from the moment you enter that to when you take the Watch off, it knows you are you.
That gets you all of the Watch's functions and it's hard to imagine why you'd spend all this money but then choose to disable some of its best features.
Any time you break the contact between the Watch and the skin of your wrist then you have to re-enter the passcode. That can be a pain if you wear the Watch very loosely, but the answer there is that you shouldn't.
There's no need to cut off blood to your hand, but put the Watch on so that it fits snugly and doesn't slip. Then you'll only get the passcode request first thing in the morning and you'll also get more accurate health tracking.
You'll even get better battery life as the Watch won't spend the whole day trying to get heart rate readings from a wrist it's not properly connected to.
So whether to use all the Watch's features or just to make us shut up about it, create a passcode. You'll be asked to enter on the Watch itself.
You'll need a passcode
Information
It's as if Apple wants to give you a break from answering questions. We had that step where it just told you about Shared Settings. Now your iPhone shows you a page about Heart Health.You're told that your Watch will warn you if it detects an unusually low or high heart rate. The way this screen is worded, you'll expect that it means the Watch will do all this if you first enable the feature. Perhaps this varies by region, but for us these settings were automatically switched on.
Apple Watch setup's Heart Health information screen
If you want to check that for yourself or change just how high or low your heart rate can get without a warning, you can open the Apple Watch app on your iPhone later.
For now, once more, all you can do is tap Continue.
It's the same with the next screen which is about emergency phone calls -- except this time you can do something later and perhaps will have to. This is about the Emergency SOS features of your Apple Watch and most significantly Fall Detection.
This is deservedly much-promoted feature whereby if you fall over, your Watch will sense that. It'll tap you on the wrist and offer to call emergency services. If you don't tap an I'm OK button or if you don't respond at all within about a minute, your Watch will send a message to your emergency contacts.
Or rather, it will if you have emergency contacts listed in your Medical ID information on your iPhone. And it will if you have Fall Detection switched on.
At some point when you set up an Apple ID, you had to enter your date of birth so that Apple knows whether you can buy anything more than PG-rated movies. Having that date of birth obviously means Apple knows your age and now it uses that fact in a new way. If you're over 65 then Fall Detection will automatically be switched on for you.
If you're not, then it's more likely that sports or other strenuous activities you do could be misinterpreted as a sudden fall. So Apple keeps Fall Detection switched off for you.
This all makes sense but if you want it, then it would be good to be able to switch it on right here during the setup. Unfortunately, you can't. You have to go to the Apple Watch app later and switch it on there. It's under My Watch, Emergency SOS.
While you wait
Next, your iPhone will tell you that it is syncing with your Apple Watch. While it copies across apps and settings, turn to your Watch itself.The screen will have a circle made up of dashes like the seconds-markers on some clock faces. As the sync progresses, more of these dashes turn from gray to white.
Rather than watch those, however, you can also scroll down to get some guidance on how to use your Watch.
Though a short series of screens, this Apple Watch Basics feature will show you how to move around the Watch and what the Digital Crown does.
The text on these screens is remarkably well done. It's an example of very precise, concise and yet completely clear explanations that are particularly worth reading.
It just won't take you very long. So whether you read them all or just skip by, you're going to be finished before your Apple Watch is.
You can't do anything with your Watch until this process is over but you can do anything you need with your iPhone. Work on that or just walk away from them both.
Everything's done
When the syncing is done, your Watch will report that it's ready. The iPhone's setup app has done its job and passes you over to the regular Apple Watch app.
This is where you can adjust those settings such as Fall Detection.
That iPhone app is also where you could set up Watch faces or buy apps for the Watch. In practice, you're going to use it chiefly when you want to install an app.
About apps
There are no Apple Watch-only apps, there are just iPhone ones with a Watch component. Sometimes the iPhone app may be a token, it may exist solely to allow there to be an Apple Watch one. Other times, the iPhone app will be a powerful one and the Watch just has a basic viewer to show some information.Whatever it is, though, you buy the iPhone app through the App Store. Then you go into the Apple Watch app on your phone, choose My Watch and scroll down what could be a very, very long list.
Apps that are already installed on your Watch appear first. Then there is a complete list of all the other apps you have which can be run on the Watch. Tap to install any you want.
Over time, you will end up adding and removing apps as you find which do or don't have decent Apple Watch versions.
You're going to be using these and Apple's own apps as straight applications that you launch and use, and you're going to be using them as complications.
Complications
On a regular wristwatch, you get the hours, minutes and seconds hands. That's the timepiece and anything else like the date or phases of the moon is a complication. On Apple Watch, Apple has taken the term and similarly uses it for anything other than straight telling the time.So a complication on Apple Watch is an extra function but it's also one that takes up some space on your Watch face. They'll usually display some useful information such as the temperature, but if you tap on them, they take you into a fuller Apple Watch app with more details.
Complications are not the only way to launch apps. You can ask Siri or you can press the Digital Crown.
Pressing that brings you out of the Watch face and to a honeycomb home screen of all the apps on your watch. Some people loathe this, others see it as a familiar part of the Watch. If you don't like it, you can change to a simple menu listing apps.
Press the Digital Crown to go to the honeycomb home screen and then press harder. This force press brings up a menu with two buttons, one saying Grid View and the other List View.
Take your pick and the Watch will remember your preference.
You're still most likely to launch apps from their complications, though.
The way you add complications is the same as the way you adjust anything to do with the Watch face.
Adjusting the Watch face
Force press on the Watch face and it will shrink in size just enough to display a Customize button. Tap on that and you're into the editor for that Watch face.Four steps to adjusting a Watch face to suit you
Swipe left and right to see what you can adjust -- it varies depending on the face -- and at some point you will see spaces for where complications go. Tap on one and then you can scroll the Digital Crown through a list of apps that will fit that complication.
Not all apps fit all complications and not all faces support every complication.
You're going to end up experimenting but if it always begins with that Force Press to start it off, it also always ends the same way. Make the adjustments you want and then Force Press on the Face editor screen. You'll again get the shrunken face and Customize button.
This time just tap lightly on the face itself and this face will spring back to filling the screen.
Take your time
You need to try the Watch apps to see what works for you and, in some cases, what works at all. Don't overload the Watch but also don't feel you have to be in a hurry.When you get that Customize button, you can also swipe to left and right to move along through any number of different faces. Swipe far enough to the right and you get to a plus symbol. Tap that and you can add another face entirely.
So experiment with different faces, different apps and complications. And also with Apple Pay.
Apple Pay
This was made for Apple Watch. Forget being able to wave your phone at a supermarket checkout and forget being able to buy things online with a tap of your thumb on a MacBook Pro.Instead, imagine the convenience of being able to run through a Metro train system like London's and just waving your Watch at the ticket barrier.
Once you've got Apple Pay set up on your Watch, you won't bother setting it up anywhere else.
However, you do have to use your iPhone to set it up the first time. These steps may vary depending upon your bank, but broadly they are all about saying which card you want and then verifying that it's yours.
So on the iPhone's Apple Watch app, choose Apple Pay and scroll down to Wallet & Apple Pay. Then tap Add Card.
Once you confirm that you want to add a card to Apple Pay, you place the card in front of the iPhone's camera and it reads the details.
You then have to step through verification processes which will typically involve your bank sending you a code number via text message.
Enter that and your card is now on your Apple Watch, ready to be used. To use it, wait until you're at a ticket barrier, supermarket checkout or any kind of pay point. Then double-tap the side button on your Watch. Normally it will show you an image of your card and say that it's ready. Just occasionally, it will instead say that the card isn't ready and that you should try again in a few minutes. Just press the side button once to return to the Watch face and then double-tap it again to go back into the card.
When the Watch confirms the card is ready, you just hold the Watch close over the reader and the payment is made. You'll get a tickle-like sensation from the haptic feedback to tell you that it's been successful.
That's it
There's more to say about the apps that come on the Watch -- such as the extensive fitness ones. There's a great deal to say about third-party apps you can buy to run on the Watch too.
However, these are all things you can explore later. For now, you've got your Apple Watch on your wrist and you've got Apple Pay set up on it.
New Apple Watch Users Guide by on Scribd
Comments
I don't remember how I did it, other than turning off Simple Passcode and then entering my eight digits. It accepted them and Bob's your uncle.
It's been over a year, so I don't remember precisely. I suspect it's something on the order of what macgui posted, because looking at the Watch App on my phone, I see only that I have "Simple Passcode" turned off.
I really hope they haven't limited that to 6 characters. Perhaps the user in this case only entered 6 characters?
You have to activate that in the Apple Watch app, though, under Passcode settings, 'Unlock with iPhone'..