How to do basic editing and detailed markup of PDFs on Mojave

The more you need to edit or alter PDFs, the closer you come to needing third-party apps. Yet again, though, the Mac comes with PDF tools that are capable and useful -- so let's talk about how to use them.
If you need to read a PDF then there is probably no better machine than a Mac. However, if you want to mark up or edit one, things are a little less clear. As it stands, macOS Mojave does come with excellent PDF handling and its markup tools are first class -- but its editing ones are not.
The chief reason you may decide to invest in third-party PDF apps is that they offer better editing features than come as standard on the Mac. Yet what Mojave does, it mostly does very well and there's enough power here that it's possible you'll never need more.
Without exception, that is the most sensible thing to do. There are times, though, when you don't have access to the original document or its app. There are times when you only want to remove page 3 or correct a typo on page 17. And then, there are times when you don't want to change a single thing on the PDF but you must redact parts.
The tools that come with your Mac won't let you redact. They won't let you change a typo. However, they will let you remove page 3 and they will let you annotate. So you can tell someone else which bits need to be changed and to what.
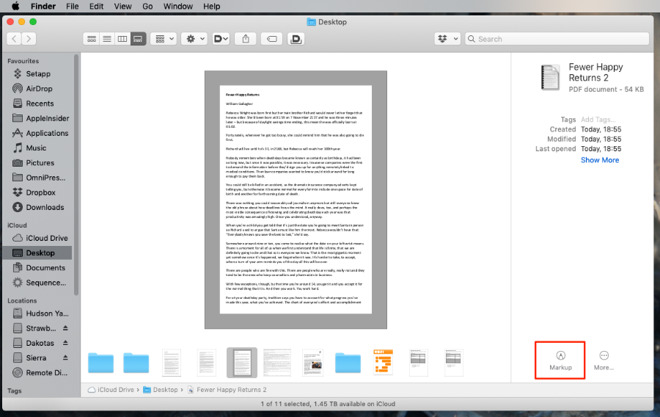
Mojave adds a markup button in the Finder's new Gallery view
You can markup a PDF by opening one in Preview and in Quick Look by finding a document tapping on the spacebar. What's more, as of Mojave, you can now switch the Finder to a Gallery view and have a Preview pane open. In that pane, you'll get some details about the document but also a Markup button.
Clicking that really just opens the PDF in Quick Look -- but it's handy.
Most of what follows applies equally to whether you open a PDF in the Preview app, or whether you use Quick Look. The differences are subtle, and in practice the reason for choosing one over the other is expediency. It's easiest and, unsurprisingly, quickest to use Quick Look.
Find a PDF document on your Mac, select it and then tap the spacebar. The Mac opens it up in a Quick Look window that lets you see and read it fully. Quick Look now also lets you mark up that PDF with all the same tools that you get for this job in Preview.
Preview is the more handy option if you're going to be doing a lot of work, though, as it means you can have that PDF open all the time. With Quick Look, as soon as you go to check some other document or window, it closes the PDF.
Click and drag any of those pages to anywhere else in the sidebar's thumbnails and you'll re-order the whole PDF.
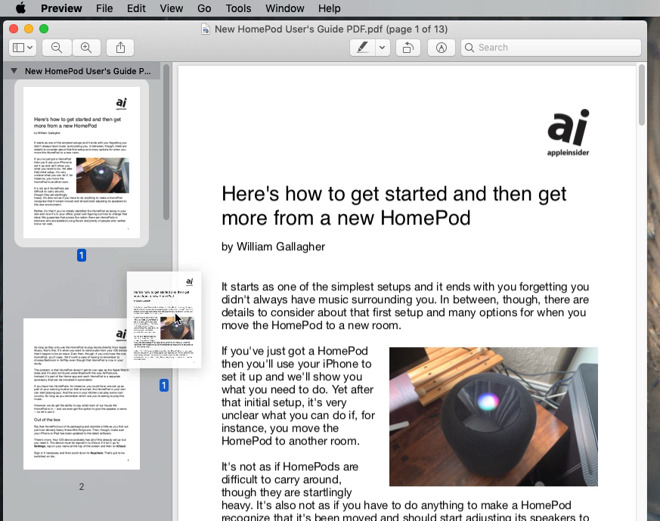
You can't do much PDF editing in Preview, but can move and delete pages
You can also delete any page -- but the way you do it is not as obvious or even consistent as how you move them. In theory, you can click to select a page and then right-click to get a popup menu and choose Move to Trash. Or you can choose the same Move to Trash from the Edit menu. And yet sometimes, for no clear reason, neither option is available.
That Edit menu option lists the keyboard shortcut for Move to Trash as Command-Delete -- but it's grayed-out too. Nonetheless, you can select a page, press Command-Delete and it's gone.
It's just that you could equally well simply press Delete.
That's a design confusion in Preview but the errant graying-out of the Move to Trash is more to do with problems with PDFs in general. If there's anything wrong with the PDF, you can get this problem. If you can't remove a page by pressing Delete, use File, Export to PDF and create a new PDF to work from.

This handy option is solely available when you have first copied a PDF or other graphic
Right- or option-click on it and choose Copy. Then when you go to Preview and select the File menu, you'll see that the very first option is New from Clipboard.
Most of the time, this option is grayed-out. Whenever you've copied anything graphical like a PDF or an actual image, though, it becomes available. Choose it when you've copied a PDF and you get a brand new, untitled copy of that.

You can also call up the Markup toolbar by clicking on the icon next to the Search bar
This toolbar contains a dozen icons, many of which are drop-down menus with more options. The most significant ones are for adding or editing text, drawing lines or shapes, and adding your signature.
Preview will usually let you add text to a document but it won't be pretty. You won't be able to add a sentence to a paragraph and make it look precisely the same font. You will, though, be able to add, say, titles.
Depending on the PDF and how it was created, you will often be able to click into a text field and then just type. When you get a form that has fields like Name, it typically lets you do this.
The rest of the time, you have to tell the PDF that you want to add text. You do that by choosing Tools, Annotate and then Text. Now you can type anywhere on the PDF and by default, Preview shows that text in red so that you're really clear where you're typing.
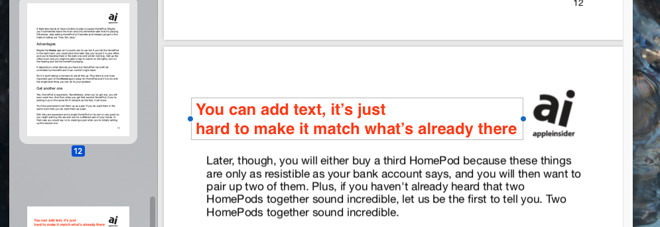
We didn't really try very hard to match the new text to the old
Once you've written text, you can select either it or the existing text in the document by choosing the Text Selection tool. It's the first icon on the left of the Markup toolbar and lets you drag across text, highlighting it as you go.
When you've done that, you can get Preview to change the color of the text's background. It doesn't change the text color itself. It's more like running a highlighter pen over the words.
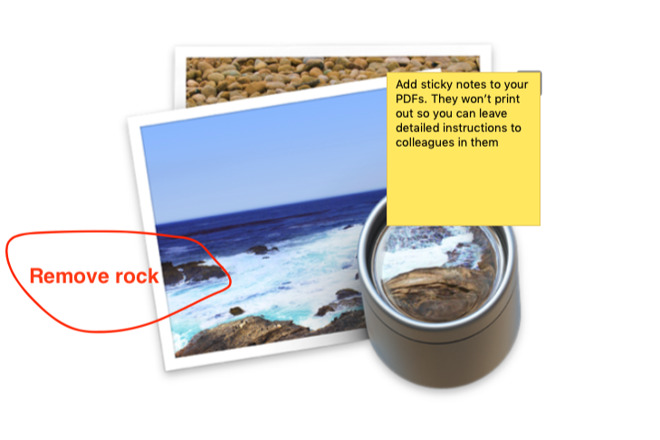
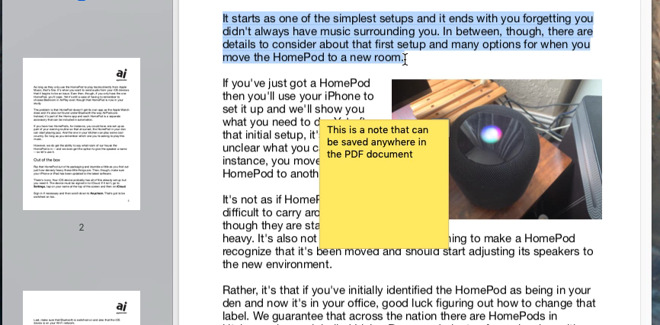
The eighth icon from the left, which looks more like a calendar symbol, is Note. Click that and you get a rather small white rectangle with a faint border around it. Click on that rectangle, though, and it expands out into a much larger yellow rectangle that you can type into.
Highlighting and annotating text in a PDF
It's a lot less obvious how you get rid of these notes if you change your mind. If it's too late to just hit Undo, you need to choose the Tools menu and select Show Inspector.
This Inspector isn't a great deal of use because it shows you a lot of information about, say, the size of the document but you can no longer edit or change any of it -- except for one thing. Click on the last icon in the Inspector window to call up Annotations. It lists every page that has one of these notes on and you can select and delete them there.
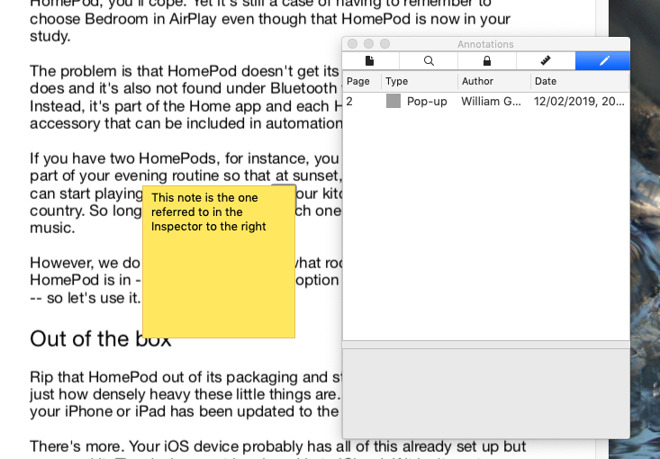
The Inspector is frustrating. Click on the line and the note disappears.
It's a little inconsistent, though. You will find that you've got an errant annotation that just doesn't show up in the Inspector's list. It won't print out, but it also won't disappear if you try creating a new version through Preview's Export to PDF.
Yet at least you're on a Mac. The Mac comes with far better and more powerful PDF creation, editing, and markup tools than it gets credit for.
Keep up with AppleInsider by downloading the AppleInsider app for iOS, and follow us on YouTube, Twitter @appleinsider and Facebook for live, late-breaking coverage. You can also check out our official Instagram account for exclusive photos.
If you need to read a PDF then there is probably no better machine than a Mac. However, if you want to mark up or edit one, things are a little less clear. As it stands, macOS Mojave does come with excellent PDF handling and its markup tools are first class -- but its editing ones are not.
The chief reason you may decide to invest in third-party PDF apps is that they offer better editing features than come as standard on the Mac. Yet what Mojave does, it mostly does very well and there's enough power here that it's possible you'll never need more.
Hang on
If you need to make major, structural, in-depth changes to a PDF, you won't do it in a PDF editing app. You'll go back to the document's original app such as Pages or Word, Keynote or Illustrator, and make the changes there.Without exception, that is the most sensible thing to do. There are times, though, when you don't have access to the original document or its app. There are times when you only want to remove page 3 or correct a typo on page 17. And then, there are times when you don't want to change a single thing on the PDF but you must redact parts.
The tools that come with your Mac won't let you redact. They won't let you change a typo. However, they will let you remove page 3 and they will let you annotate. So you can tell someone else which bits need to be changed and to what.
Quick
Last time, we did all our PDF work in Apple's Preview app. This time, we will do exactly the same thing -- but we do have more options.Mojave adds a markup button in the Finder's new Gallery view
You can markup a PDF by opening one in Preview and in Quick Look by finding a document tapping on the spacebar. What's more, as of Mojave, you can now switch the Finder to a Gallery view and have a Preview pane open. In that pane, you'll get some details about the document but also a Markup button.
Clicking that really just opens the PDF in Quick Look -- but it's handy.
Most of what follows applies equally to whether you open a PDF in the Preview app, or whether you use Quick Look. The differences are subtle, and in practice the reason for choosing one over the other is expediency. It's easiest and, unsurprisingly, quickest to use Quick Look.
Find a PDF document on your Mac, select it and then tap the spacebar. The Mac opens it up in a Quick Look window that lets you see and read it fully. Quick Look now also lets you mark up that PDF with all the same tools that you get for this job in Preview.
Preview is the more handy option if you're going to be doing a lot of work, though, as it means you can have that PDF open all the time. With Quick Look, as soon as you go to check some other document or window, it closes the PDF.
The basic tools
Open any PDF in Preview and you will get that document plus a very few tools arranged around it. Click on the first icon on the left and you get a dropdown menu with various options. Click on Thumbnails and a sidebar will open with small images of each page in your PDF.Click and drag any of those pages to anywhere else in the sidebar's thumbnails and you'll re-order the whole PDF.
You can't do much PDF editing in Preview, but can move and delete pages
You can also delete any page -- but the way you do it is not as obvious or even consistent as how you move them. In theory, you can click to select a page and then right-click to get a popup menu and choose Move to Trash. Or you can choose the same Move to Trash from the Edit menu. And yet sometimes, for no clear reason, neither option is available.
That Edit menu option lists the keyboard shortcut for Move to Trash as Command-Delete -- but it's grayed-out too. Nonetheless, you can select a page, press Command-Delete and it's gone.
It's just that you could equally well simply press Delete.
That's a design confusion in Preview but the errant graying-out of the Move to Trash is more to do with problems with PDFs in general. If there's anything wrong with the PDF, you can get this problem. If you can't remove a page by pressing Delete, use File, Export to PDF and create a new PDF to work from.
Starting anew
It's not a bad idea to start a new PDF anyway. If you do open one and then remove some of its pages, you are extremely likely to inadvertently save the new, stripped one back over the original. There is an alternative, though. Instead of opening a PDF to start work on, first find that document in the Finder.This handy option is solely available when you have first copied a PDF or other graphic
Right- or option-click on it and choose Copy. Then when you go to Preview and select the File menu, you'll see that the very first option is New from Clipboard.
Most of the time, this option is grayed-out. Whenever you've copied anything graphical like a PDF or an actual image, though, it becomes available. Choose it when you've copied a PDF and you get a brand new, untitled copy of that.
Markup
When you have a PDF open, Preview will display a bar with markup tools on it. You may have to tell it to do this by choosing View, Show Markup Toolbar.You can also call up the Markup toolbar by clicking on the icon next to the Search bar
This toolbar contains a dozen icons, many of which are drop-down menus with more options. The most significant ones are for adding or editing text, drawing lines or shapes, and adding your signature.
Preview will usually let you add text to a document but it won't be pretty. You won't be able to add a sentence to a paragraph and make it look precisely the same font. You will, though, be able to add, say, titles.
Depending on the PDF and how it was created, you will often be able to click into a text field and then just type. When you get a form that has fields like Name, it typically lets you do this.
The rest of the time, you have to tell the PDF that you want to add text. You do that by choosing Tools, Annotate and then Text. Now you can type anywhere on the PDF and by default, Preview shows that text in red so that you're really clear where you're typing.
We didn't really try very hard to match the new text to the old
Once you've written text, you can select either it or the existing text in the document by choosing the Text Selection tool. It's the first icon on the left of the Markup toolbar and lets you drag across text, highlighting it as you go.
When you've done that, you can get Preview to change the color of the text's background. It doesn't change the text color itself. It's more like running a highlighter pen over the words.
Notes
Since you can't click into a sentence and just write as much text as you like, the tool for adding text is mostly useful for short lines. If you need to write more, such as telling someone that you need major changes to the document, you can add a note.The eighth icon from the left, which looks more like a calendar symbol, is Note. Click that and you get a rather small white rectangle with a faint border around it. Click on that rectangle, though, and it expands out into a much larger yellow rectangle that you can type into.
Highlighting and annotating text in a PDF
It's a lot less obvious how you get rid of these notes if you change your mind. If it's too late to just hit Undo, you need to choose the Tools menu and select Show Inspector.
This Inspector isn't a great deal of use because it shows you a lot of information about, say, the size of the document but you can no longer edit or change any of it -- except for one thing. Click on the last icon in the Inspector window to call up Annotations. It lists every page that has one of these notes on and you can select and delete them there.
The Inspector is frustrating. Click on the line and the note disappears.
It's a little inconsistent, though. You will find that you've got an errant annotation that just doesn't show up in the Inspector's list. It won't print out, but it also won't disappear if you try creating a new version through Preview's Export to PDF.
PDF is a compromise
Inconsistencies like this make editing PDFs a little tedious and sometimes a lot frustrating. That doesn't get a lot better when you're using third-party apps, either, as it's less about the app and more about the Portable Document Format itself.Yet at least you're on a Mac. The Mac comes with far better and more powerful PDF creation, editing, and markup tools than it gets credit for.
Keep up with AppleInsider by downloading the AppleInsider app for iOS, and follow us on YouTube, Twitter @appleinsider and Facebook for live, late-breaking coverage. You can also check out our official Instagram account for exclusive photos.
Comments