AppleInsider · Kasper's Automated Slave
About
- Username
- AppleInsider
- Joined
- Visits
- 51
- Last Active
- Roles
- administrator
- Points
- 9,819
- Badges
- 1
- Posts
- 63,192
Reactions
-
How to create custom voice commands for iPhone
One of the greatest things about the iPhone is the wealth of accessibility features available straight out of the box, and one of the most robust features made available in the iPhone's accessibility suite is voice commands. Here's how to set up voice commands in iOS 17.
iPhone's robust settings allow for users to set up elaborate voice commands
The iPhone comes equipped with a few voice commands set up straight out of the box, but depending on your wants and needs, there may be additional commands you'd like to have at your disposal. In that case, there is a quick and easy way to set up additional custom voice commands on your iPhone that are as simple or elaborate as your heart desires.
You could set up a simple command that allows you to swipe through videos on Instagram or TikTok without touching your screen. Or, you could get especially in-depth with the use of Shortcuts, which can allow for a nearly limitless level of customization.How to create a custom voice command on iPhone
Creating a custom voice command will require small adjustments to your phone's accessibility settings. The exact modifications you'll need to make are quick and will have your brand-new voice commands running instantly.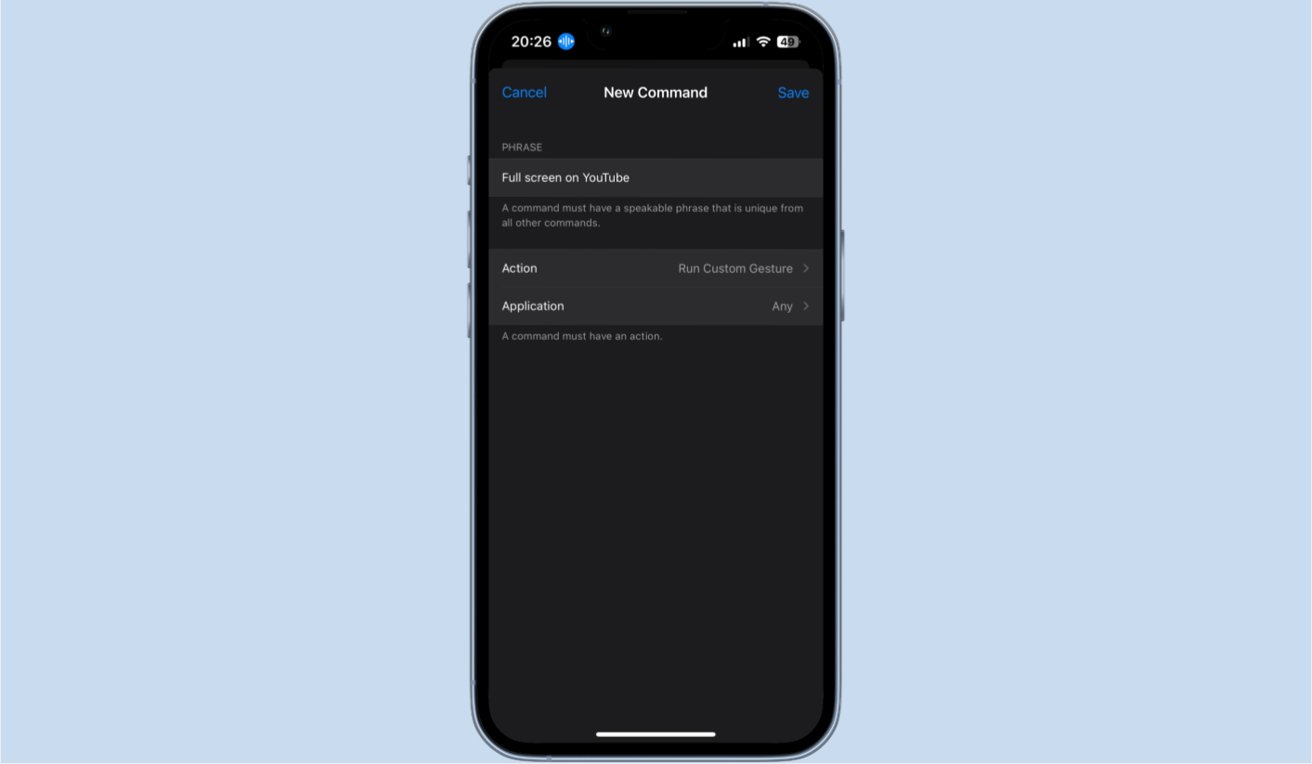
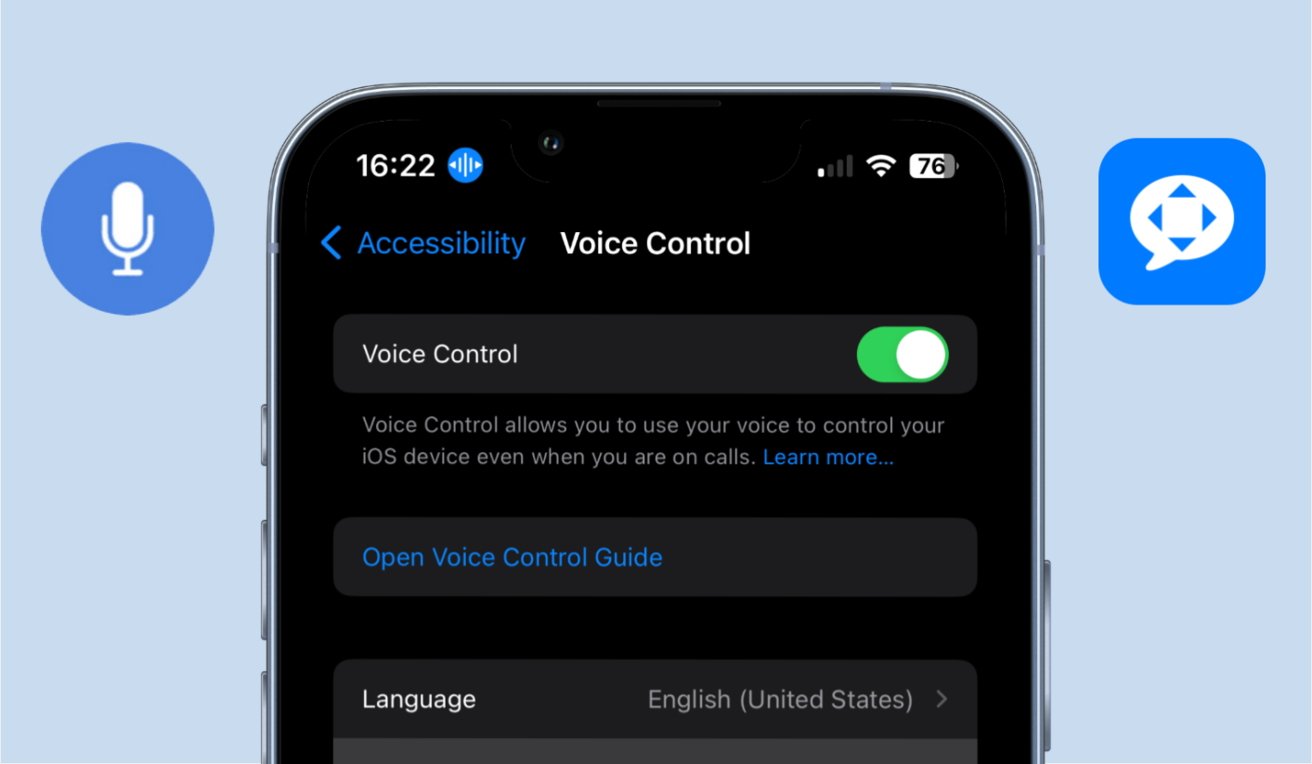
Most phrases can be used as commands, with few exceptions for preexisting commands- Open the Settings app.
- Scroll down to or search for Accessibility settings.
- In the Accessibility settings menu, tap into Voice Control.
- Be sure that voice control is enabled, and then tap into the Commands menu.
- Tap the Create New Command option.
- Enter the phrase you'd like to use to activate the command.
- Select the action you'd like the command to activate, whether it be text entry, a custom gesture, or a shortcut.
- As a final adjustment, you can set the command to only be able to run while using certain apps.
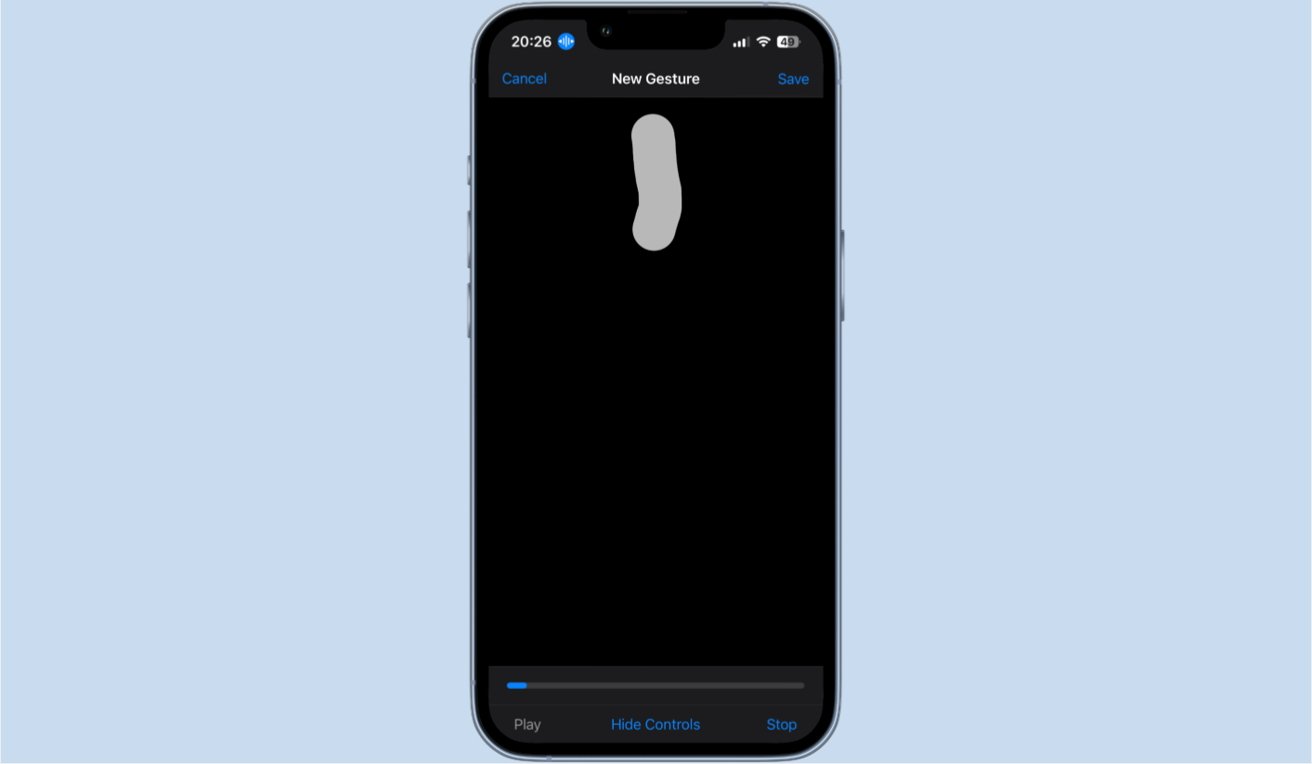
Custom gestures can be used to set up precise, exact screen strokes and taps.
When setting up your custom voice commands, there are two small caveats to bear in mind. The first thing you should note is that if you want to use a Shortcut, it will be inconvenient. How inconvenient it will be depends on the amount of Shortcuts you have set up on your Apple devices. When selecting that you'd like a command to run a Shortcut, you are presented with a plain list of the Shortcuts you have set up, with no options available to organize or search through them. You'll simply have to scroll through them all to find the Shortcut you'd like to use. If you only have a handful of Shortcuts created, this will be no issue. If you have an abundance of Shortcuts created, this can make the process of setting up a voice command much more tedious than it needs to be.
Additionally, there are certain phrases the iPhone won't let you use to set up a command, and those phrases are anything that is a preexisting command used by the iPhone. You can look through these phrases in the Voice Commands settings screen. If there is a phrase you're absolutely set on using that the iPhone will not allow you to use, you can go in and disable the preexisting command that uses that phrase, which will allow you to bind it to a custom command. Once you do have an acceptable phrase and command set up, you need only speak the phrase aloud for your iPhone to execute the command.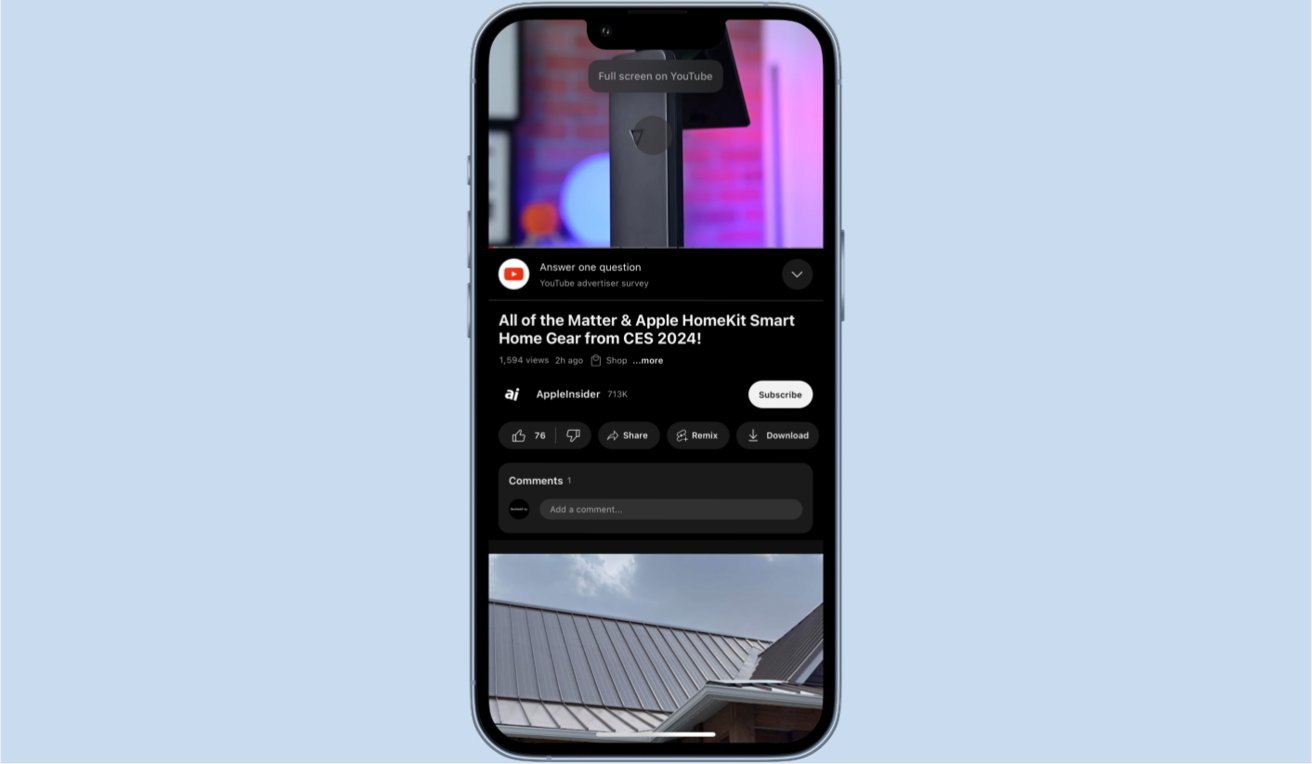
This exact gesture would simply work to swipe upwards on YouTube videos to make it full screen
Aside from the text, gesture, and shortcut command options, there is one last kind of command you can set up. You may set up a string of commands to run all under one phrase. A simple example would be if you wanted a command that would launch a streaming app, put your phone into landscape mode, and turn up your volume, all in one succinct command. Setting this up is even simpler than setting up other custom commands.How to create a chain of custom voice commands on iPhone
Inside the menu to set up a command, you may have noticed a grayed-out option labeled "Playback Recorded Commands." This option will always be grayed out, but that's by design, as this feature is exclusively activated by voice commands and can be done from any screen on your iPhone.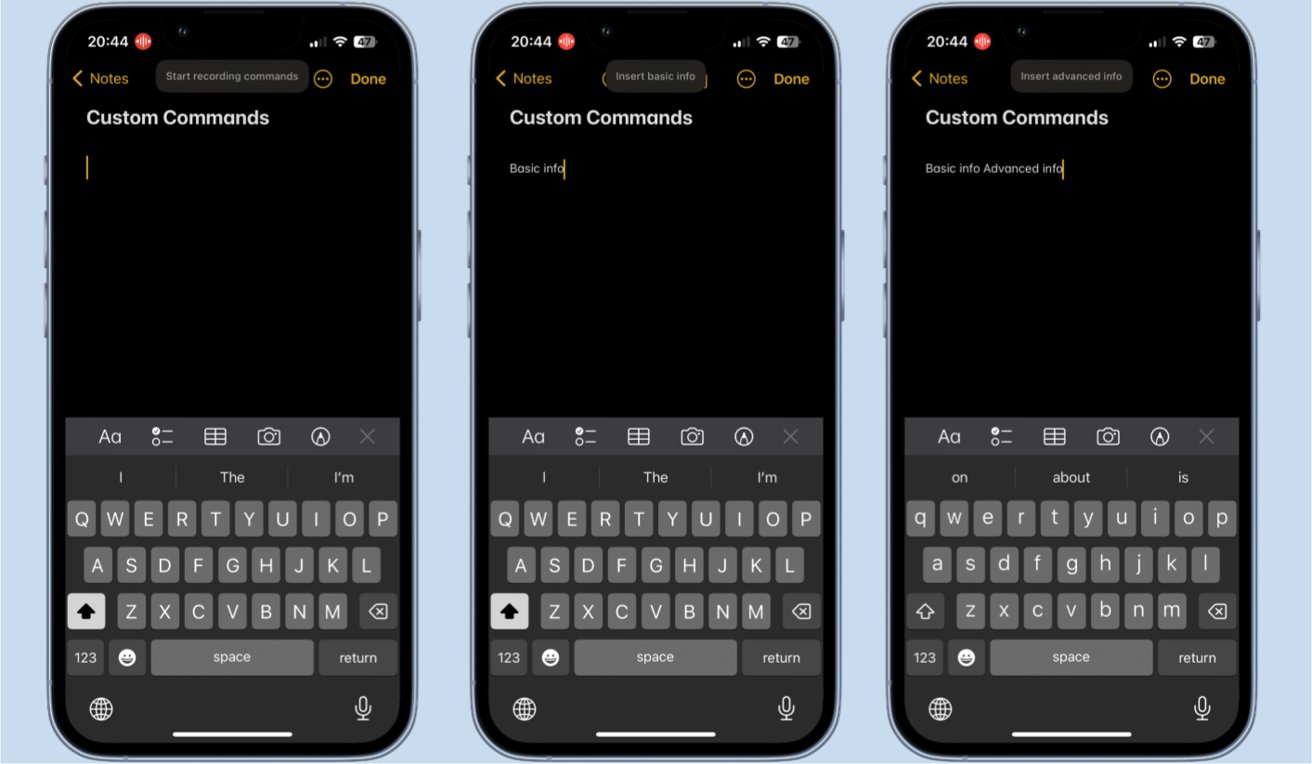
Playback commands can be set up anywhere, but ones including text must be set up in a text entry setting- Anywhere on your iPhone, speak aloud the phrase Start recording commands.
- Speak aloud the chain of commands you'd like to activate. Your iPhone will still behave as though you have spoken the command on its own.
- When you have finished, speak aloud the phrase Stop recording commands.
- Name the command, and select what apps it will work in.
-xl.jpg)
Your chain commands will display the commands being run as they go.
One minor note with setting this up is that in order to include any contextually specific commands in the chain, such as text entry commands, you will have to be in their contextually correct environment. For example, if you wanted to include a command that would insert your email address in your chain, you would need to be in an environment where that command could actually run. If you try to record a string of commands on your home screen, for instance, any text entry commands you dictate will not show up as part of the finished chain.
Once the custom command is made, speaking it will cause all recorded commands to run in the order you spoke them in while setting up the command. While the set of commands is playing out, your phone will display a bubble denoting which ones are running as they play out.
Read on AppleInsider

-
Understanding spatial design for visionOS
Apple Vision Pro's release is imminent, and there are lot of things for developers to consider when building apps for the headset. Here's what you should think about when making visionOS apps.

Apple Vision Pro in a cold environment.
The Apple Vision Pro is an interactivity departure for Apple. Unlike apps for Mac or iOS, which rely on user interacting largely with a flat plane and a well-established user interface language, visionOS throws that all away, forcing developers to embrace new ways for users to interact with their apps.
Apple has provided extensive documentation and tutorials for designing for spatial computing. The following are some key points to keep in mind as you design your apps for visionOS.Passthrough versus immersive mode
visionOS lets you create apps in either passthrough or immersive mode.
In passthrough mode, the user sees their surroundings through the Apple Vision Pro headset using its built-in external cameras, but apps and windows are displayed floating in space.
Users can use gestures and eye movement to interact with the user interface in this mode
In immersive mode, the user enters a complete 3D world in which they are surrounded by a 3D-generated scene containing 3D objects. Immersive mode apps can also be games in which the user enters the game environment space itself.
For most visionOS apps, Apple recommends starting users in passthrough mode, establishing a ground plane, or orientation, and later transitioning to fully immersive mode if needed.
This is because some users may find immediate immersion in a 3D space on an app's launch jarring.
Passthrough mode.Gestures
Apple Vision Pro (AVP) relies heavily on gestures - more so than iOS or iPadOS.
AVP is the first mainstream computer that allows you to control and manipulate the interface using only your hands and eyes without an input device. Using gestures you move your hands in space to control the user interface.
An object that can receive input in visionOS is called an entity. Entities are actually part of the RealityKit framework.
To implement gestures in a visionOS app, three things are required:- An entity must have an InputTargetComponent
- An entity must have a CollisionComponent with shapes
- The gesture must be targeted to the entity you want to interact with
Objects in visionOS are defined by components and there are different types: input, world, view, view attachment, hover effect, collision detection, and text components.
Each component controls a different aspect of visionOS's interface and control. Apple has defined a Swift struct for each.
An InputTargetComponent is a struct that tells visionOS which object can receive input in the form of gestures.
If you don't add an InputTargetComponent, an object in visionOS can't receive input at all.
You can also set whether an object can receive direct or indirect input.
In Swift:myEntity.components.set(InputTargetComponent()
To define which part of an entity can receive input, you add aCollisionComponent. Collision components have shapes that define hit-test areas on an entity.
By changingCollisionComponentshapes you can change what parts of an entity will accept or ignore gesture input.
To disable any physics-based processing on an entity, you can disable collision detection on theCollisionComponentusing aCollisionFilter.InputTargetComponentswork in a hierarchy so if you add them to an entity that has descendant entities that also haveInputTargetComponentsthe child entities will process input unless you disable it.
You can set what type of input anInputTargetComponentcan receive by setting the.allowedInputTypesproperty.
A descendantInputTargetComponent's.allowedInputTypesproperty overrides the.allowedInputTypesproperties of ancestors.
You can also set the.allowedInputTypeswhen you first initialize the structure with theinit()method.
You can toggle whether theInputTargetComponentcan accept input by setting the.isEnabledproperty.
Gestures can be set to be targeted at a specific entity, or any entity.
You can find out which entity received input in the gesture's.onEndedmethod like this:let tappedEntity = gestureValue.entity
In most cases, you'll use entities in passthrough mode where you may have a mixture of windows, icons, 3D objects, RealityKit scenes, and ARKit objects.
Passthrough mode with windows and 3D objects.HoverEffectComponents
If an entity is an interactive entity (I.e. it's enabled for input), you can add aHoverEffectComponentto it to astound and delight your users.
The HoverEffectComponent is possibly the coolest thing ever in the entire history of user interfaces:
If you add a HoverEffectComponent to an interactive entity, visionOS will add a visible highlight to the entity every time the user looks at it.
When the user looks away from the entity the highlight is removed.
This is one step away from the full mind control of computers.
Like the single-click on the macOS desktop, or highlighting text in iOS, the visual highlight tells the user the entity is selectable - but it does so without any physical interaction other than eye movement.
As the user moves their eyes around the field of view in visionOS, it will highlight whatever entity they look at - as long as it has a HoverEffectComponent.
This is pure magic - even for Apple. Incredible.
The eyes will be new input devices in spatial computing.
This is indeed a very exciting prospect: the ability to control a computer with your eyes will be vastly faster and more accurate than manual input with your hands.
It will also open up a whole new world of computer control for those with disabilities.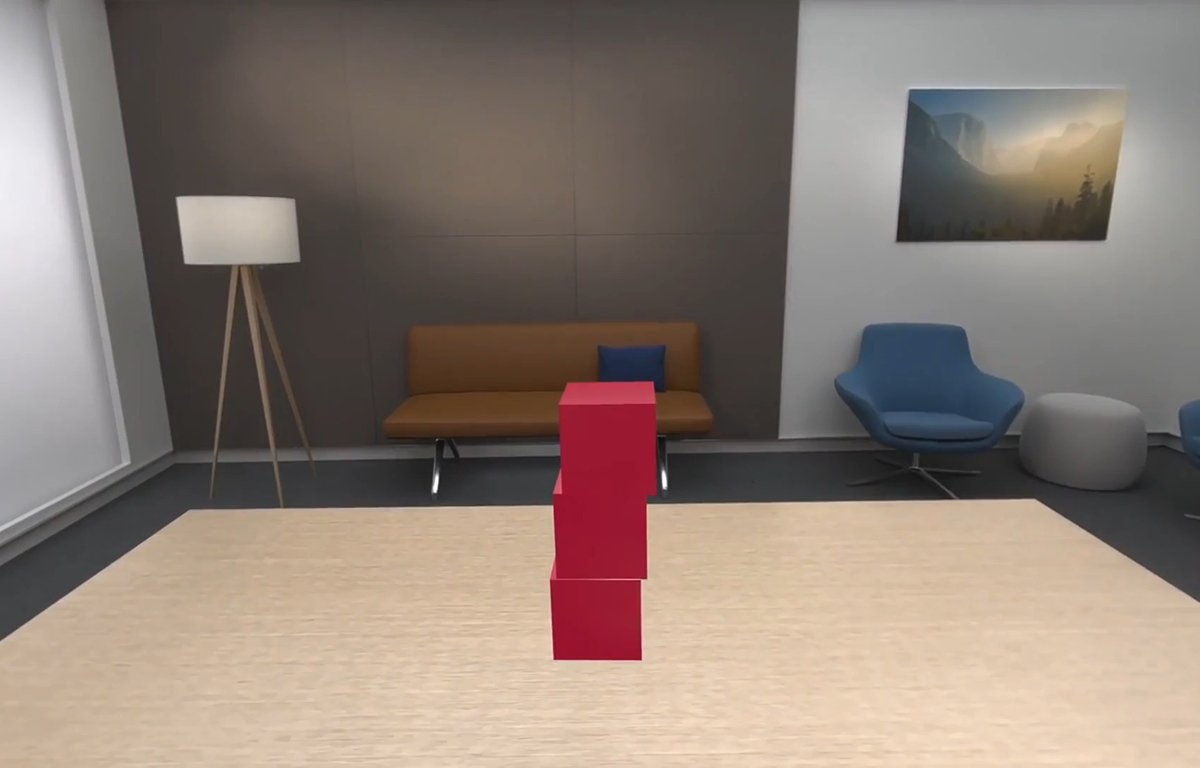
visionOS can include spaces that include several kinds of objects, or entirely rendered 3D scenes.Virtual Hands
One new aspect of spatial computing is the idea of virtual hands: in visionOS apps you'll be able to raise your hands and control objects in your field of view in AVP.
We covered this previously in our article on visionOS sample code. Apple already has some demo programs with this working.
Using virtual hands, you will be able to touch and control objects in your view inside of AVP. This gives you the classic UI concept of direct manipulation but without a physical input device.
Virtual hands are similar to on-screen hands used in many modern video games. In fact, this idea was already in use decades ago in some games such as the groundbreaking Red Faction for PlayStation 2 - but it still required a physical input device.
With AVP the experience is more direct and visceral since it appears as if you are touching objects directly with no hardware in between.
Using virtual hands and gestures you will be able to tap on and move objects around inside visionOS's space.
You can also use them in immersive games.Additional considerations for gesture control
There are a few other things you'll want to think about for gestures, control, and spatial interaction.
You'll need to think about nearby controls for distant objects. Since some objects in AVR's 3D space can appear farther away than others, you'll also have to consider how to allow your user to interact with both.
Apple advises to consider 3D space and depth. Developing for AVP will be more complex than for traditional screen-bound devices.Comfort and 360-degree views
Apple stresses several times to keep in mind that comfort is important. Remember that when using the AVP the entire body is used - especially the head.
Users will be able to swivel and rotate their heads in any direction to change the view. They will also be able to stand and rotate, bend, and squat or sit.
You'll need to keep this in mind when designing your app because you don't want to force the user into too much movement, or movements they might find uncomfortable.
There's also the issue of too many repetitive movements which might fatigue the user. Some users may have limited range of motion.
Some users may be able to make some movements but not others. Keep these considerations in mind when designing your app.
Also, be aware that there will be some additional weight on the user's head due to the weight of AVP itself. You don't want to force the user to hold their head in a position too long which might cause neck fatigue.
No doubt over time as later iterations of AVP become lighter this will become less of an issue.
Apple also discourages the use of 360-degree or wrap-around views.
While users will be able to pan across the view by looking in different directions, Apple doesn't want developers to make apps that span a full circle.A few other tidbits
Apple lists a few other things to help in your visionOS development:
Apple recommends not placing the user in an immersive scene when your app launches. You can do so, of course, but unless your app is an immersive game Apple doesn't recommend it.
Even for immersive games, you may want to start the user in a window so they can change their mind or access other apps before they start the game.
Apple defines a key moment as a feature or interaction that takes advantage of the unique capabilities of visionOS.
ARKit only delivers data to your app if it has an open immersive space.
Use Collision Shapes debug visualization in the Debug Visualizations menu to see where the hit-detection areas are on your entities.
You can add SwiftUI views to visionOS apps by using RealityView attachments to create a SwiftUI view as a ViewAttachmentEntity. These entities work just like any other in visionOS.
Also, be sure to see the section of the Xcode documentation entitled Understand the relationships between objects in an immersive space.
You can currently can resize or move a window in visionOS after it is created using onscreen controls, but you can't do so programmatically.
Therefore you should think carefully about a window's initial size when you create it. When visionOS creates a new window it places it onscreen wherever the user is looking at the moment.
If your app includes stereo views that display video you'll want to convert the videos to MV-HEVC format using the AVAsset class in AVFoundation.
To provide lighting in a RealityKit scene in visionOS you can either let the system provide the lighting or you can use an ImageBasedLightComponent to light the scene.
The CustomMaterial class isn't available in visionOS. If you need to make a custom material for a scene, use the Reality Composer Pro tool which can make the material available as a ShaderGraphMaterial struct instead.
Apple has a WWDC 23 video session on using materials in RCP. See the video Explore Rendering for Spatial Computing from WWDC.
Also be sure to watch the WWDC 23 video Principles of Spatial Design as well as Design Considerations for Vision and Motion.
You can get the current orientation of the AVP by using thequeryDeviceAnchor(atTimestamp:)method.Spatial audio and sound design 101
Another spatial part of the AVP experience is immersive audio.
Full-environment audio has been around for decades in software, especially in games, and with headphones or surround-sound home theater systems, users have been able to enjoy immersive sound experiences for years.
But AVP takes the experience to a new level.
For one thing, having immersive audio connected to an immersive or mixed reality visual environment creates an entirely new dimension of realism than previously possible in computing.
Having both sound and the visual experience work in tandem creates a new standard of what's possible.
Your brain works by using complex interpretations of what both your eyes see and your ears hear. Many spatial cues in human perception are based on hearing.
For example, the slight delay of a sound arriving at one ear a split second before the other combined with your head obscuring parts of sounds is what allows your brain to tell you what direction a sound originates from. These are called interaural time differences and interaural level differences.
Pitch, timbre, texture, loudness, and duration also play roles in how humans perceive sound. Reflected sounds also have an effect on perception.
Humans can typically hear sound frequencies ranging from 20Hz at the low end to 20Khz at the high end, although this range declines with age, and some people can hear sounds beyond these ranges.
The classic Compact Disc audio format samples sound at 44.1KHz - twice the maximum frequency of human hearing. This is based on the Nyquist Limit - which states that to accurately capture a sound by recorded sampling, the sample frequency must be twice the maximum sound frequency.
One oddity of human hearing is that people have difficulty localizing any sounds that originate from or reflect off of cone-shaped surfaces - which isn't surprising since these shapes rarely occur in nature.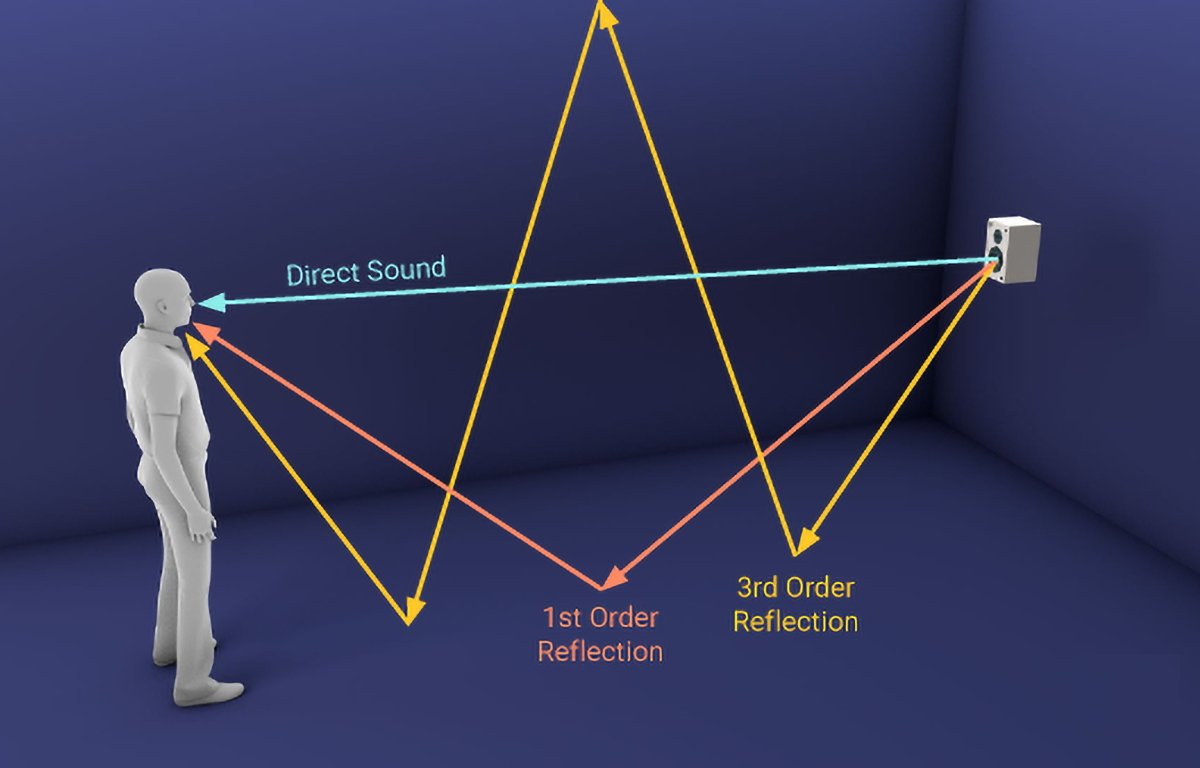
Direct and reflected sounds. Courtesy Resonance Audio.
When vision and sound inputs are properly combined and synchronized, your brain makes connections and judgments automatically without you having to think about it.
Most of your ordinary perception is based on these complex interpretations and sensory input. So is your brain's perception of your orientation in space (combined with inputs from your inner ears which affect balance).
AVP provides a new level of experience because it allows synchronized input of both vision and immersive sound. Keep this in mind too when designing your apps.
You want your users to have the most realistic experience possible, and this is best achieved by careful use of both sound and vision.
For non-immersive apps use audio cues to make interactions more lifelike.
For example, you can use subtle audio responses when a user taps a button or have audio play and seem to come directly from an object the user is looking at.
If you are making an immersive app you will need to carefully tune any audio so it properly matches what the user sees. For games, it's important to use 3D audio cues so they precisely match gameplay events and environments.ADSR
Every sound has what is known as an ADSR - attack, delay, sustain, release.
Attack is the rate or slope at which a sound's volume goes from zero to maximum. A perfectly vertical attack means a sound goes from silence to max instantly.
Delay is the time the sound lasts from its maximum, or peak, until it drops or settles into its standard volume, which lasts until the sound's final stage - its release.
Sustain is how long a sound is held at standard volume after the delay period. This is the level most people perceive a sound.
Release is the duration of time from the start of the sound fading out until it goes to zero volume or silence. The release phase begins at the end of the sustain period until silence.
A perfectly vertical release curve means a sound goes from standard volume to silence instantly. An extremely long and shallow release curve means a sound fades out very slowly over time.
If you've used the crossfade effect in the Apple Music app you've heard shallow attack and release curves.
Sounds with a perfectly vertical attack or release are called gated sounds.
Taken together, a sound's four ADSR values are known as its envelope.
Most professional sound editing software lets you adjust all four points on a sound's ADSR graph. Altering the ADSR affects how users perceive sound.
Using ADSR you can create some pretty interesting and subtle effects for sounds.
ADSR was originally used only for synthesized music but today's pro sound software lets you apply ADSRs to sampled (recorded) sound as well.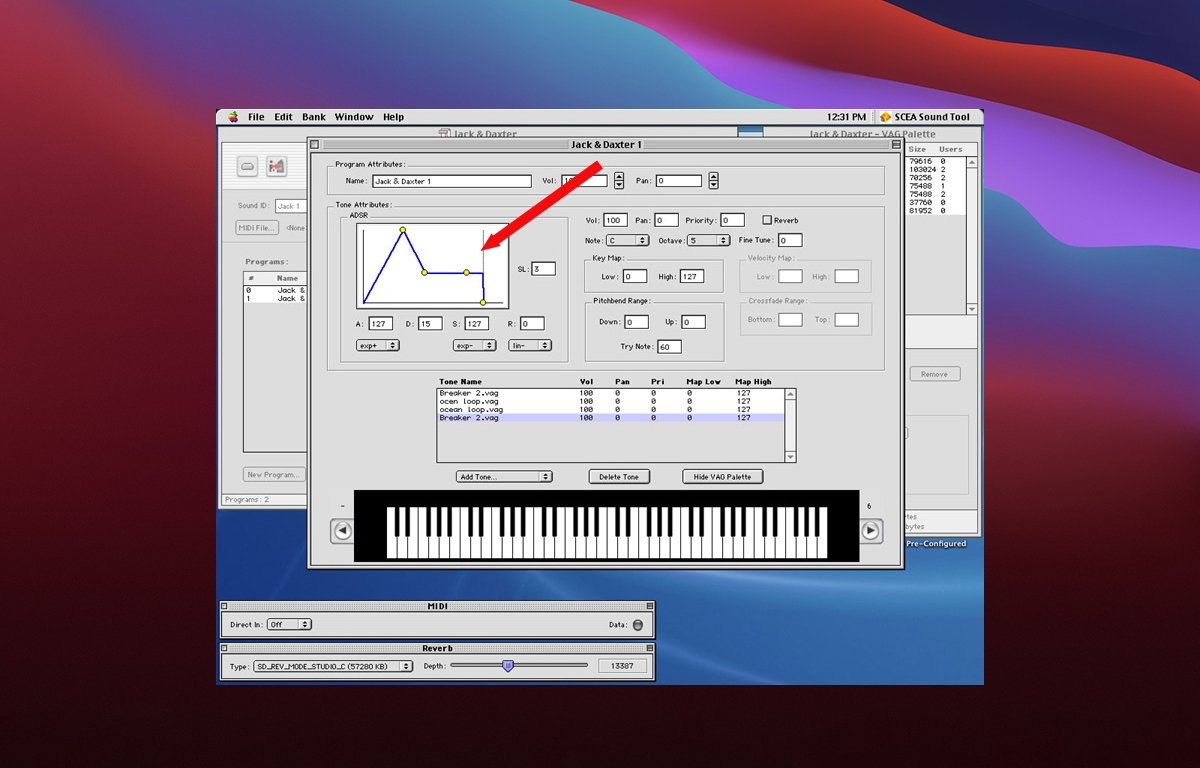
ADSR adjustment in the PlayStation 2 sound editor.Sound effects
If you're making an immersive game for visionOS, you'll need to think about sound effects carefully.
For example, suppose your game contains a distant explosion or gunfire. You will need to both time and mix your sound so that the relative loudness of each sound matches the distance and intensity of the effect.
Sound realism in immersive games is also dependent on the materials in an environment.
Is there a huge rock canyon in your game where an explosion or gunfire goes off? If so you'll need to include multiple realistic echo effects as the sound bounces off the canyon walls.
You will also need to position each sound in 3D space relative to the user - in front of, behind, to the sides of the user, or even from above or below. Certain sounds in real life may seem to come from all directions at once.
Other types of sounds in real life may temporarily leave the participant deaf, or leave them with only ringing in their ears for a while (grenade concussions come to mind).
Consider that for a distant explosion many miles away in a game setting, in real life, the viewer wouldn't actually hear the explosion until several seconds after they see it.
Little touches like these will add extra realism to your apps.
On top of all this, keep in mind your user may be moving their head and thus alter their perspective and field of view while sounds are playing. You may have to adjust some sounds' spatial cues in 3D space in real time as the user's perspective changes.
There are audio libraries to help with this such as Ressonance Audio, OpenAL, and others, but we'll have to wait and see how spatial audio evolves on AVP.
Sound design for games is an entire discipline unto itself.
For an excellent deep dive on how sound works in the real world check out the exceptional book The Physics of Sound by Richard Berg and David Stork, although some math is required.Apple's visionOS Q&A
At WWDC 23 and in recent developer labs Apple has held several sessions with visionOS experts, and as a result, Apple has compiled a visionOS Q&A which covers many more topics.
You'll want to check it out to make sure your visionOS apps can be as great as possible.
Read on AppleInsider

-
Here we go again - Apple rejects Hey Calendar app from App Store
Stop us if you've heard this before -- Hey Calendar has been rejected from the App Store, despite it clearly being allowed under provisions about apps used to access paid services like Netflix and similar.

Apple rejects Hey Calendar app from App Store
It's a familiar saga for the developers of Hey Calendar -- one of their apps has been denied a spot on Apple's App Store. If this seems familiar, that's because the same thing had happened to the company's email app, Hey Email.
Hey apps are free, standalone apps that access a paid service. This is similar to how apps like Netflix and Spotify function -- the app is essentially a reader app that accesses off-device content.
In fact, that "reader app" concept was the argument that Hey used to get its email app added back to the App Store. And, it had a specific carve-out for that general class of app inserted into the App Store terms and conditions.
But on Friday, Hey and Basecamp co-founder David Heinemeier Hansson took to X to inform his followers that Hey Calendar was being rejected for the same reasons that Hey Email was.Apple just called to let us know they're rejecting the HEY Calendar app from the App Store (in current form). Same bullying tactics as last time: Push delicate rejections to a call with a first-name-only person who'll softly inform you it's your wallet or your kneecaps.
-- DHH (@dhh)
He says an Apple representative told him that the app doesn't "do anything," and should feature an in-app purchase to enable full functionality. Without it, it would be ineligible for download.
The rejection seems contrary to stated App Store rules. There are explicit rules in the App Store Review Guidelines that state that "free apps acting as a standalone companion to a paid web based tool (eg. VIP Cloud Storage, Email Services, Web Hosting) do not need to use in-app purchase, provide there is no purchasing inside the app or calls to action for purchase outside of the app."
By these metrics, Hey Calendar should be allowed on the App Store.
According to Hey co-founder Jason Fried, Apple said it would prefer it if the company bundled Hey Calendar into Hey Email as a single app. But, as Heinemeier Hansson notes in his X thread, companies like Google and even Apple are allowed to own separate standalone apps without jumping through any hoops.Yes they do. Jason asked them on the phone: "If we just put all these features in the existing app, is that ok?". Answer: Yes. So Apple thinks separate apps for iCloud is better for users, but doesn't want competing services like HEY to be able to do the same? What? Why?!
-- DHH (@dhh)
The founders of Hey still firmly believe that Apple is overstepping its boundaries by enforcing rules on smaller developers that it does not implement on larger companies. In 2020, Fried made a statement expressing concerns that Apple inserts itself into critical developer dealings with their users, suppressing user choice and creating a rift that can be detrimental to customer service.
Read on AppleInsider

-
Optimizing Metal: Ways to improve code made for Apple's graphics framework
There is a vast array of ways to optimize your Metal graphics code to get top performance. Here's how to get started getting your code into better shape for the Metal framework.
Apple GPU architecture
Apple GPUs are Tile-Based Deferred Renderers - which means they use two main passes: tiling, and rendering. The overall rendering pipeline is shown below.
You can think of these two phases as one when geometry is calculated and created, and another when all pixel rendering is processed.
In most modern Apple GPU software, geometry is calculated and broken down into meshes and polygons, then rendered to a pixel-based image, one image per frame.
Modern Apple GPUs have specific subsections in each core that handle shaders, textures, a pixel backend, and dedicated tile memory. Each core uses these four areas during rendering.
During each frame render, multiple passes are used, running on multiple GPU cores, with each core processing multiple tasks. In general, the more cores, the better the performance.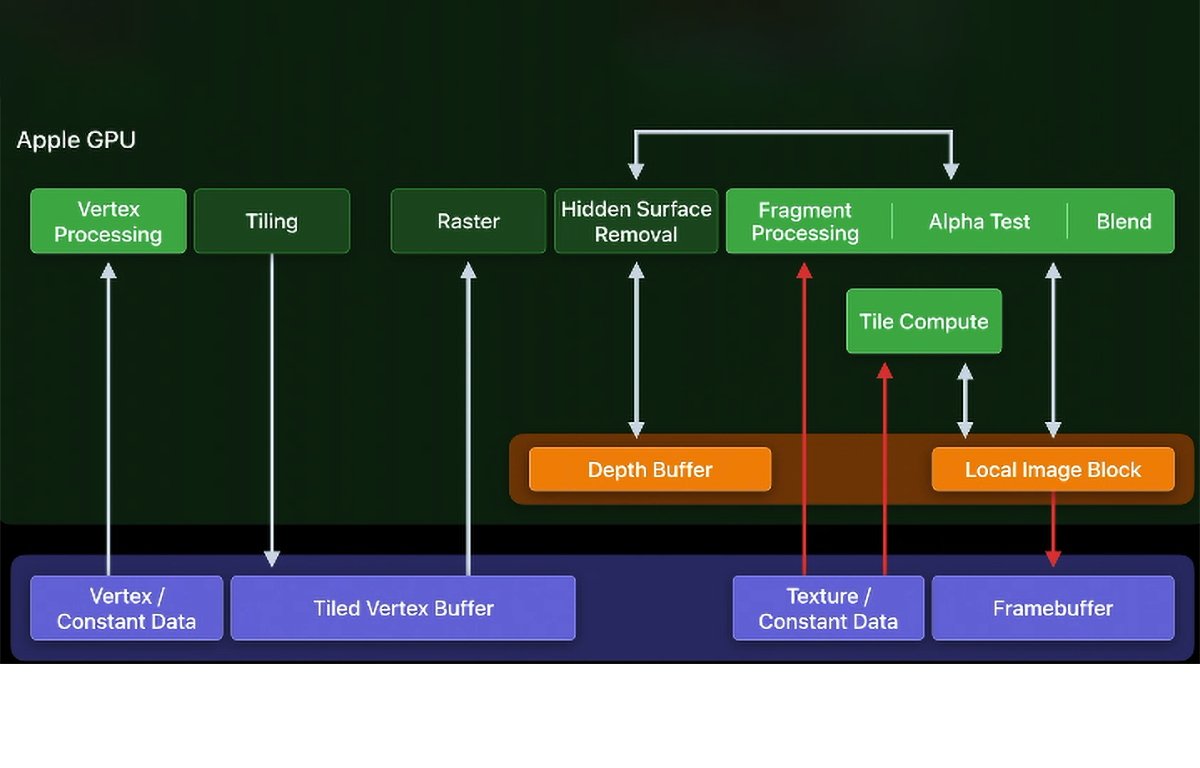
Modern Apple GPU rendering pipeline.GPU Counters
To measure this performance, GPU counters are used.
GPU counters keep track of each GPU's load and measure if each does or doesn't have enough work. They also find performance bottlenecks.
Finally, GPU counters optimize the commands that take the longest in order to speed up performance.
There are over one hundred and fifty types of Apple GPU performance counters, and covering them all is beyond the scope of this article.
There is the problem of making sense of all the performance counter data. To do this, you use the Metal System Trace and Metal Debugger built-in to Xcode and Instruments.
We covered Metal System Trace and Debugger in a previous Metal article.
There are four Metal GPU Counters which include important ways to optimize Metal in your apps and games. They are:- Performance limiters
- Memory Bandwidth
- Occupancy
- Hidden Surface Removal
, or limiter counters measure the activity of multiple GPU subsystems by finding the work being executed, and finding stalls that can block or slow down parallel execution.
Modern GPUs execute math, memory, and rasterization work in parallel (at the same time). Performance limiters help identify performance bottlenecks that slow down your code.
You can use Apple's Instruments app to use performance limiters to optimize your code. There are half a dozen different performance limiters in Instruments.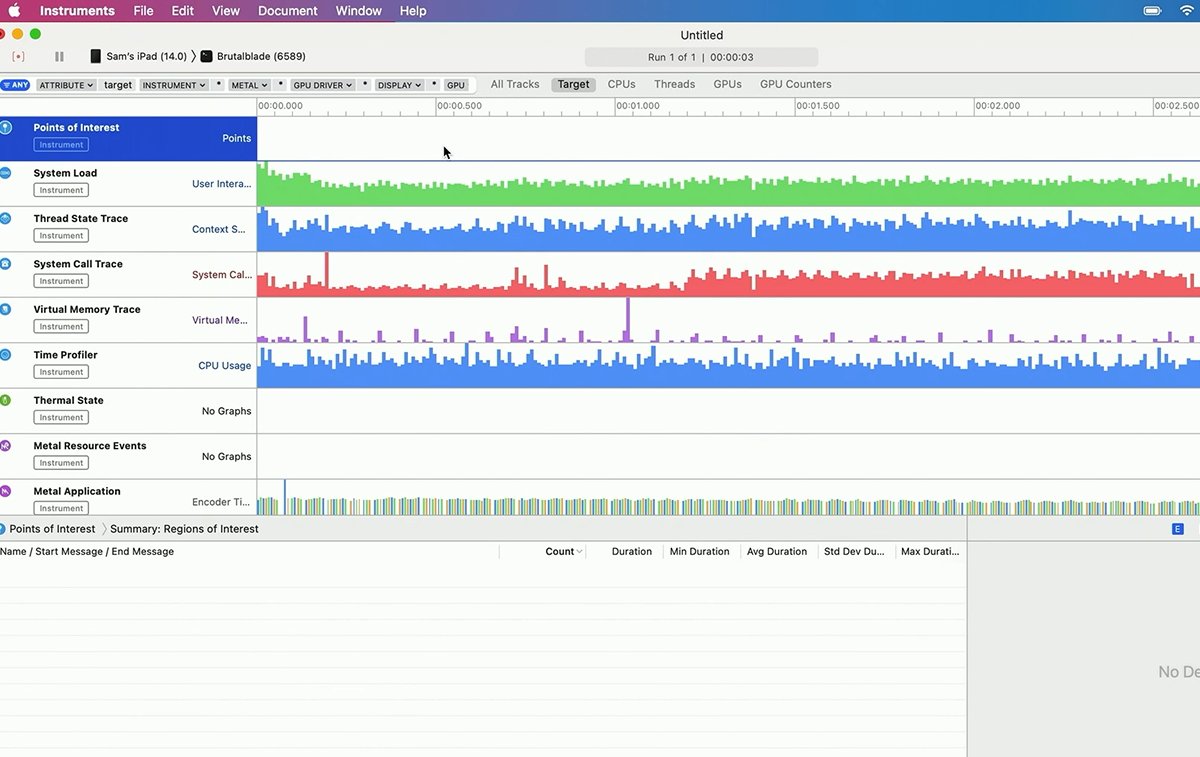
Apple's Instruments app.Memory Bandwidth Counters
Memory bandwidth GPU counters measure transfers between GPU and system memory. The GPU accesses system memory whenever buffers or textures are accessed.
But be aware that System Level Caches can also be triggered, which means you may occasionally notice small bursts of higher memory throughput than actual DRAM transfer speeds. This is normal.
If you see a memory bandwidth counter with a high value it likely means that transfer is slowing down your rendering. To alleviate these bottlenecks there are several things you can do.
One way to reduce memory bandwidth slowdowns is to reduce the size of working data sets. This speeds things up because less data is being transferred from system memory.
Another way is to only load data needed by the current render pass, and to only store data needed by future render passes. This also reduces the overall data size.
You can also use block texture compression (ASTC) to reduce texture asset sizes, and lossless compression for textures generated at runtime.
Occupancy measures how many threads are currently executing out of the total thread pool. 100% occupancy means a given GPU is currently maxed out in terms of the number of threads and overall work it can handle.
The Occupancy GPU counter measures the percentage of total thread capacity used by the GPU. This total is the sum of the compute, vertex, and fragment occupancy.
Hidden Surface Removal usually occurs somewhere in the middle of each render pass before fragment processing - shortly after the Tiled Vertex Buffer is sent to the GPU to be rasterized.
Depth buffers and hidden surface removal are used to eliminate any surfaces that are not visible to the view's camera in the current scene. This speeds up performance because those surfaces don't need to be drawn.
For example, surfaces on the backsides of opaque 3D objects don't need to be drawn because the camera (and the viewer) never see them - so there's no point in drawing them.
Surfaces hidden by other 3D objects in front of them relative to the camera are also removed.
GPU counters can be used during hidden surface removal to find the total number of pixels rasterized, the number of fragment shaders (actually the number of calls to fragment shaders), and the number of pixels stored.
GPU counters can also be used to minimize blending, which also incurs a performance cost.
To optimize drawing with hidden surface removal, you'll want to draw objects by order of visibility state - namely testing whether or not objects are opaque, testing by translucency, and trying to avoid interleaving opaque and non-opaque meshes.Resources
There are a variety of Metal resources available including Apple's Metal Developer pages at developer.apple.com/metal/tools/, WWDC videos, and the excellent third-party book Metal Programming Guide: Tutorial and Reference via Swift by Janie Clayton.
To get started with Metal optimization, be sure to check out the WWDC videos Optimize Metal apps and games with GPU counters from WWDC20, Harness GPUs w Metal also from WWDC20, and Delivering Optimized Metal Apps + Games from WWDC19.
Next, read Capturing a Metal workload in Xcode and Metal Debugging Types on the Metal Debugger pages on Apple's Developer Documentation website.
There is also Analyzing your Metal workload in the Metal Debugger documentation.
You'll definitely want to spend lots of time with Xcode's Metal Debugger and Trace documentation to learn in-depth how the different GPU counters and performance graphs work. Without these, you can't get a detail-level view of what's actually going on in your Metal code.
For compressed textures, it's also worthwhile to read up on Adaptive Scalable Texture Compression (ASTC) and how it works in modern rendering pipelines.
ARM has a great overview of ASTC at its developer website community.arm.com. Also, check out highperformancegraphics.org.
Metal performance optimization is a vast and complicated subject - we've just barely gotten started and will further explore this topic in future articles.
Read on AppleInsider
-
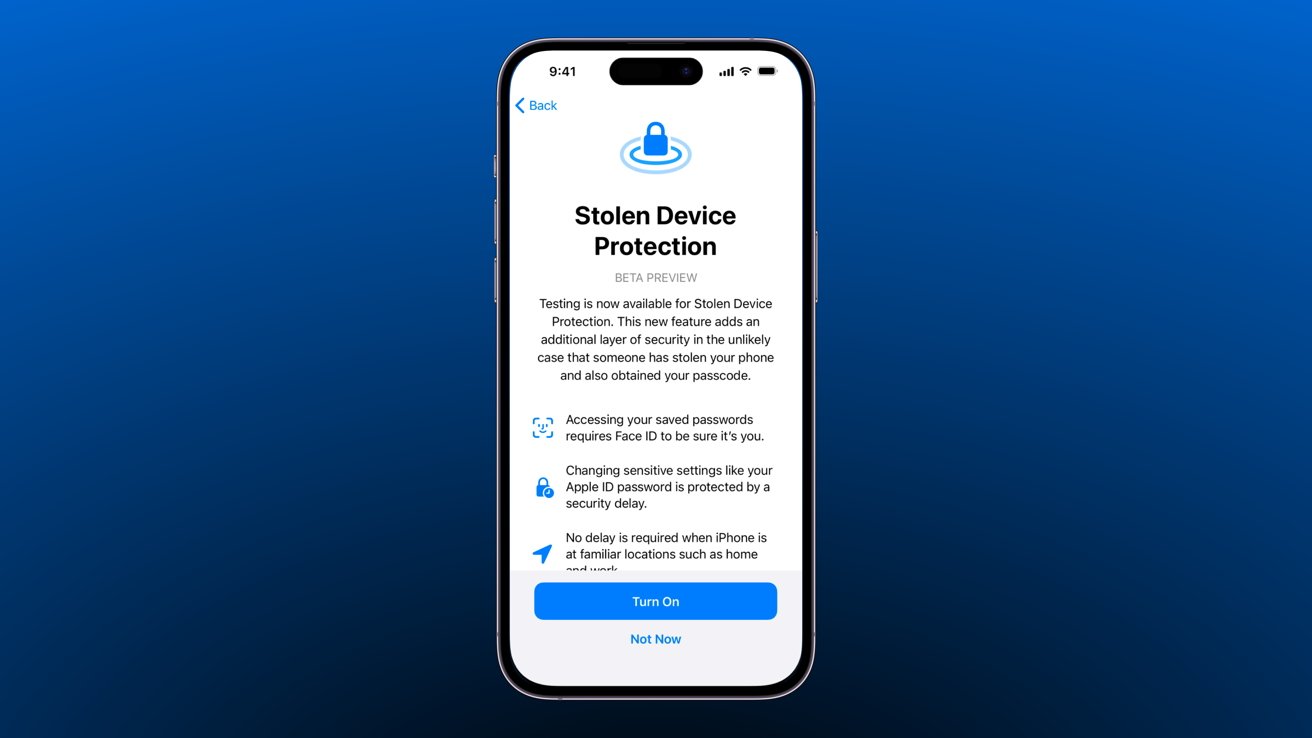
Stolen Device Protection to thwart iPhone thieves with passcodes with time delay
If a thief can steal an iPhone and passcode, they can lock the user out of their Apple ID and wreak havoc within seconds, but Apple's Stolen Device Protection feature coming in iOS 17.3 will stop that from happening.
Stolen Device Protection
A February report revealed that iPhone users were being targeted by thieves that would use sneaky tactics to learn a device passcode, then steal the device. As the thief gets away, they can use the passcode to change the Apple ID password, kick the user out of signed-in devices, and have complete control of the account within seconds.
Apple will solve this issue by implementing an optional security delay to alter critical information in a future iOS update. The feature is called Stolen Device Protection and will activate when outside of trusted locations like home or work.
With Stolen Device Protection active, users won't be able to change critical portions of their Apple ID or device settings without waiting an hour and authenticating biometrics twice. Theoretically, a theft victim would notice their device has gone missing within the hour window, allowing them to set the iPhone to Lost Mode and stopping device access or account changes from being possible.
Since users won't be able to rely on the passcode fallback option, biometrics will be required for various actions with Stolen Device Protection enabled.
Biometrics are required when:- Using passwords or passkeys saved in Apple Passwords
- Applying for a new Apple Card
- Viewing the Apple Card virtual card
- Turning off Lost Mode
- Erasing all content and settings
- Take certain Apple Cash and Savings actions in Wallet
- Using payment methods saved in Safari
- Using your iPhone to set up a new device
The above actions will prompt the user for biometrics like Face ID or Touch ID to continue. A thief will likely not be able to fake biometric authentication.
Certain operations will still fall back to a passcode, like when authenticating Apple Pay. In that instance, users will be able to use their bank's fraud protection to get funds back if a thief makes an unauthorized transaction.
The security delay will appear when attempting to change critical settings like the Apple ID password. If the thief tries to access the following settings, they must authenticate biometrics, agree to a one hour delay, then authenticate biometrics again after the hour to complete the action.
Security delay occurs when:- Changing your Apple ID password
- Updating Apple ID account security settings, like removing a trusted device, trusted phone number, Recovery Key, or Recovery Contact
- Changing your iPhone passcode
- Adding or removing Face ID or Touch ID
- Turning off Find My
- Turning off Stolen Device Protection
Trusted locations learned by the system, like home or work, remove the security delay. The security delay applies even with biometrics present, so it may be inconvenient to wait an hour every time one of the above settings needs to be altered, so trusted locations alleviate that.
Stolen Device Protection should give victims enough time to discover their device is missing, log into their Apple ID, and then activate Lost Mode. Once the device is in Lost Mode, the thief can no longer access the device, alter settings, or do anything without biometrics.
Thanks to that one hour delay, if thieves somehow steal a device, unlock it with a known passcode, navigate to the Settings page to initiate a change, then trick the victim into verifying biometrics for that first scan, the theif would still need to wait another hour to complete the change. It is incredibly unlikely that the thief will stick around or have access to the victim twice in that hour, eliminating the ability for things like Apple ID passwords to be changed by theives altogether.
An Apple representative explained that Stolen Device Protection is available in beta as a toggle in Face ID & Passcode settings. A later iOS release, likely the full release of iOS 17.3, will present the feature to users during onboarding.
Read on AppleInsider

