How and when to turn CDs, DVDs or folders into disk image files on macOS

Apple's macOS makes it easy to create disk images, the virtual equivalent of physical media. You already use them every time you install an app on your Mac but you can also exploit them for archiving and sharing your own work. AppleInsider shows you how to do it, and what to do with them after you're done.
It's a long time since you bought software that came on a shiny disc. However, practically every time you download an app to your Mac, it still comes on the virtual equivalent: a disk image. This DMG file format is how practically all developers ship practically all their software and they do it for reasons you can benefit from too.
Their chief reason is simplicity. It is much more straightforward to give you a single thing to download than a entire folder full of separate files.

For a developer, that means being able to give you an application plus supporting documentation, an installer and assorted other extras. For you, it can mean taking a mass of related documents and making a single archive out of them.
Now, you can do that with a zipped or any compressed file too but there's a big difference. If you zip up 1,000 documents and then want just 1 of them back, you have to unzip the lot. With a disk image, it's exactly as if you have saved them to a CD or DVD. Opening the disk image is like inserting a physical disk.
Your Mac shows you all of the files on that and then when you've taken the one you want, you eject the DMG exactly the same way you would a real disk.
Plus in theory you can burn your virtual disk image to an actual disk and store it away off site somewhere.
Archive a folder
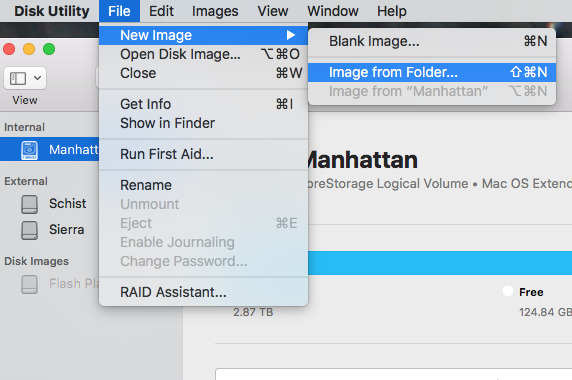
Open the Disk Utility app that came with your Mac. Choose File then New Image and lastly Image from Folder.
Then pick a folder with all of the files you want to save to the DMG. Unusually and slightly disconcertingly, the moment you select a folder to open, Disk Utility immediately presents you with the very similar Save dialog. It's now asking where you want this disk image to be saved.
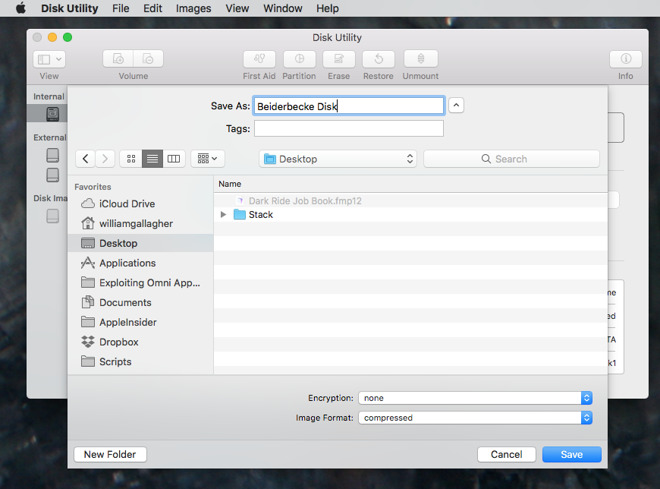
Choose somewhere you'll find it: you're probably going to move this to somewhere else later, so saving it to the Desktop is fine for now.
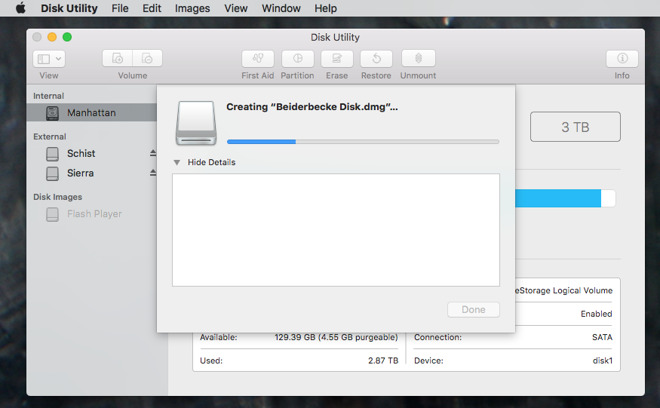
Depending on your Mac, Disk Utility can take several minutes to create this disk image and save it for you. It's possible to make it slightly slower, too: choose the dropdown marked Encryption and pick from two different levels of security. This makes your disk image impossible, or at least tricky, to be read by anyone other than you but it can dramatically adds to the time taken to save it unless you're on the newest hardware from Cupertino.
Nonetheless, this is a great system to use when you've finished a project and your Mac is littered with files and documents that you may need again but definitely not now. Select a folder with them all in, create a disk image and then you have just one place to go to retrieve any or all of the documents.
That's not all
This procedure is good for when you've finished that project and have all the files. Sometimes, though, you'll want to build up to having this disk image as you go. Have Disk Utility create a blank disk image and then you can drag files to it as you create them.
The process is similar. Open Disk Utility, choose File then New Image and this time pick Blank Image. You'll have to specify how big this disk is going to be. That's not just for now, it's forever: you're saying what size this disk will always be. Unless you happen to know for certain, you're always going to be guessing so typically it's better to wait until you're done and choose to make the image from the finished folder.
Also, don't be tempted to create this disk image and then use it as your permanent or only place to store documents. Disk images are great for storage and transport, but they're not meant to be what you work from every day.
Keep creating your files on your Mac and save copies to this blank image instead.
But there's less too
Maybe developers switched to disk images because they were used to creating physical disks. Perhaps Apple gave us this format because we were all so familiar with CDs and DVDs, or at least we once were.
Whatever the reason, disk images are meant to be treated and regarded the same as actual physical disks but they are not the same. Clearly there's nothing physical but as well as meaning you don't have anything reflective to hold in your hand, it means you also don't have constraints.
CDs and DVDs have to have limits on how much you can save to them. Disk images do not.
So when you're using a disk image to store files for an archive and that's on a network attached drive, that's great. If you're sending the archive away to somewhere well, you may have to think about whether it will fit on your USB drive but still you don't have any significant constraints.
It's when you want to move that virtual disk image onto a real physical disk that you have to think about space limitations.
In Disk Utility, when you go to say where you want your image saved, there is an option at bottom right called Image Format. One option there is DVD/CD Master. This creates a virtual disk but in a format called .CDR which is really just for burning to physical disks.
You don't need it. Once you've got a disk image, you don't even need Disk Utility. The plain ordinary Finder will burn a CD or DVD for you.
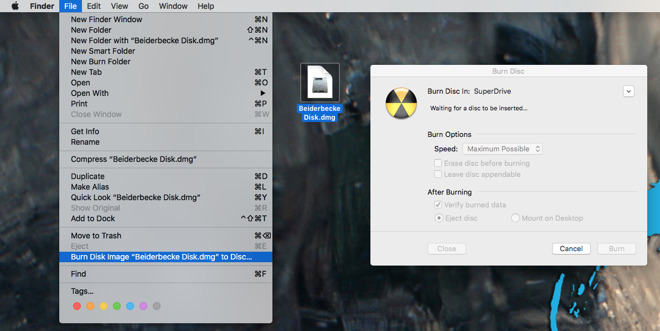
In the Finder, click to select your DMG disk image and then choose File and the option that begins Burn Disk Image. That menu option will change depending on the name of the disk image you've selected but it does the same thing. It opens up your disk burning hardware and prompts you to insert a blank disk.
Speaking of blank, that could be how you're looking right now. We used to use these things called Compact Discs and DVDs, plastic shiny objects. We used to use drives that could write them or what we used to call burning. It was a funny word for something that took ages, but we were younger then.
Today even if you never see any actual CDs or DVDs anymore, you do regularly see disk images -- and you can exploit them for your own archiving needs.
It's a long time since you bought software that came on a shiny disc. However, practically every time you download an app to your Mac, it still comes on the virtual equivalent: a disk image. This DMG file format is how practically all developers ship practically all their software and they do it for reasons you can benefit from too.
Their chief reason is simplicity. It is much more straightforward to give you a single thing to download than a entire folder full of separate files.
For a developer, that means being able to give you an application plus supporting documentation, an installer and assorted other extras. For you, it can mean taking a mass of related documents and making a single archive out of them.
Now, you can do that with a zipped or any compressed file too but there's a big difference. If you zip up 1,000 documents and then want just 1 of them back, you have to unzip the lot. With a disk image, it's exactly as if you have saved them to a CD or DVD. Opening the disk image is like inserting a physical disk.
Your Mac shows you all of the files on that and then when you've taken the one you want, you eject the DMG exactly the same way you would a real disk.
Plus in theory you can burn your virtual disk image to an actual disk and store it away off site somewhere.
Archive a folder
Open the Disk Utility app that came with your Mac. Choose File then New Image and lastly Image from Folder.
Then pick a folder with all of the files you want to save to the DMG. Unusually and slightly disconcertingly, the moment you select a folder to open, Disk Utility immediately presents you with the very similar Save dialog. It's now asking where you want this disk image to be saved.
Choose somewhere you'll find it: you're probably going to move this to somewhere else later, so saving it to the Desktop is fine for now.
Depending on your Mac, Disk Utility can take several minutes to create this disk image and save it for you. It's possible to make it slightly slower, too: choose the dropdown marked Encryption and pick from two different levels of security. This makes your disk image impossible, or at least tricky, to be read by anyone other than you but it can dramatically adds to the time taken to save it unless you're on the newest hardware from Cupertino.
Nonetheless, this is a great system to use when you've finished a project and your Mac is littered with files and documents that you may need again but definitely not now. Select a folder with them all in, create a disk image and then you have just one place to go to retrieve any or all of the documents.
That's not all
This procedure is good for when you've finished that project and have all the files. Sometimes, though, you'll want to build up to having this disk image as you go. Have Disk Utility create a blank disk image and then you can drag files to it as you create them.
The process is similar. Open Disk Utility, choose File then New Image and this time pick Blank Image. You'll have to specify how big this disk is going to be. That's not just for now, it's forever: you're saying what size this disk will always be. Unless you happen to know for certain, you're always going to be guessing so typically it's better to wait until you're done and choose to make the image from the finished folder.
Also, don't be tempted to create this disk image and then use it as your permanent or only place to store documents. Disk images are great for storage and transport, but they're not meant to be what you work from every day.
Keep creating your files on your Mac and save copies to this blank image instead.
But there's less too
Maybe developers switched to disk images because they were used to creating physical disks. Perhaps Apple gave us this format because we were all so familiar with CDs and DVDs, or at least we once were.
Whatever the reason, disk images are meant to be treated and regarded the same as actual physical disks but they are not the same. Clearly there's nothing physical but as well as meaning you don't have anything reflective to hold in your hand, it means you also don't have constraints.
CDs and DVDs have to have limits on how much you can save to them. Disk images do not.
So when you're using a disk image to store files for an archive and that's on a network attached drive, that's great. If you're sending the archive away to somewhere well, you may have to think about whether it will fit on your USB drive but still you don't have any significant constraints.
It's when you want to move that virtual disk image onto a real physical disk that you have to think about space limitations.
In Disk Utility, when you go to say where you want your image saved, there is an option at bottom right called Image Format. One option there is DVD/CD Master. This creates a virtual disk but in a format called .CDR which is really just for burning to physical disks.
You don't need it. Once you've got a disk image, you don't even need Disk Utility. The plain ordinary Finder will burn a CD or DVD for you.
In the Finder, click to select your DMG disk image and then choose File and the option that begins Burn Disk Image. That menu option will change depending on the name of the disk image you've selected but it does the same thing. It opens up your disk burning hardware and prompts you to insert a blank disk.
Speaking of blank, that could be how you're looking right now. We used to use these things called Compact Discs and DVDs, plastic shiny objects. We used to use drives that could write them or what we used to call burning. It was a funny word for something that took ages, but we were younger then.
Today even if you never see any actual CDs or DVDs anymore, you do regularly see disk images -- and you can exploit them for your own archiving needs.
Comments
An archive or disk image may have utility in speeding up a whole disk backup because the internal file structure is now hidden from the file system. Instead of numerous files and directories in the archive, you essentially have only one file which is easier to access, read and re-create on the target.
My question is: Are there guidelines or metrics that would show how much time could be saved?
*By convert, I mean opened the disk image in Disk Utility and created an encrypted sparse image file from it. Then I deleted the .DMG file (which are probably still saved in an old Time Machine backup).
And if you have to share this ISO with Windows users you have to do some magic Terminal trick first to make it PC compatible.
This is unnecessarily too complicated & is one of a few things on OSX that is more complicated than on Windows. (admittedly in Windows you using Nero not native Windows app to do one)
I recently tried burning a couple of disk images onto DVDs and Blu-Rays, but they could not be read properly on a standard DVD/ Blu-Ray player for some reason.
If I connect it to the Mac, the Mac sees it as a disk image.
I created at least 3-4 coasters because of this. No idea why. I keep wondering if it is prudent to invest in Toast.
I see the BDMV folder for the Blu-Ray.