How to take a screenshot on a Mac - the comprehensive guide

If you ever wondered how to take a screenshot on a Mac, here's a comprehensive guide of not only how to do it, but every option available to you from Apple -- and the stand-out best third-party app.
There are better ways of taking screenshots.
We must love our Mac screens. Apple gives us five ways to take screenshots or screen grabs of them, each with options. Then there are at least as many other third-party apps that will do exactly the same thing.
Or rather, not quite exactly. Each option of Apple's and each third-party app does this grabbing of your screen, but does it in slightly different ways. The principle is always the same, but it's the method you use and precisely what results you get that make the difference.
It makes the difference over whether it's worth paying for an app or just using Apple's built-in options. And it makes a difference, too, over just what you can then use the images for. You'll always be able to take an image and work on it in, say, Photoshop or Pixelmator Pro, but many of the screen grab tools available will let you work directly on the screenshot.
Start with Apple
Apple has long had ways for you to take screenshots on the Mac and in 2018 considerably updated them with the release of macOS Mojave. Yet to this day, what it's never done, is make it obvious how to take a screenshot on a Mac.
It's one of those Apple decisions where you have to be shown, because it's sufficiently hidden that you will never stumble on the answer otherwise.
In this case, that's because the only way to do it is to use a keyboard shortcut. There's no separate app for the task, and there's no menu option -- although a menu would get in the way of your screen shot.
Screenshot 101
Hold down Command-Shift-3 and, immediately, whatever is on your screen is saved as a PNG file on your desktop. You wanted a screenshot, you've got one, so you're done.
Except that this basic Command-Shift-3 keystroke takes a grab of the entire screen when you might want just a portion. It also takes the shot immediately, perhaps before you've got everything ready.
It also briefly puts what Apple calls a floating thumbnail in the bottom right-hand corner of your screen.
This thumbnail looks exactly what you may be used to from taking screen grabs on your iOS device -- except it isn't. There's one crucial difference, which is that if you take a second screen shot before the first thumbnail vanishes, your new grab includes it.
On iOS, the system is intelligent enough to ignore the thumbnail and grab whatever is underneath it, but macOS is not. The forthcoming macOS Tahoe still has this error, seven years after the feature was introduced.
However, Apple has fixed another issue, which was that screenshots taken with Command-Shift-3 used to automatically remove your cursor. Now the cursor can stay in the shot, which is handy for when you're pointing out which tick box someone should click.
You have to choose Show Mouse Pointer, but it's a setting that then stays on until you turn it off again. It's just a setting available when you press Command-Shift-5, and there's still a very significant Command-Shift-4 to know about.
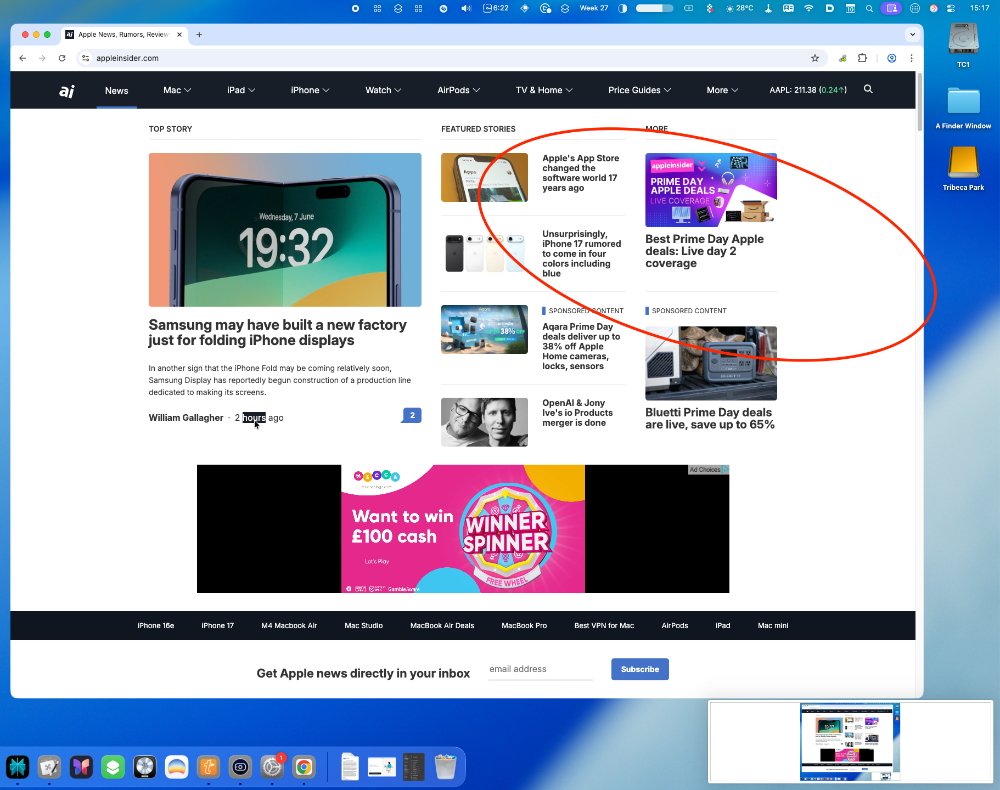
What's great is that you can circle and annotate anything. What's not so great is that you have to watch you don't accidentally include a thumbnail at bottom right -- and that you do include the external drives at top right
Go one better
Press Command-Shift-4, and you get a much different result to the old-fashioned Command-Shift-3. As soon as you press those keys, your cursor turns to a crosshair. Click and drag that crosshair over an area you want to take a screen grab of, and as soon as you let go of your mouse or trackpad, that's what you get.

Maybe the most common use for selecting a portion of the screen is when you're trying to take a shot of a single window. But that use is sufficiently common that Apple has added an extra element to help with it.
Press Command-Shift-4 to get the crosshairs, but this time don't click. Move your mouse cursor over the window you want to grab, and then tap the space bar. The whole window turns a light blue and your cursor becomes an icon of a camera.
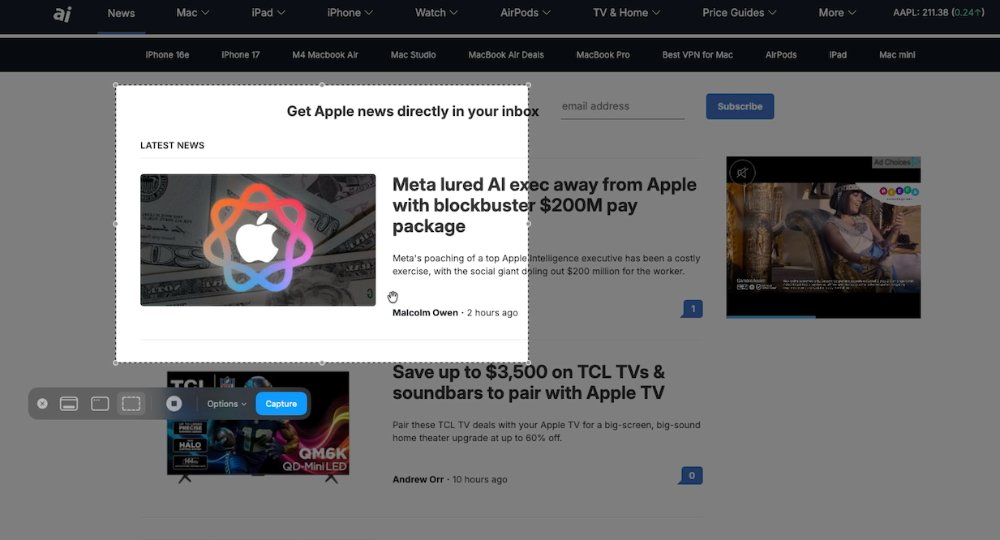
You can highlight just one area you want to take a screen grab of.
Click the mouse or press the Return key, and a screen grab of just that window will be saved to your desktop.
If you don't want to clutter up your desktop with screengrabs that you're just making to send to someone and forget about, you don't have to. And you don't have to change any settings to accomplish this.
Instead, this time, press Command-Control-Shift-4, so the same keystroke but with an added Shift key. Everything works the same as it does with crosshairs and selecting windows, but instead of saving the PNG file to your desktop, your Mac puts the image into the clipboard. Go into Mail, or any other app, and simply Paste.
So now you can highlight a particular area, make a screen grab, paste it into an email message and move on.
One more
As of macOS Mojave, you can now press Command-Shift-5 to get screenshots as well. If you only learn one keystroke, this is the one because it gives you all of the various options in one place.
Press that key combination and you get a floating palette of options at the bottom of your screen.
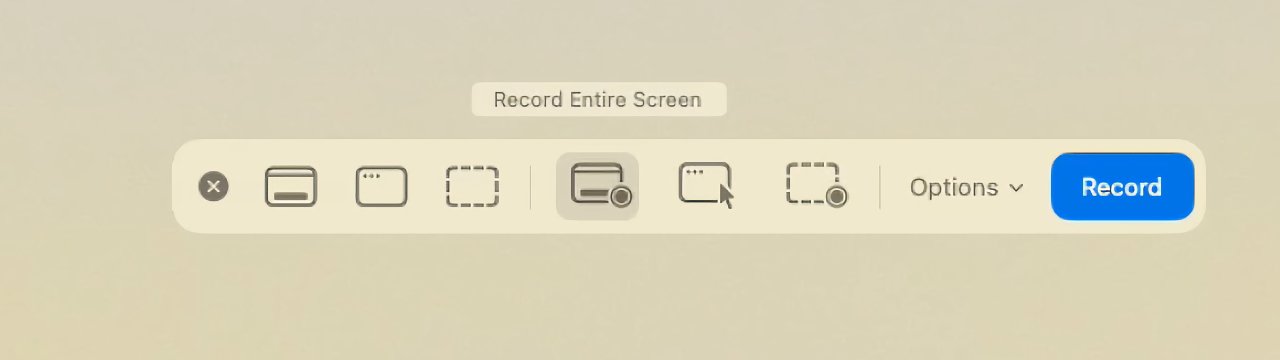
The screengrab tools you get for pressing Command-Shift-5.
To the left are options for taking screen grabs. So there's a button for grabbing your whole screen, then next to it one for just grabbing a particular window. Then there's a selection button, with an icon of a square made up of dotted lines, which is how you say you want to drag to select part of the screen.
There are then controls for doing the same with video, taking screen movies of the whole or part of the screen.
Next to those, though, there is a button for Options. It's in this section that you can change where screenshots are saved, but you can do more, such as setting a timer. Tell your Mac to take a screen grab any time from immediately to five seconds from now. That's how you can press the button and scurry to arrange menus.
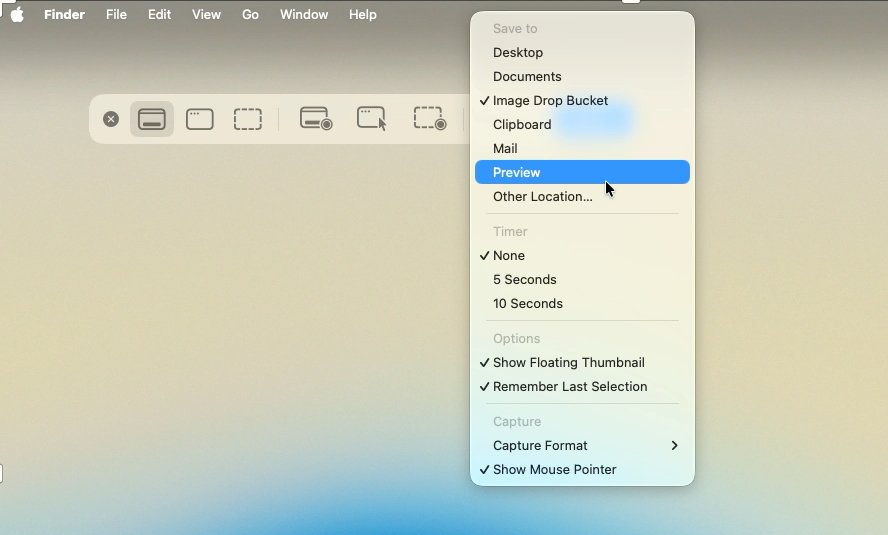
You can choose where to save images, or set a timer, or whether your cursor will be shown
It's also where that Show Mouse Pointer option is. For speed, when you're trying to help out someone by showing them the right menu option to choose, it's handy to have the cursor included like this.
But overall, you're much better off marking up your images with annotations.
Marking up
There's one more option in that Command-Shift-5 pallete, and that's where you control Show Floating Thumbnail. This is where you can switch off the thumbnail that appears at the bottom right of your screen, if you want to.
It really is a pain to have it on when you're taking a lot of shots and have to wait for the thumbnail to vanish between each one, but there's a reason Apple makes this the default.
When the thumbnail image appears on your screen, you can click on it to open it up into an editor. So before it's even saved to your desktop, you can edit it -- or you could, in theory.
Right now during the macOS Tahoe beta stage, there's an issue here were you get the button to turn on Markup, but it doesn't do anything. Doubtlessly that will be fixed, though, and you'll again have full markup controls.
Which means that you will be able to crop the image, rotate it -- or annotate any part of it. Right within macOS, you can draw arrows pointing to elements, you can draw ragged circles around them, and you can write text notes.
So you might show someone a dialog box that needs three things to be turned on or off. Point out each part, and you can number them, or you can write 'on' or 'off' right there.
When you're finished, click Done and the image is saved to your desktop.
This does all require you to be fast enough to click on the thumbnail before it vanishes. And it's funny how it feels as if the thumbnail lingers when you don't want it, but races away when you do.
Even if you don't catch it in time, though, you can find the image in the Finder and annotate from there. Either right click on the file, choose Quick Actions and then Markup, or click to select an image, then press the space bar to get a Quick Look.
While Quick Look is on screen, you'll find a Markup button at top right. It's the same button in the same place as when you've clicked on the thumbnail, but even now in the beta test, this way works.
There's still more
The screen grab features of macOS are so comprehensive as to be practically absurd. It's hard to imagine anyone ever needing all of this -- until that someone is you, and suddenly you've got a specific task to do that this solves perfectly.
There's no question but that as of macOS Mojave, Apple has the giant majority of users covered for this. Yet there is more that other companies' apps -- or at least one firm's app -- can do.
Screen capture tools seem to come and go -- Snappy, which AppleInsider previously recommended, appears to have been abandoned, for instance.
It's reasonable to assume that Snappy and others have fallen by the wayside because of Apple's significant improvements to screenshots. But really, it's a combination of Apple and of one single third-party app that is just so very good.
That's the the $29 CleanShot, which is also available in Setapp.
This app takes screengrabs like all of the rest of them, but, if you choose, it will hide all the mess on your desktop first. When you've taken fifty screenshot images in order to test out all of Apple's options and then thirty more to test out the features of third-party alternatives, CleanShot X hides all of them to give you a, well, clean shot.
Then there's Scrolling Capture. When you need to take a single screenshot of something like a web site that is too long, CleanShot X can scroll the page as it goes.
Apple's version can't do any of this, yet what it can do is so much more than most people will ever need. It just needs you to know about it all, since Apple doesn't ever show you.
Read on AppleInsider


Comments
Also in Cmd-Shift-4, you can hit the space bar to take a screenshot on the window your in.
I wish there was a good alternative...
I also recommend altering shortcuts for apps like iTunes/TV to allow for fullscreen video with a simple Command-F and even allowing for Paste and Match Style for apps like Pages/Numbers/Word/Excel to be Command-V if maintaining formatting is something you almost always require when working.
Of course you can. You think Apple wouldn't think of that? It's in Preview, the obvious place to look:
We run a web-based PACS & i am constantly switching between 1 of 8 tabs, so this makes dead simple - My 8 pages load in separate tabs every morning, i switch back & forth between the tabs all day, rinse repeat for the past 5 years.
There is a great supplementary tool for taking screen shots that I have found very useful named ScreenFloat:
https://www.screenfloatapp.com/ScreenFloat_-_Make_your_Shots_fly/ScreenFloat_-_Make_your_Shots_fly%21.html
The main job it does for me is to instantly create a floating window from a marquee selection which stays on top of all other windows as an instant reference, instead of scribbling something down.