Tips: How to take screenshots from a fourth generation Apple TV
Sometimes, you've just got to get proof of the high score you just got on that Apple TV game, or if you're like us, you've got to take a screenshot to show something off. AppleInsider shows you how to take screenshots from your fourth-generation Apple TV without breaking out the camera.

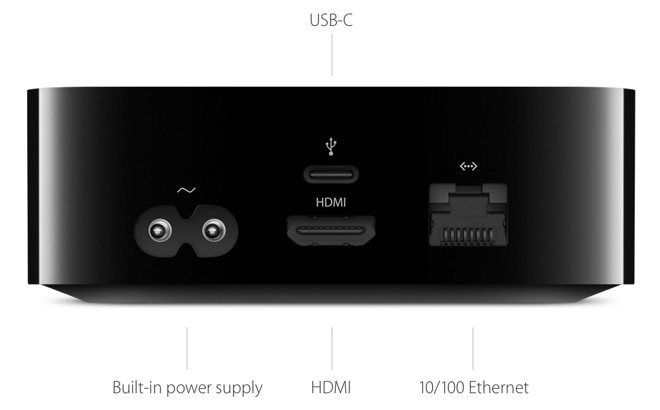
The fourth generation Apple TV has a USB-C port. Apple says it's for troubleshooting, with the company or the Apple TV itself instructing the user to plug the device into a computer running iTunes. We're going to use it to allow Xcode or QuickTime to connect to the device, facilitating capture.
If you've got most any Mac, you need a USB-A to USB-C cable, like a $11 10-foot one available on Amazon. The 2016 MacBook Pro needs a USB-C to USB-C cable. Connect the Apple TV to the "host" computer.
If you don't already have a free Apple developer's account, sign up for one. Next, download and install Xcode.
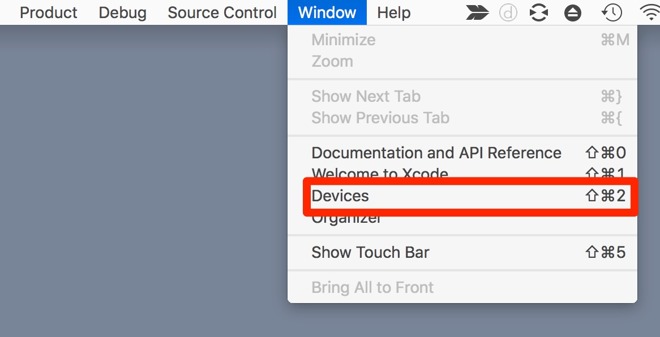
Pull down the Window menu in Xcode, and select Devices.

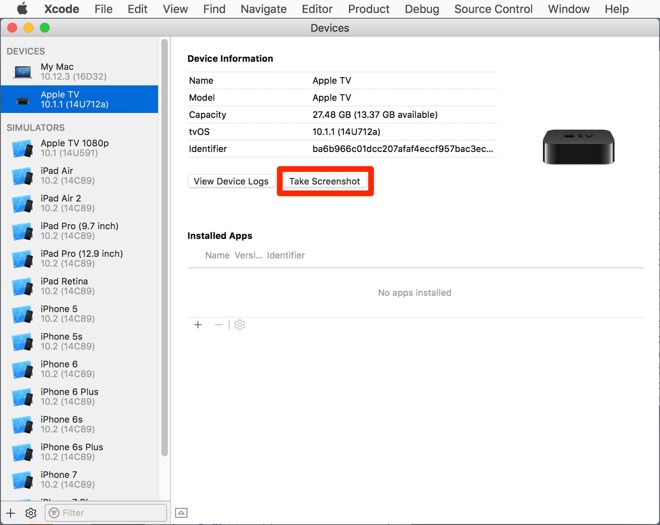
If all goes well, you'll see the Apple TV under "Devices" in the upper left hand corner of the window. Click Apple TV once. This will bring up an assortment of information about the device, plus give you a Take Screenshot button.

There won't be a preview on the Mac's screen. Every time you click on Take Screenshot, you'll hear the camera shutter noise from your computer, and the captured image will pop up on your desktop!
Alternatively, you can open QuickTime, select File > New Movie Recording and tap on the source selector, represented by an upside-down caret symbol next to the record button. Select Apple TV from the dropdown menu to reveal a live video feed from the set-top.
QuickTime can be used to record both video and audio. Screenshots can be taken using the usual screen capture technique: Command + Shift + 4 then Space and click on the open QuickTime window.

The fourth generation Apple TV has a USB-C port. Apple says it's for troubleshooting, with the company or the Apple TV itself instructing the user to plug the device into a computer running iTunes. We're going to use it to allow Xcode or QuickTime to connect to the device, facilitating capture.
If you've got most any Mac, you need a USB-A to USB-C cable, like a $11 10-foot one available on Amazon. The 2016 MacBook Pro needs a USB-C to USB-C cable. Connect the Apple TV to the "host" computer.
If you don't already have a free Apple developer's account, sign up for one. Next, download and install Xcode.
Pull down the Window menu in Xcode, and select Devices.

If all goes well, you'll see the Apple TV under "Devices" in the upper left hand corner of the window. Click Apple TV once. This will bring up an assortment of information about the device, plus give you a Take Screenshot button.

There won't be a preview on the Mac's screen. Every time you click on Take Screenshot, you'll hear the camera shutter noise from your computer, and the captured image will pop up on your desktop!
Alternatively, you can open QuickTime, select File > New Movie Recording and tap on the source selector, represented by an upside-down caret symbol next to the record button. Select Apple TV from the dropdown menu to reveal a live video feed from the set-top.
QuickTime can be used to record both video and audio. Screenshots can be taken using the usual screen capture technique: Command + Shift + 4 then Space and click on the open QuickTime window.


Comments
Our 2016 MacBook Pros came with a USB-C to USB-C cable--it's the power cord. As long as this cord is a normal one that also supports data, this should work. The new LG 4K display also came with one.