How to use Sketch & Markup with iOS 13 and macOS Catalina

Continuity Sketch and Markup are two new Sidecar-related features that allow you remotely draw graphics or annotate documents from any iPad or iPhone capable of running iPadOS 13 or iOS 13, along with any Mac that can support the new macOS Catalina.

On the Mac side, a Skylake CPU or Apple's T2 chip is needed to support the hardware-accelerated HEVC video encoding of an encrypted video stream used to send a secondary virtual display to the tablet. On the iPad end, Sidecar needs an Apple Pencil to tap and draw on the screen -- you can't navigate UI elements from the Mac using your fingers.
But take out the live virtual display of your Mac desktop, and remove the need to navigate Mac UI elements on the other end, and you still have a functional, useful feature with Continuity Sketch and Markup.
Hardware requirements for Continuity Sketch and Markup are far less arduous. Any Macs that can run the new macOS 10.15 update, including machines dating back to 2012, can use the features.
To work, all of your devices need to have Bluetooth and WiFi turned on. Your devices don't need to be connected to the same WiFi network because AWDL sets up an ad-hoc WiFi connection. However, neither device can be sharing its WiFi using Personal Hotspot or Internet Sharing, as this prevents AWDL from working. Your devices also need to be linked to the same Apple ID.
Apple changed the behavior of Control Center in iOS 11 to allow users to disconnect from WiFi networks or Bluetooth accessories without actually disabling their wireless radios, specifically to enable these Continuity features to continue working.
This "Import from" option is also available from the File menu, or in apps like Notes, from the Media icon in the toolbar.
There are multiple ways to begin a Continuity Sketch session
When you select "Add Sketch," a wireless session is opened between your Mac and the selected device, and your iPhone or iPad opens a blank sketch pad with an ink pen, a chisel Tip marker, and chalk pencil. Each tool can be tapped to reveal options for five different tip sizes from narrow to fat, providing 15 different drawing tool styles, and a slider providing 100 gradients of translucency below fully opaque. A color palette lets you select from 108 shades and ten gradients from black to white.
Continuity Sketch works on an iPhone, using a basic version of the Sidecar app
You can freely sketch with a single finger, laying down layers of virtual ink or chalk, or you can position the ruler tool to constrain drawing along a straight edge. The ruler includes an angle setting, with haptic feedback that clicks into place at 45-degree increments.
A smart eraser tool lets you click to switch between a bitmap "pixel eraser" which erases areas you touch, and a vector "object eraser" that deletes an entire stroke of ink in your sketch with each touch.
Finally, a smart selection tool lets you select a single element of your sketch, or a group of elements, and move them around independently of the rest of your sketch. When you draw a selection lasso around part of a drawn shape or colored-in area, it selects that area as if a vector on a separate layer. If you draw a selection that includes multiple strokes, they are all selected as a group and can be moved around together.
After making a selection, you can use iOS 13's triple-tap gesture to present the editing menu and use cut, copy, and paste to delete or duplicate multiple instances of the selection. You can also use undo and redo. You can't resize a selection, and there are no text or shape tools.
Note that these drawing tools are the same that are presented in iOS Notes when you access the Markup tool to enter a sketch directly. On iPad, you get the same tools with additional inkwells, a movable toolbar that can be attached to the bottom or side, and an option to auto-minimize the toolbar palette.
-l.png)
Continuity Sketch on iPad
Continuity Sketch disappears without saving if you click outside of the insertion point on your Mac or hit Cancel on your mobile device. It's intended to let you add a quick, simple sketch into an email or another document on your Mac.
If you plan to create some masterpiece of drawing on your iPhone, you should do it directly in Notes and then share it via AirDrop once you're done so you don't risk losing it if there is some connectivity problem. And if you plan to get fancy, you might want to use a more full-featured drawing app.
As with the Continuity Camera and Scan features, Sketch is provided as a way to use the hardware on your iOS device -- the camera, and now the touchscreen -- as a convenient, easy to use input device for your Mac. And if you're using it from an iPad with Apple Pencil, you can use your Pencil to do more precise drawing within Continuity Sketch.
This enters Quick Look Markup, where you can use your Mac's mouse or trackpad to draw precise, resizable, rotatable, movable shapes either roughly freehand or with the smart Sketch tool that snaps your doodle into a perfect circle, triangle or rectangle shape. You can add other shapes, speech bubbles, arrows, and even a signature and magnifying glass bubble. However, you're limited to the Mac's precise pointer, which is more accurate but might feel less intuitive than multitouch input.
In Catalina, you can now click on Quick Look's new Annotate icon (below), shaped like an iPad, to access a menu of nearby Continuity mobile devices to markup your document with your finger or Apple Pencil using the same Sketch tools detailed above.
Note that this only appears in Quick Look. For some reason, Apple didn't also add the Annotate icon to the very similar (but also slightly different) Markup tools that appear in Preview. Alternatively, you can also use the Finder's Quick Actions menu to select Markup.
Catalina's Quick Look features an Annotate button to launch Continuity Markup
Unlike Continuity Sketch, the strokes you make inside Continuity Markup are shown in realtime on the Mac in the Quick Look window. Additionally, because it's a live input session hosted by Quick Look, if you disconnect from your mobile device, the annotations you've made don't go away. However, your markup sketch brushstrokes can't be selected as objects to resize or delete on the Mac.
Oddly enough, if you reconnect to your mobile device, you can continue from where you left off, selecting an individual or a group of annotations that you previously made on your mobile device using the Sketch selection tool, and then moving, deleting or duplicating them as desired. You can also select, restyle, move, and otherwise edit markup shapes and lines created on the Mac side, which similarly appear on your mobile device in real-time.
In Continuity Markup you can also access some of the same shape tools as Quick Look Markup on the Mac; in addition to the Sketch tools, Continuity Markup also presents a plus button that opens up the ability to add text from the keyboard, a Signature scribbled with your finger, place a Magnifier, and draw a Square, Circle, Speech Bubble, or Line/Arrows.
-l.png)
-l.png)
Continuity Markup on iPad
Tap on a shape tool and it presents options for changing the color and style, letting you draw solid or outlined shapes in three different weights, and lines with single, double or no arrows (above). A line or arrow also includes a bezier point for making a curved line segment.
You can enter and style text in Continuity Markup, and perform the same smart selections of brushstrokes and shapes, tripping tapping for that undo, cut, copy, paste, redo menu (below).
Continuity Markup on iPhone
What's interesting about Markup shapes is that-- unlike the Sketch brush strokes-- they are added as selectable objects in the Quick Look Markup, so you can select and edit them on the Mac as vector elements.
It's not clear why you can't access these other shape tools from within Continuity Sketch. Perhaps these shapes are created by Quick Look itself so that you are just defining the placement and style on your mobile device, and the Mac is creating the artwork locally.
There isn't anything saved on the iOS end; you're just using your mobile device as an input for drawing annotations on the Mac. When you're finished, you click Done in Quick Look to exit Continuity Markup mode.
You can click Markup again and continue editing the annotations you've made. Again, Sketch brushstrokes you made from your iOS device are only editable if you connect to the iOS device again and edit them from the device; the Mac won't select them. Shapes created on the Mac or in the iOS Markup session are both editable on the Mac during your Quick Look session. However, once you exit Quick Look, all of your annotations are saved to the file you've marked up, and are not editable again.
Continuity Markup seems to work pretty well in JPEG and PNG image files, but had trouble loading the PDFs I tried. In some cases, my iPad would create a session but not draw the tool palette.
Also, Catalina doesn't offer Quick Look Markup at all for HEIC files, the modern H.265 format that newer iPhones now use to capture photos by default. If you want to markup an unsupported image type, you'd have to export it to a JPEG or PNG, or more simply just create a screenshot and perform Markup on that.
On both an iPhone or iPad, a Continuity Sketch or Markup session is handled by the Sidecar app, the same app that the full Sidecar feature uses to set up a remote display session where you can see a view of your Mac desktop and interact with Mac windows and menus using a Pencil. For many users, Continuity Sketch and Markup will deliver much of the value of Sidecar on their existing hardware, short of working with professional illustration software and providing interaction with Touch Bar, an iPad keyboard, and Pencil.
Sidecar-lite
One of the most exciting features of macOS Catalina that Apple demonstrated this summer at WWDC19 was Sidecar, which turns an iPad into a secondary Pencil-enabled sketchpad-display for remotely interacting with your Mac desktop. The new feature requires fairly modern hardware to work. Sidecar needs a Mac equipped with an Intel Skylake or better processor shipped since late 2015, and a newer iPad that supports Apple Pencil.On the Mac side, a Skylake CPU or Apple's T2 chip is needed to support the hardware-accelerated HEVC video encoding of an encrypted video stream used to send a secondary virtual display to the tablet. On the iPad end, Sidecar needs an Apple Pencil to tap and draw on the screen -- you can't navigate UI elements from the Mac using your fingers.
But take out the live virtual display of your Mac desktop, and remove the need to navigate Mac UI elements on the other end, and you still have a functional, useful feature with Continuity Sketch and Markup.
Hardware requirements for Continuity Sketch and Markup are far less arduous. Any Macs that can run the new macOS 10.15 update, including machines dating back to 2012, can use the features.
The ADWL magic behind Continuity
Like Sidecar and other Continuity features, the new Continuity Sketch and Markup tether an iOS 13 or iPadOS 13 mobile device to a Catalina Mac using Apple Wireless Direct Link (AWDL). AWDL is Apple's Continuity protocol that's used to discover nearby devices using Bluetooth LE and then transfer data between them using fast WiFi connectivity. It powers Apple's earlier Continuity features including AirDrop and Handoff, as well as the Continuity Camera and Scan that shipped last year as part of macOS Mojave.To work, all of your devices need to have Bluetooth and WiFi turned on. Your devices don't need to be connected to the same WiFi network because AWDL sets up an ad-hoc WiFi connection. However, neither device can be sharing its WiFi using Personal Hotspot or Internet Sharing, as this prevents AWDL from working. Your devices also need to be linked to the same Apple ID.
Apple changed the behavior of Control Center in iOS 11 to allow users to disconnect from WiFi networks or Bluetooth accessories without actually disabling their wireless radios, specifically to enable these Continuity features to continue working.
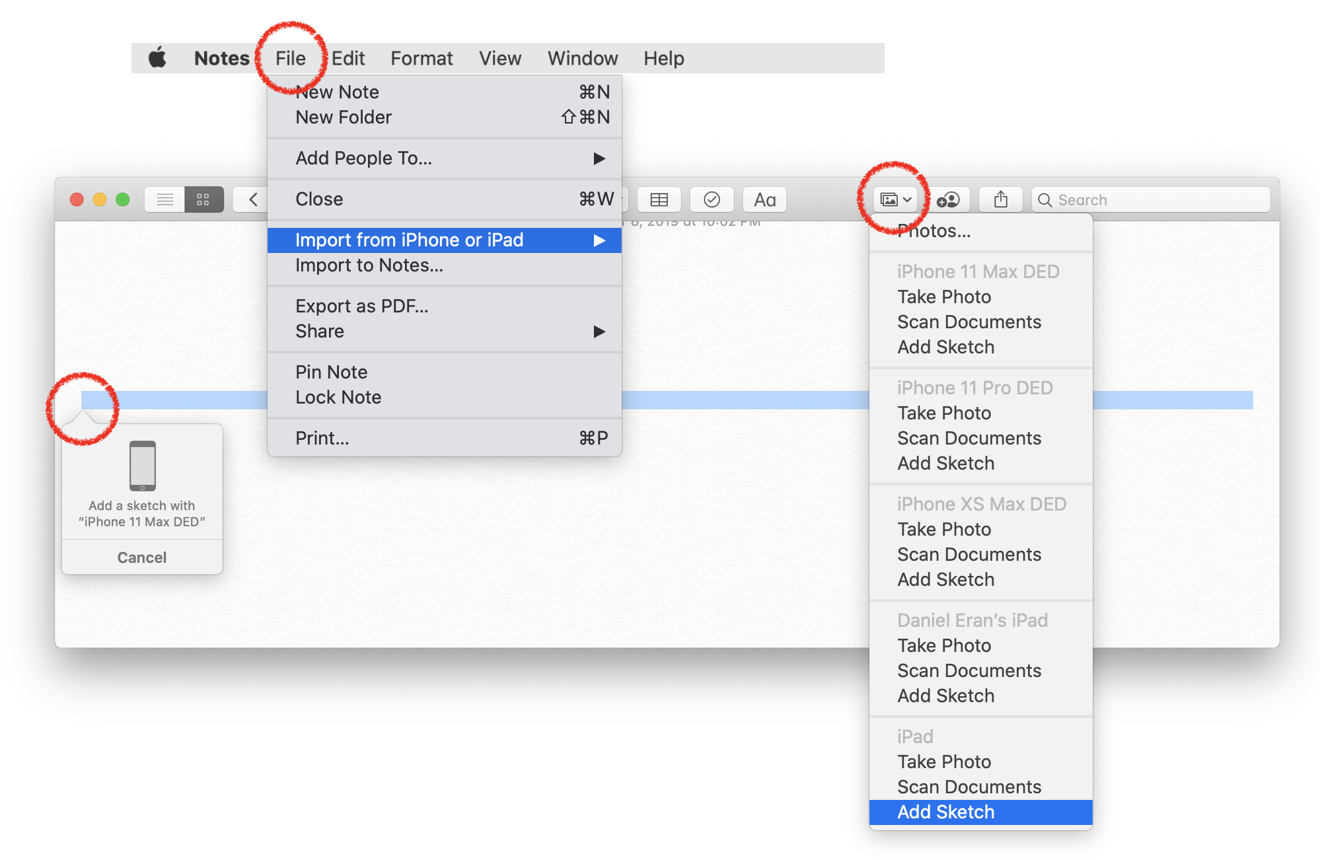
Continuity Sketch from any mobile device
Just as with Continuity Camera, apps that support insertion from a mobile device including the Finder, Mail, Messages, Notes, TextEdit, Pages, Numbers, and Keynote enable a right-click menu that lets you "Import from an iPhone or Mac," selecting a Photo, Scan or now a Sketch. If you have multiple mobile devices, each is presented as an option for input.This "Import from" option is also available from the File menu, or in apps like Notes, from the Media icon in the toolbar.
There are multiple ways to begin a Continuity Sketch session
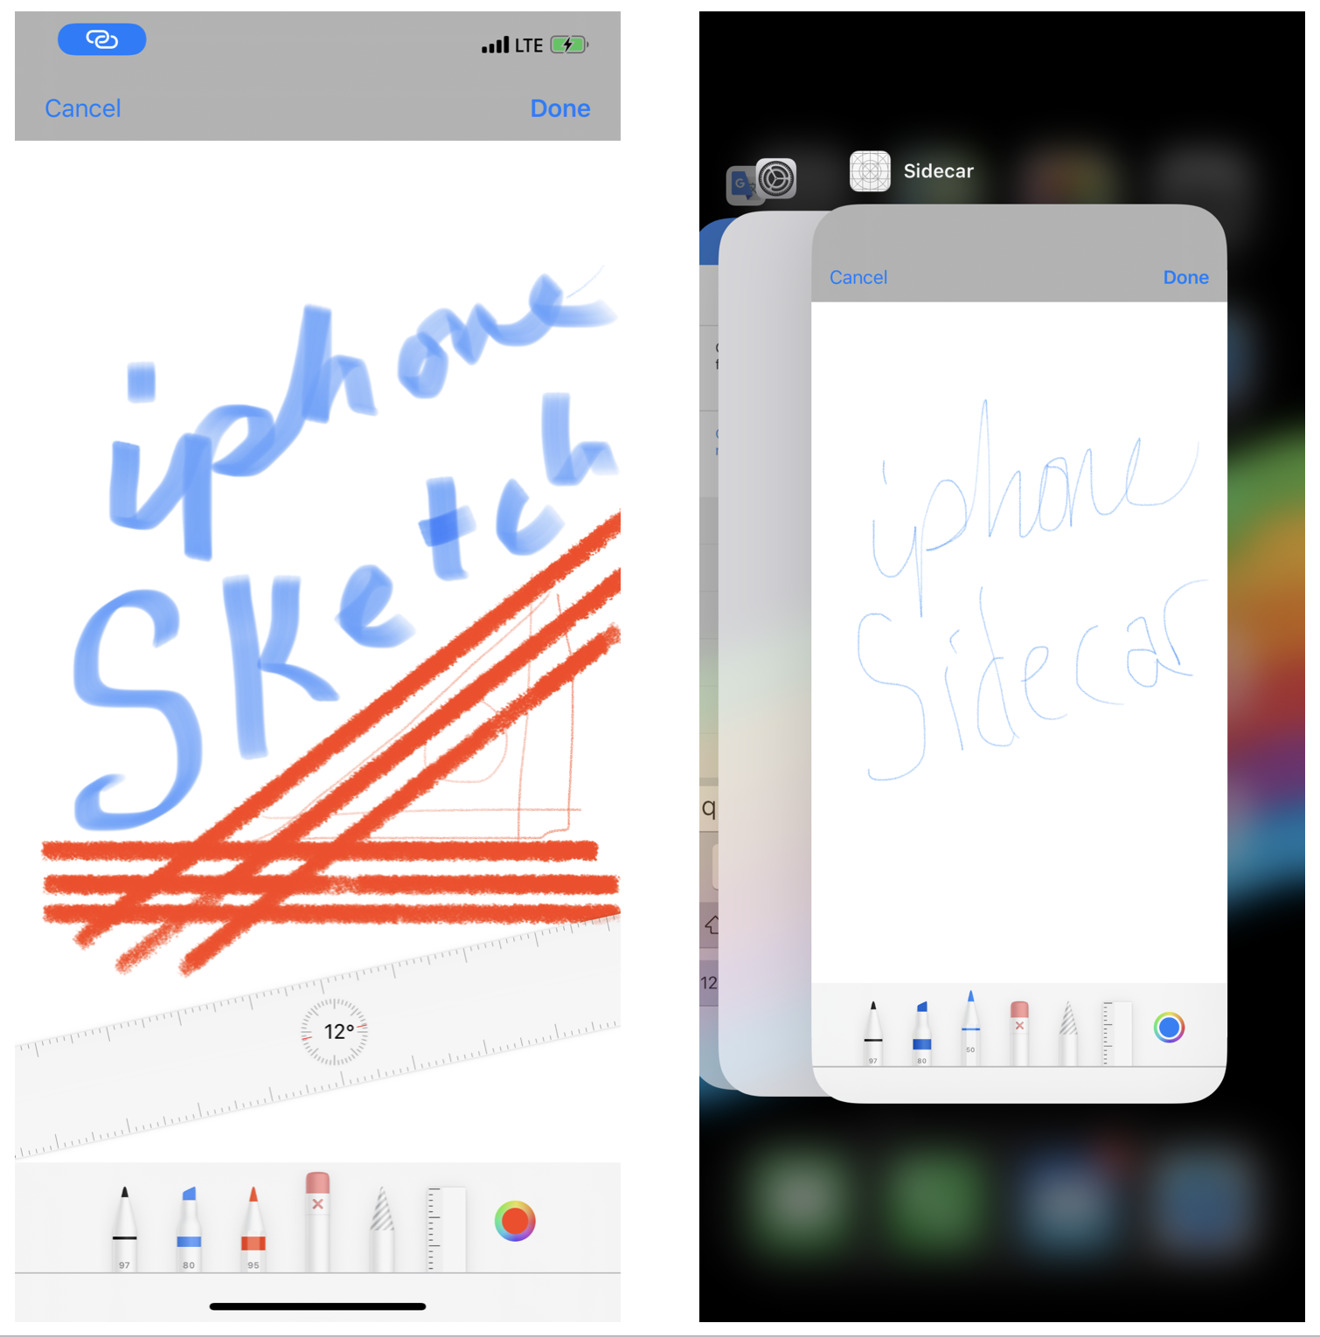
When you select "Add Sketch," a wireless session is opened between your Mac and the selected device, and your iPhone or iPad opens a blank sketch pad with an ink pen, a chisel Tip marker, and chalk pencil. Each tool can be tapped to reveal options for five different tip sizes from narrow to fat, providing 15 different drawing tool styles, and a slider providing 100 gradients of translucency below fully opaque. A color palette lets you select from 108 shades and ten gradients from black to white.
Continuity Sketch works on an iPhone, using a basic version of the Sidecar app
You can freely sketch with a single finger, laying down layers of virtual ink or chalk, or you can position the ruler tool to constrain drawing along a straight edge. The ruler includes an angle setting, with haptic feedback that clicks into place at 45-degree increments.
A smart eraser tool lets you click to switch between a bitmap "pixel eraser" which erases areas you touch, and a vector "object eraser" that deletes an entire stroke of ink in your sketch with each touch.
Finally, a smart selection tool lets you select a single element of your sketch, or a group of elements, and move them around independently of the rest of your sketch. When you draw a selection lasso around part of a drawn shape or colored-in area, it selects that area as if a vector on a separate layer. If you draw a selection that includes multiple strokes, they are all selected as a group and can be moved around together.
After making a selection, you can use iOS 13's triple-tap gesture to present the editing menu and use cut, copy, and paste to delete or duplicate multiple instances of the selection. You can also use undo and redo. You can't resize a selection, and there are no text or shape tools.
Note that these drawing tools are the same that are presented in iOS Notes when you access the Markup tool to enter a sketch directly. On iPad, you get the same tools with additional inkwells, a movable toolbar that can be attached to the bottom or side, and an option to auto-minimize the toolbar palette.
Continuity Sketch on iPad
Continuity Sketch disappears without saving if you click outside of the insertion point on your Mac or hit Cancel on your mobile device. It's intended to let you add a quick, simple sketch into an email or another document on your Mac.
If you plan to create some masterpiece of drawing on your iPhone, you should do it directly in Notes and then share it via AirDrop once you're done so you don't risk losing it if there is some connectivity problem. And if you plan to get fancy, you might want to use a more full-featured drawing app.
As with the Continuity Camera and Scan features, Sketch is provided as a way to use the hardware on your iOS device -- the camera, and now the touchscreen -- as a convenient, easy to use input device for your Mac. And if you're using it from an iPad with Apple Pencil, you can use your Pencil to do more precise drawing within Continuity Sketch.
Continuity Markup: Sketch on a Quick Look document
If you want to draw annotations on top of an existing graphic or PDF document, you can access the same Continuity Sketch drawing tools from Quick Look. Select a document, tap the spacebar to enter Quick Look, then at the top of the window tap on the Markup icon.This enters Quick Look Markup, where you can use your Mac's mouse or trackpad to draw precise, resizable, rotatable, movable shapes either roughly freehand or with the smart Sketch tool that snaps your doodle into a perfect circle, triangle or rectangle shape. You can add other shapes, speech bubbles, arrows, and even a signature and magnifying glass bubble. However, you're limited to the Mac's precise pointer, which is more accurate but might feel less intuitive than multitouch input.
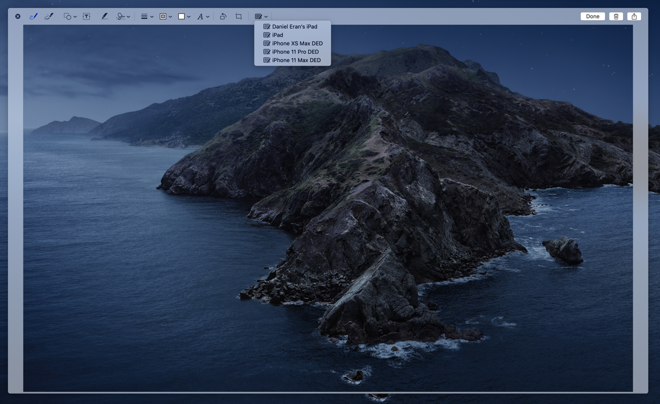
In Catalina, you can now click on Quick Look's new Annotate icon (below), shaped like an iPad, to access a menu of nearby Continuity mobile devices to markup your document with your finger or Apple Pencil using the same Sketch tools detailed above.
Note that this only appears in Quick Look. For some reason, Apple didn't also add the Annotate icon to the very similar (but also slightly different) Markup tools that appear in Preview. Alternatively, you can also use the Finder's Quick Actions menu to select Markup.
Catalina's Quick Look features an Annotate button to launch Continuity Markup
Unlike Continuity Sketch, the strokes you make inside Continuity Markup are shown in realtime on the Mac in the Quick Look window. Additionally, because it's a live input session hosted by Quick Look, if you disconnect from your mobile device, the annotations you've made don't go away. However, your markup sketch brushstrokes can't be selected as objects to resize or delete on the Mac.
Oddly enough, if you reconnect to your mobile device, you can continue from where you left off, selecting an individual or a group of annotations that you previously made on your mobile device using the Sketch selection tool, and then moving, deleting or duplicating them as desired. You can also select, restyle, move, and otherwise edit markup shapes and lines created on the Mac side, which similarly appear on your mobile device in real-time.
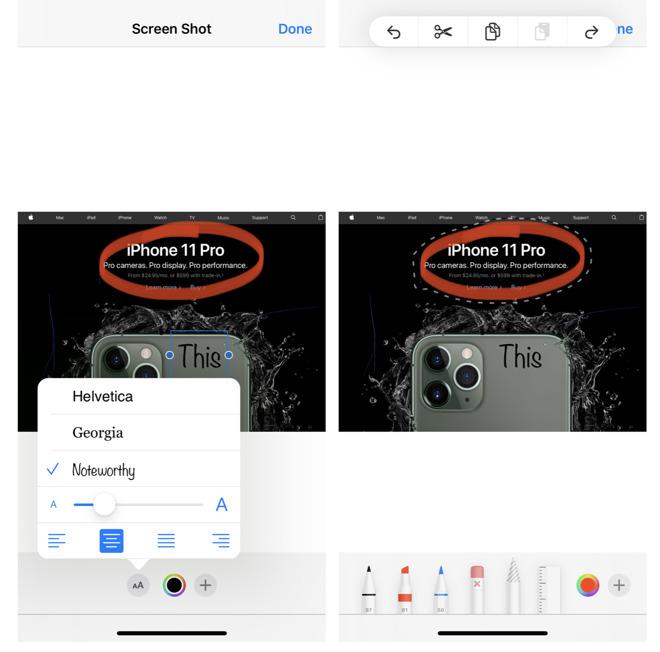
In Continuity Markup you can also access some of the same shape tools as Quick Look Markup on the Mac; in addition to the Sketch tools, Continuity Markup also presents a plus button that opens up the ability to add text from the keyboard, a Signature scribbled with your finger, place a Magnifier, and draw a Square, Circle, Speech Bubble, or Line/Arrows.
Continuity Markup on iPad
Tap on a shape tool and it presents options for changing the color and style, letting you draw solid or outlined shapes in three different weights, and lines with single, double or no arrows (above). A line or arrow also includes a bezier point for making a curved line segment.
You can enter and style text in Continuity Markup, and perform the same smart selections of brushstrokes and shapes, tripping tapping for that undo, cut, copy, paste, redo menu (below).
Continuity Markup on iPhone
What's interesting about Markup shapes is that-- unlike the Sketch brush strokes-- they are added as selectable objects in the Quick Look Markup, so you can select and edit them on the Mac as vector elements.
It's not clear why you can't access these other shape tools from within Continuity Sketch. Perhaps these shapes are created by Quick Look itself so that you are just defining the placement and style on your mobile device, and the Mac is creating the artwork locally.
There isn't anything saved on the iOS end; you're just using your mobile device as an input for drawing annotations on the Mac. When you're finished, you click Done in Quick Look to exit Continuity Markup mode.
You can click Markup again and continue editing the annotations you've made. Again, Sketch brushstrokes you made from your iOS device are only editable if you connect to the iOS device again and edit them from the device; the Mac won't select them. Shapes created on the Mac or in the iOS Markup session are both editable on the Mac during your Quick Look session. However, once you exit Quick Look, all of your annotations are saved to the file you've marked up, and are not editable again.
Continuity Markup seems to work pretty well in JPEG and PNG image files, but had trouble loading the PDFs I tried. In some cases, my iPad would create a session but not draw the tool palette.
Also, Catalina doesn't offer Quick Look Markup at all for HEIC files, the modern H.265 format that newer iPhones now use to capture photos by default. If you want to markup an unsupported image type, you'd have to export it to a JPEG or PNG, or more simply just create a screenshot and perform Markup on that.
On both an iPhone or iPad, a Continuity Sketch or Markup session is handled by the Sidecar app, the same app that the full Sidecar feature uses to set up a remote display session where you can see a view of your Mac desktop and interact with Mac windows and menus using a Pencil. For many users, Continuity Sketch and Markup will deliver much of the value of Sidecar on their existing hardware, short of working with professional illustration software and providing interaction with Touch Bar, an iPad keyboard, and Pencil.
Comments