How to use Trash on macOS Sonoma

Believe it or not, there are ways you can make the Trash on your Mac more functional. Your Trash can be better, be it through skipping prompts or setting up some automation.

Using Trash on your Mac may seem cut and dry, but there are a few ways to optimize it.
One of the longest-standing pieces of skeuomorphism on your Mac is the Trash, and it functions exactly the same as its real-world counterpart. You can fill it up with all sorts of junk you don't want or need anymore, but you will eventually have to empty it out. Unlike your actual trash can, Trash in macOS Sonoma can be made more convenient.
Skip confirming to delete, and set up automatic deletion
Has your actual trash can ever asked you "Are you sure?" in the middle of emptying it? Naturally, it can be annoying that your virtual trash can does ask you. Thankfully, this can be turned off if it proves to be an annoyance to you. If you would prefer your Mac not to ask for confirmation when emptying out your Trash, doing so will only take a brief trip to Finder's settings menu.
- Open a Finder window.
- Select Finder in your menu bar, then select Settings
- In Finder Settings, click on Advanced.
- Uncheck the box next to "Show warning before emptying the Trash.
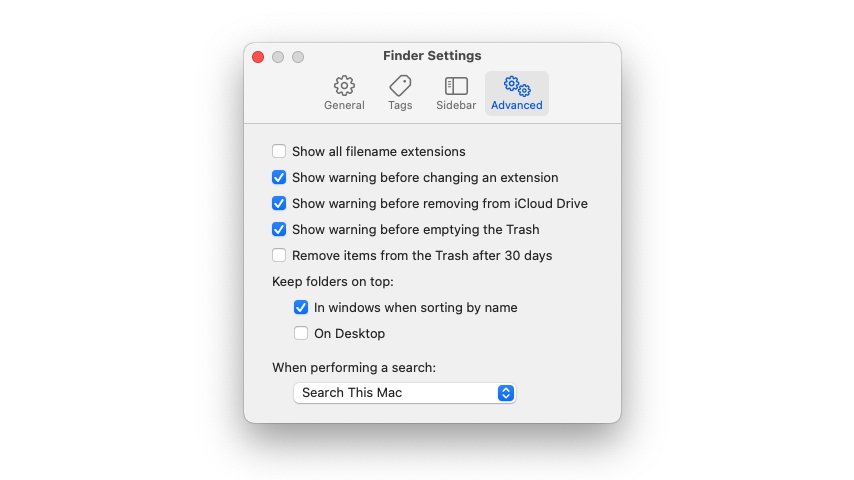
Finder's advanced settings allow users to make a couple of simple and useful modifications to Trash.
Just like that, no more warning when emptying your Trash. You'll be free to permanently delete files without having to click an extra box. One more convenient setting to take advantage of while you're in the Advanced tab of Finder Settings is to set up your files to delete automatically. This can be done by simply ticking the box next to "Remove items from Trash after 30 days."
Much like an actual trash can, it is very easy to let Trash get a little too full. Unlike an actual trash can, there is no limit to how much can be in ther so you could find your overall storage space filling up. However, with this setting enabled, files will automatically disappear from your Trash after a month.
This can be great for files you may forget to manually delete, or for files that need to stick around for just a little while longer before you fully part ways.
Taking files out of the Trash
Whether you've accidentally put something in the Trash, or put something in there too soon, it is possible to get it back out. To recover any erroneously trashed files, you'll only need to navigate through a couple of clicks.

Put Back is a simple recovery option that will also open the window your putting a file back into.
- Open your Trash.
- Secondary-click on whichever file you wish to recover, or highlight multiple files before clicking.
- Click Put Back.
Upon clicking Put Back, your selected file, or files, will be moved back to where they came from. Additionally, the folder the file(s) came from will be opened in a new Finder window. The option to put a file back is right next to the "Delete Immediately" option, but thankfully turning off warnings before emptying Trash does not apply to individually selected files.
There is also a keyboard shortcut that you can use both for deleting and for putting back.
You can delete any item by selecting it and pressing Command-Delete. If you then open the Trash and select the item, pressing Command-Delete will put it back wherever it was before.
Read on AppleInsider