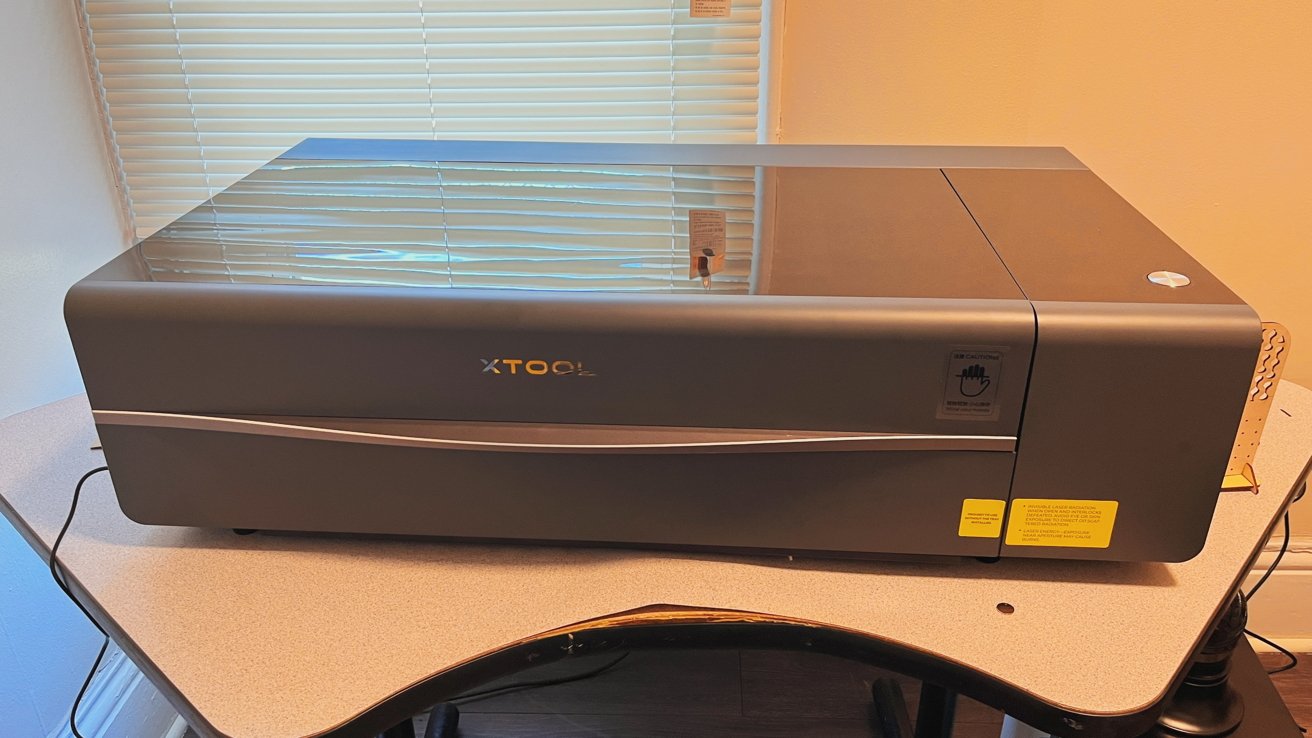
xTool P2 55W Desktop CO2 Laser Cutter review: impossibly fun to use if you can justify the...

Harness the power of light with the xTool P2 laser cutter and engraver, a 55W CO2 laser that can help you achieve all your DIY dreams.
xTool P2 55W Desktop CO2 Laser Cutter review
Laser cutting is taking the maker world by storm, the same way that 3D printing had years ago. What was once a niche hobby by those who were comfortable constructing their own lasers piecemeal has now opened up thanks to ready-to-use laser machines that anyone can purchase.
While Glowforge is probably one of the most well-known ready-to-use lasers out there, it's far from the only one.
That's why we're excited to take a look at xTool's P2 55W Desktop CO2 Laser Cutter. It's an all-in-one machine that has the chance to revolutionize at-home laser work.
xTool P2 55W Desktop CO2 Laser Cutter specs
Before I get down to talking about my personal experience with the P2 Laser, here's a handful of useful specs that you should probably know before we get started.
| Laser type | CO2 laser tube |
| Power | 55W |
| Weight | 99.2lbs (45kg) |
| Bed area | 680 mm x 360 mm (26.8" x 14.2") |
| Working area | 600 mm x 308 mm (23.6" x 12.1") |
| Working height | 72mm (2.7"), up to 215mm (8.4") with add-on riser base |
| Connection types | USB C, Ethernet, Wi-Fi |
| Cameras | two 16MP cameras, one wide angle, one precision |
| Engraving precision | 0.01mm |
| Engraving speed | 600mm/s |
| Conveyor support | yes, with accessory |
| Pass through support | yes |
| Rotary support | yes, with accessory |
| Emergency stop button | yes |
xTool P2 55W Desktop CO2 Laser Cutter review - alarmingly easy to set up
I can be a little skittish when it comes to setting up unfamiliar tools. This is doubly true for anything large or inherently dangerous. The P2 weighs just about 100 lbs and is covered in a bunch of stickers warning you not to catch your work area on fire or shoot a laser into your eyeball -- so I was a bit hesitant to get started.
I was immediately overwhelmed when I finally got time to unbox the P2. However, in hindsight, I didn't need to be. As it turns out, xTool has made a product almost anyone can set up.
Once you get your P2 out of the box -- probably the most difficult task of the entire setup process -- it only takes about 20 minutes to get your laser operational. This is exceptional, whether you're very eager or nervous, as it means you'll move through the annoying setup steps almost immediately.
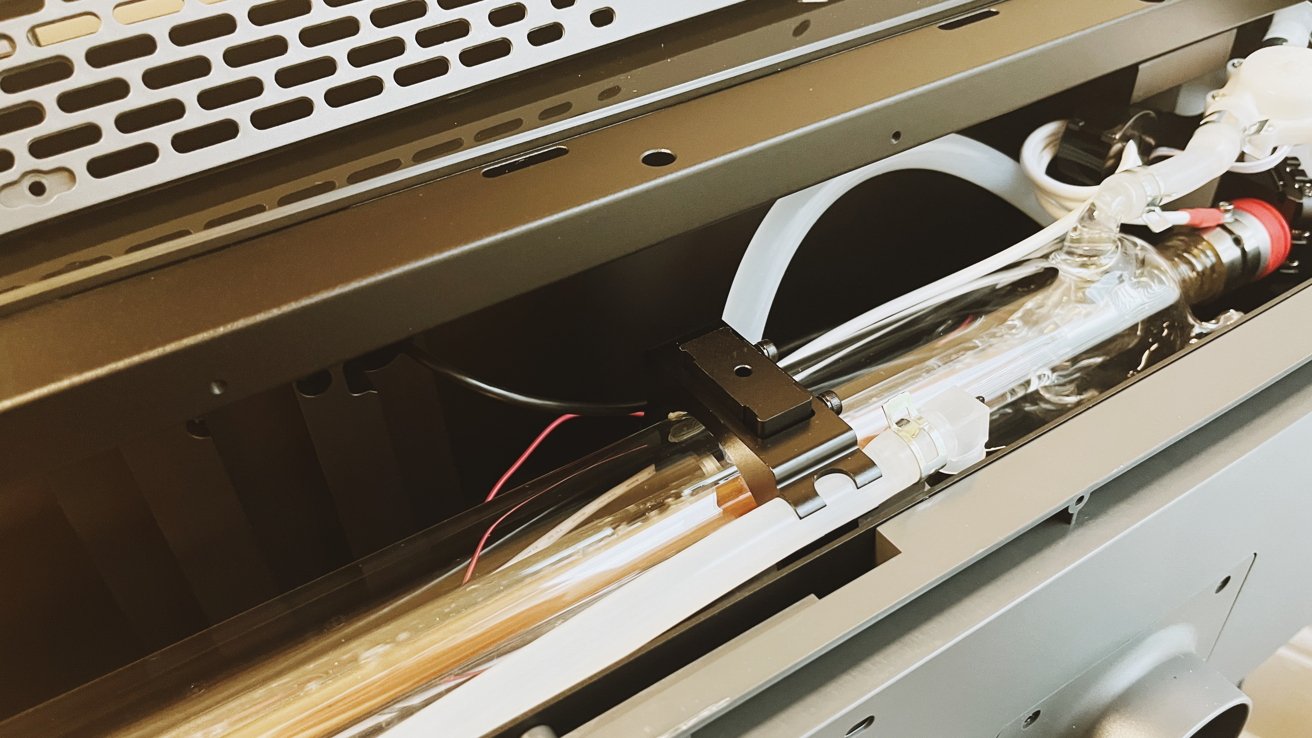
xTool P2 55W Desktop CO2 Laser Cutter review - - Popping open the back to check the laser tube
The setup consists mostly of doing a few quick checks to ensure your gantry and laser head move freely, confirming your laser tube isn't cracked, filling your reservoir with purified (or distilled) water and antifreeze, and attaching your exhaust hose.
Accessing the reservoir tank is done by removing eleven screws, popping off the back cover, and unscrewing the cap to the tank. While xTool doesn't furnish the distilled water you'll need, it does provide you with antifreeze and a useful funnel.
When adding the antifreeze, you must consult a handy chart to figure out how much to add. This is important if you plan to house your laser in unheated or under-heated workspaces like a garage or basement workshop.
Once you've got your fluids in the machine, it's time to get calibrating. I was anticipating calibration to be a real nightmare -- sort of the same way that calibrating a 3D printer can be arduous -- but it wasn't. I assume some of this was luck, as my P2 didn't require a lot of fussing. However, calibrating a laser cutter is less fiddly than a 3D printer.
You'll need to connect your machine to a computer via USB to calibrate. There's no way around this, which means if you're a desktop user, you will want to move your desktop temporarily into your workspace, even if you plan on using the device wirelessly with your iPad.
Using xTool Creative Space, you simply set your laser head to the lower right corner. Then, apply a masking tape over the hole on the laser head. Close the lid of your laser, pulse once or twice -- not too many times, as you can set the tape on fire -- and see where your mark lands.
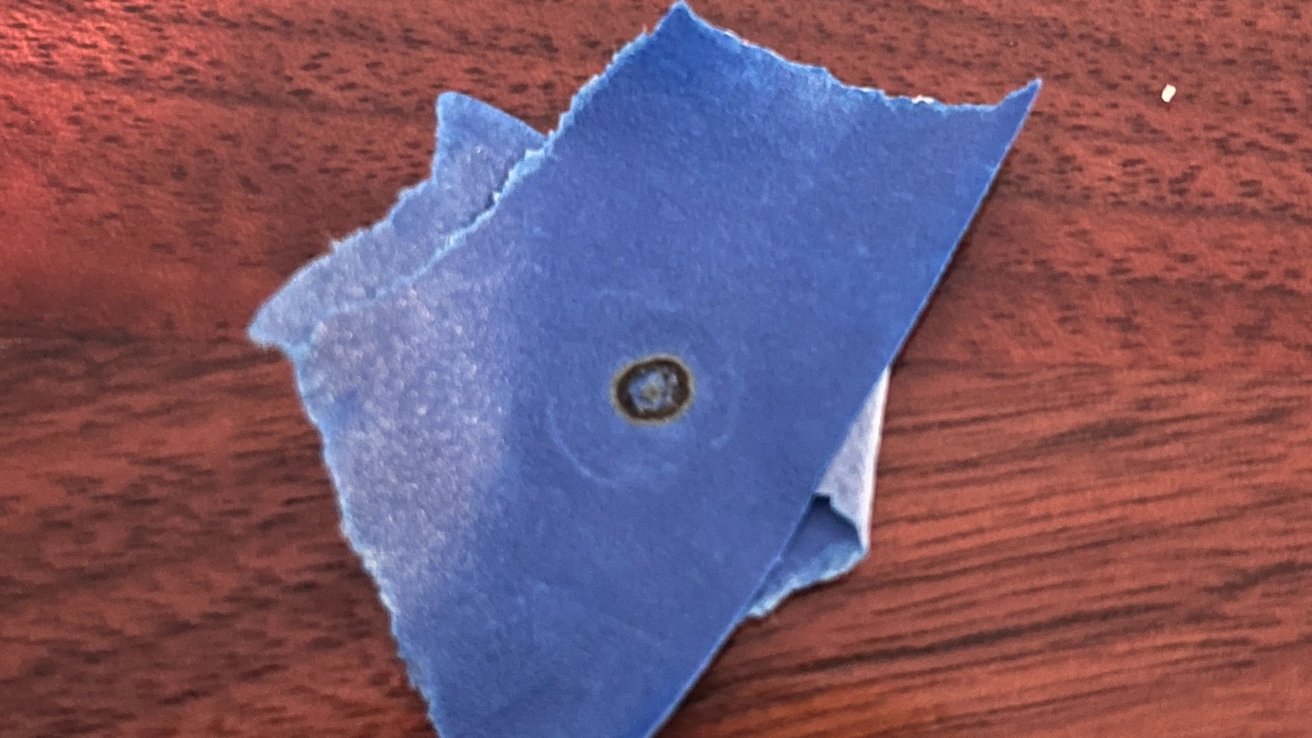
xTool P2 Laser review - Calibrating the laser involves trying not to light a piece of masking tape on fire
You're good if it hits within 3mm of center on the hole. If not, you've got some fiddly work ahead. You'll need to grab the included screwdriver and hex key and adjust your mirror until you can get your laser to burn a hole in the middle of the tape.
Fortunately, xTool has a great video that shows what you'll need to do if you deviate outside that range.
Mine was barely off-center -- definitely within the 3mm range --, but I still fussed with it a bit to see if I could get it even closer to the center. It took me about three minutes in total to get the results I wanted, bringing the total setup time -- not including breaks -- to under 20 minutes.
xTool P2 55W Desktop CO2 Laser Cutter review - xTool Creative Space
Before I get into the actual product, I want to talk about xTool Creative Space, or XCS for short. XCS is the software that xTool has designed to be used in conjunction with its products for calibration and creating projects.
I was blown away by how easy XCS is to use, regardless of whether I was using it on my iMac or iPad. It has a very simple interface that is intuitive to use.
xTool P2 Laser review - Laying out a cut file in xTool Creative Space on iPad
Because I have some experience with 3D printer, design, and CAD software, I didn't feel like I needed to look up any tutorials. However, should you need extra help, the internet is full of tutorials for using XCS, including many from xTool.
Starting a project is as easy as snapping a picture of the materials on your project bed with the xTool camera. Then, you drag your project file into it, position it on the material, and make sure your settings are correct. Adjusting settings is done easily within the right-hand sidebar.
After that, you just need to press process, start, and then hit the button on your xTool P2 -- that's it.
If you want, you can even design projects in XCS, though the tools can be a little rudimentary. I found that it is a bit easier to design in Adobe Illustrator or similar program, save out as a .SVG, and import into XCS.
You're not beholden to XCS, either. Like many 3D printers, xTool allows you to use other software to operate their machines. Many people are very loyal to Lightburn, but in the interest of transparency, I never bothered to use it. I found XCS more than adequate for my needs.
What you can cut and engrave with the xTool P2 55W Desktop CO2 Laser Cutter
You might be wondering what you can do with the xTool P2 -- and rightfully so. According to xTool, you can cut and engrave paper, wood, acrylic, leather, cardboard, MDF, felt, and rubber -- but this isn't an exhaustive list.
I personally have tried wood, paper, chipboard, cardboard, and acrylic during my test. However, a quick scouring of the internet shows you can also cut and engrave fabric, slate, mylar, marble, tile, and glass.

xTool P2 Laser review - Engraving on the front of a chipboard notebook
However, it's worth noting that there are a few things you cannot cut with any CO2 laser, P2, or other.
Do not attempt to engrave or cut galvanized metals, as they are coated in zinc. When heated, zinc off-gasses a very toxic gas.
Cutting most plastics won't work, either. Not only do they melt rather than cut cleanly, but they also tend to catch fire. ABS, HDPE, and polycarbonate cannot be used with laser cutters. Additionally, PVC off gasses dangerous chlorine gas which is not only hazardous to anyone who breathes it in, it is also corrosive to metal, which isn't good for your machine.
xTool Smoke Purifier
Laser cutting is going to create smoke, which you'll need to deal with. The cheapest way to deal with this is simply to toss your exhaust hose out of your window. If you have a permanent location for your machine, you might want to add a wall vent.
These aren't the only options, though -- you can also look into buying a dedicated air filter. xTool was nice enough to send its smoke purifier -- or air filter -- alongside the P2.
The smoke purifier is a PC-tower-sized box you hook up to your vent. It has a three-stage filter system that pulls the air from your laser through the top and out through the front.
It's incredibly simple -- there's a knob on the side that controls how much suction the filter uses, a power switch on the back, and a lid to pull out and replace your filters as needed.
Setup is super easy, too. You just attach the vent hose from your laser cutter to the top of the air filter, tighten the metal bracket around the hose, and you're done. If you wish, you can even vent the purified air via a second hose, should you decide to.
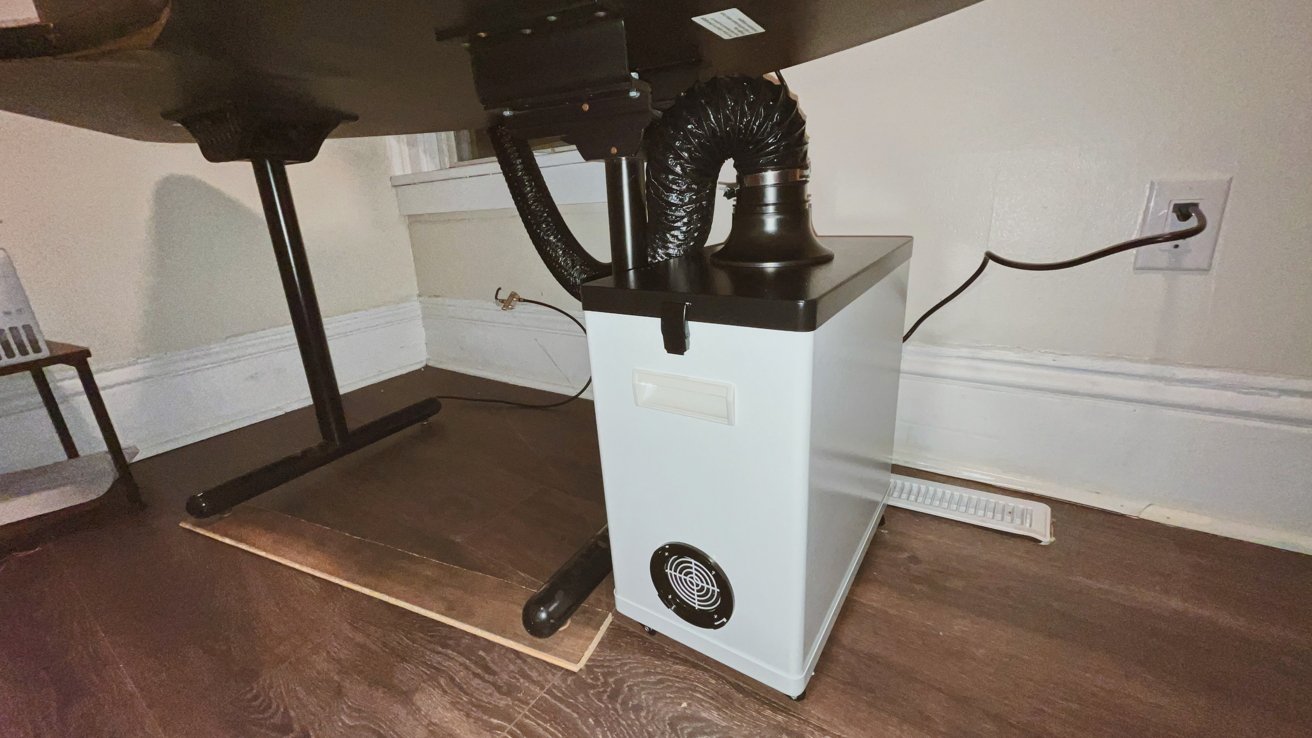
xTool P2 Laser review - The Smoke Purifier under the laser table
The top layer of the filter is designed to capture large particles. This layer is washable and is going to get the dirtiest first.
The second layer is a HEPA honeycomb structure that xTool says filters out 99.97% of 0.03m particles. The third layer is an activated carbon filter. This layer is designed to absorb harmful gasses and unpleasant odors.
How often you change your filter will greatly depend on how often you run your laser and what you're cutting. There isn't anything on the filter itself to tell you when it needs to be changed -- no lights, no little display -- so you'll have to rely on a spot check of the top filter.
I thought the smoke purifier worked pretty well. It's loud but not deafeningly so, and certainly not much louder than the P2 itself. I had already resolved to wear hearing protection around the laser- it never hurts to be overly cautious- so I wasn't too bothered. That said, I wouldn't run it while the kids are napping or if you plan on taking an important phone call the next room over.
The smoke purifier is not a cheap accessory by any means -- at $800, it is a considerable investment. Replacement filters aren't cheap, either -- it costs $136 to replace all three filters.
However, if you cannot externally vent your laser in your workspace or want to reduce the amount of harmful emissions your laser makes, it's not a bad idea to pick one up.
xTool P2 55W Desktop CO2 Laser Cutter review -- also alarmingly easy to use
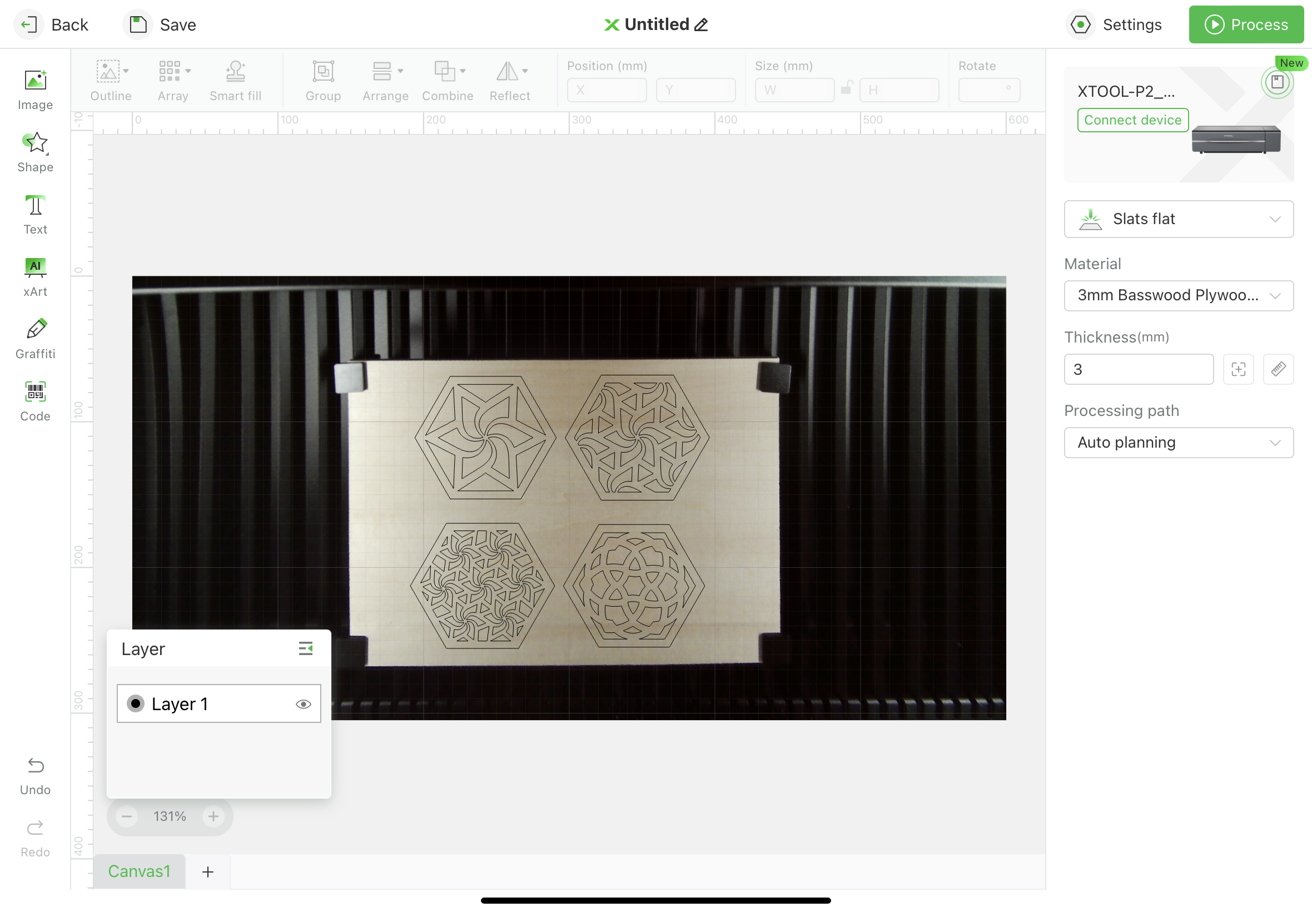
Once I got everything set up, which again -- only took me about a half hour -- I was ready to start my first project. I decided to start with something pretty simple -- a set of wooden coasters.
I opened up xTool XCS, and the P2 automatically sent me a picture of the cutting bed. This allowed me to see exactly where to place my cut files.
I will say that because it is a wide-angle lens, there's a tiny bit of distortion. For most projects, this isn't going to be a problem.
But, if you're doing cuts that need a lot of precision -- say, if you're using material that you've already cut shapes from before -- you can choose a precision snapshot that uses the camera attached to the head of the laser.
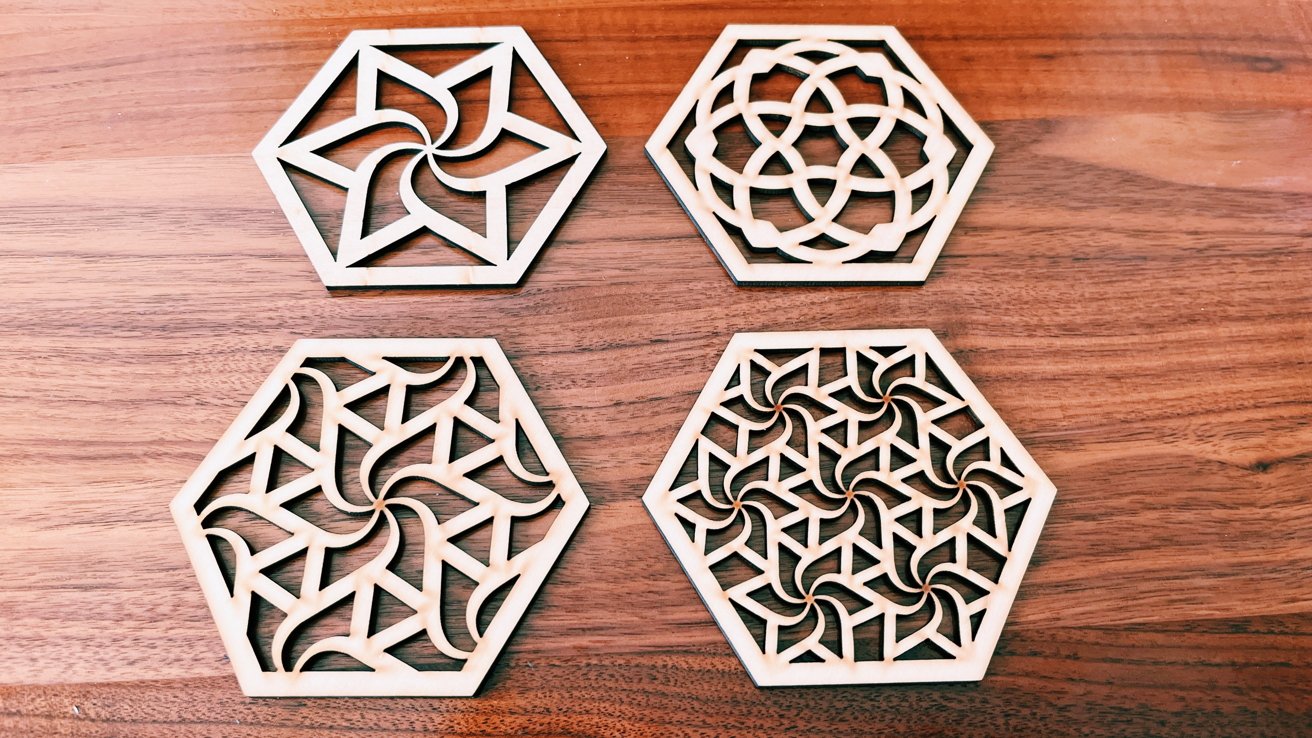
xTool P2 Laser review - As it turns out, a laser cuts 3mm basswood very, very quickly
Once I had a clear picture of the 3-millimeter basswood I wanted to cut, all I had to do was drag my cut file, an .SVG, to the material, position it how I wanted, and press process. Then, after pressing "start," I just had to hit the shiny silver button on the P2.
From start to finish, the four wooden coasters only took a couple of minutes to cut. The laser quickly worked on such a complex project -- I was somewhat stunned. As it turns out, cutting is very, very quick.
My next project was one I'd wanted to do for a while. I wanted to make a little keychain of a stop sign. So, this time I headed to Adobe Illustrator, designed a stop sign, and imported it into XCS. After a quick search of how to properly engrave acrylic, I set up a multi-step engrave-and-cut project.

xTool P2 Laser review - engraving clear acrylic results in a neat frosted glass effect
I hit the big silver button on the P2, and seven minutes later, I had my keychain. The frosted effect was incredible, and I marveled at the precision.
From there, I cut and engraved many things: geometric jewelry, a coffin-shaped trinket box, a wooden jewelry stand, some acrylic lights, and more. Every time, I was impressed with the speed and precision of the machine.
xTool P2 55W Desktop CO2 Laser Cutter - there is still a learning curve, though
That being said, that doesn't mean I didn't have failures. The failures seemed obvious in hindsight, but hindsight is 20/20, so I won't fault myself too badly there.
I had initially wanted to make a puzzle out of basswood for my dad. I started the project by engraving an AI-generated image of a dog I created in XCS. The engraving took about 45 minutes because it was very detailed.
After it was finished engraving, it began the cut -- and this is where I'd really screwed up. You see, the xTool P2 comes with a slatted base, which just so happened to be about the width of a puzzle piece.

xTool P2 Laser review - Mistakes were made
When the laser began cutting, pieces fell through the slats to the floor of the laser bed and were quickly ignited by the laser as it repeated passes over the same area.
Yes, I started a small fire three or four projects in. However, the fire went out when I turned off the laser. So, to its credit, the machine does a pretty good job of not allowing small flames to get out of hand quickly. That being said, keeping a fire extinguisher nearby is a smart idea.
I also learned that even when sanded, acrylic doesn't adhere to itself very well with standard CA glue. As it turns out, you need special glue that effectively welds the acrylic to itself.
My last lesson was one I should have probably predicted going in. However, in my excitement to begin a living hinge project, I scaled down my book box project to fit within a sheet of basswood. The issue was that I didn't realize that scaling it down also scaled down the holes, which were properly sized for a 3-millimeter material thickness.
So, after I was done, I learned that every hole in my project was now about 1.5mm too small for the tabs. While this was annoying, it was fixable and required me to take rotary tools and hand-widen the slots. So, not my finest moment, but certainly not enough to turn me off of laser cutting.
xTool P2 55W Desktop CO2 Laser Cutter review -- a fantastic workhorse that nearly anyone can use
When I started this review, I struggled with recommending a product that costs north of $4,000. That's a considerable cost, especially if you've not delved into laser cutting already.
However, it's hard not to recommend the P2, too. As someone who always dreamed of using a laser cutter but had zero experience, I can't say enough positive things about it.
I've only spent a few weeks with it, but I've already got friends and family asking if they can pay me to cut projects for them. I already have Mother's Day and Father's Day gifts planned out. I have already come up with dozens of ideas for projects I can't wait to start on.

xTool P2 Laser review - An engraved acrylic lamp
A quick trip to Etsy shows that the average cost of a laser project file is under $5. Materials, while not dirt cheap, aren't terribly expensive, either. After I blew through the acrylic sheets xTool provided, I replenished my stock with 40 new sheets for $31.
Ultimately, if you're in the market for a laser cutter and have the space for it, the xTool P2 is fantastic. This is especially true if you plan on using it to create projects you'll sell. I could see the xTool paying for itself -- and its upkeep -- in no time flat.
Where to buy the xTool P2 55W Desktop CO2 Laser Cutter
You can snag the xTool P2 55W Desktop CO2 Laser Cutter from xTool's website for a limited-time price of $4,299, which is down from its regular price of $4,999. It comes in Space Gray and Pearl White.
Alternatively, xTool via Amazon stocks the P2 55W Laser, but for $100 more at press time.
Rating: 4 out of 5
A word about ratings: It can be difficult to assign a simple rating to certain objects -- I would argue that this product would be closer to a 3 for an average crafter and a 5 for someone who plans on creating a part or full-time gig out of laser cutting.
Ultimately, I chose to give it a 4 out of 5 because of its versatility and ease of use juxtaposed with its high cost and large size.
xTool P2 Laser - Pros
- Fast setup time
- Enclosed system
- Beginner friendly
- Dual camera system
- 55W laser capable of cutting thick materials
- Plenty of add-ons to expand capabilities
xTool P2 Laser - Cons
- Expensive startup cost
- Requires external venting or dedicated air filter for an additional $800 purchase
- Large size may limit where you can place it
Read on AppleInsider

Comments