How to fully restore a 10th generation Mac mini to like-new condition

Refurbishing the last of the plastic body Mac minis is pretty easy -- once you know a few tricks. Here's how to get that 15-year old computer up and running again, and faster to boot.
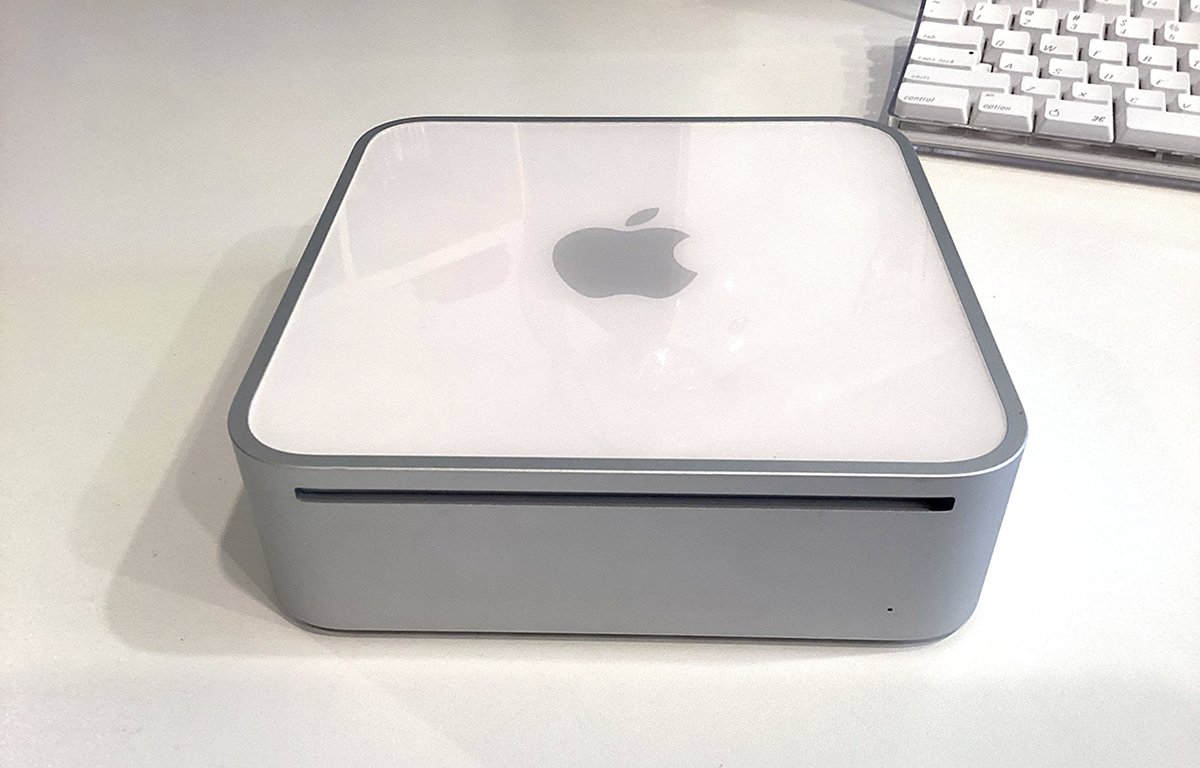
10th generation Mac mini 2.26GHz.
We've covered how to keep ancient first-generation Mac minis running.
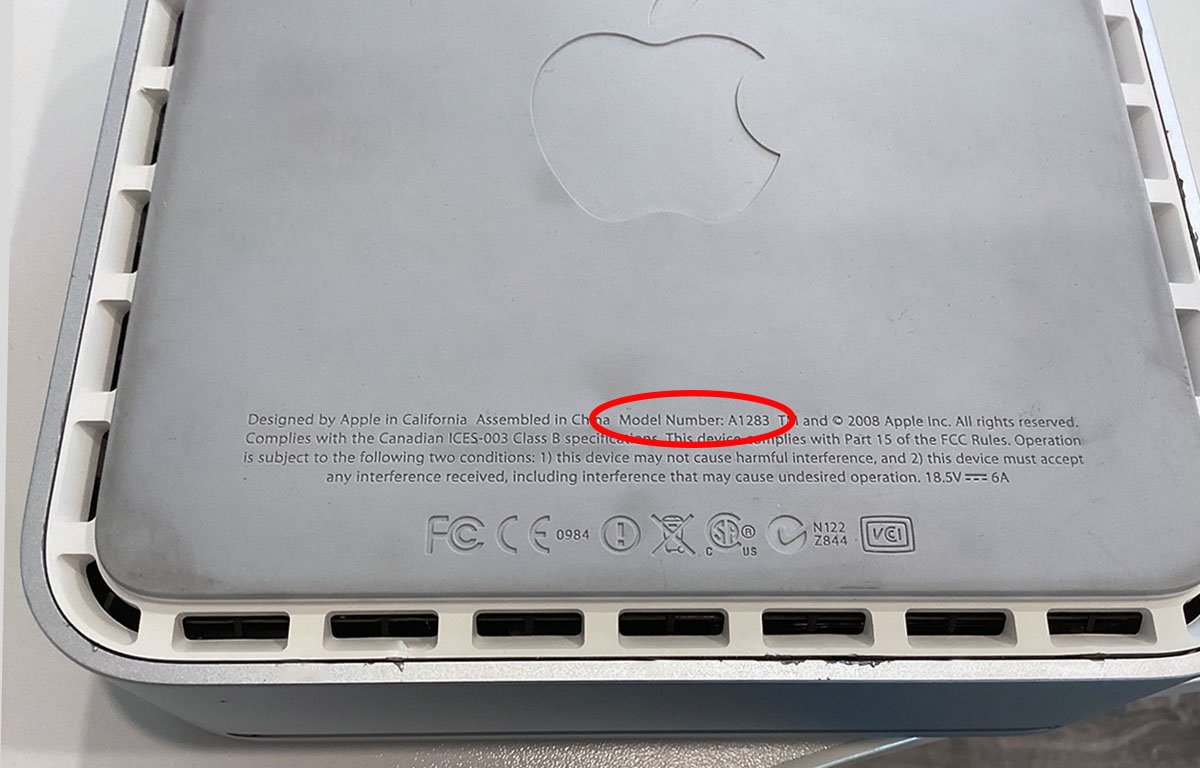
In this article we'll look at how to fully restore and upgrade a tenth-generation Mac mini - the 2.26 Core Duo 2-based (P8400) A1283 model which shipped in 2009.
Like its predecessors, the tenth generation model had an aluminum/polycarbonate plastic shell with a plastic/rubber base and an internal plastic drive carrier.
The 2.26 Ghz model was one of the last polycarbonate models made before Apple switched to the all-aluminum unibody design.
There were essentially three subfamilies of the original minis, spanning 10 "generations."
- 1.25GHz - 1.5GHz G4 (A1103)
1.5GHz - 2.0GHz Intel (A1176)
2.0GHz - 2.66GHz Intel (A1283)
The final model in the polycarbonate series was a mini server. This model lacked an internal DVD-R drive and which instead contained two identical 500GB hard drives.
The final polycarbonate mini models shipped in June 2010. The entire line spanned approximately five years.
You can still find many of these machines in online retail and auction sites such as eBay for a very reasonable price.
We paid just about $60 for ours which included the 120V power brick, a mini DisplayPort to VGA video adapter, as well as an original Apple Magic Mouse.
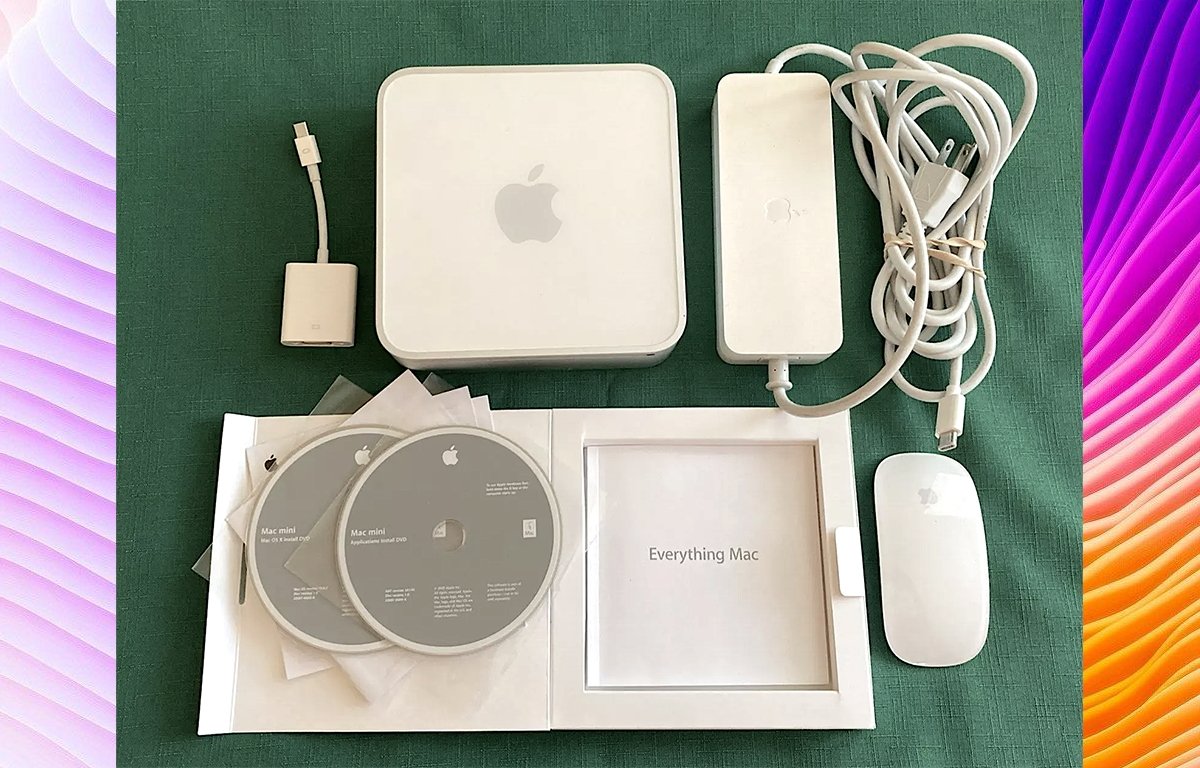
Mac mini eBay haul: VGA adapter, mini, power brick, DVDs, and an Apple Magic Mouse.
Unlike the earlier mini models, Apple made some internal improvements to the 2.26 and later models which makes refurbishment a bit easier.
Keep in mind however, refurbishment is a detailed process and is only for those confident in their repair abilities. The Mac minis contain a lot of tiny parts and screws, and with fifteen-year old plastic, parts can break easily.
Attempt this repair at your own risk.
Tools
As with previous mini refurbs, you'll need a special set of tools to open the machine:
- A 4.5-inch (11.5cm) wall spackling tool
- A medium magnetized Phillips-head screwdriver
- A tiny magnetized Phillips-head electronics screwdriver, or jeweler's screwdriver
- A small flat plastic or metal spudger
- Scissors
- Compressed air or an air compressor
- A bright flashlight
- Bright room lighting
- Optionally a small magnifier or jeweler's loupe
- Kapton tape
- A CR2032 replacement button-cell battery
Step 1: Open your Mac mini
Using either a large soldering mat, or a soft cloth or towel, lay your Mac mini upside down in preparation to open it.
You'll use a wide spackling knife to open the case. There's an art to this but if you're careful it's not too difficult.
To open the case, orient the computer with the front towards you, top down. The machine's ports should be facing away from you.
Lay your Mac mini face down in preparation for opening.
Insert the spackling knife into the seam on the right side of the machine, and pry up and to the right in one sharp motion. This should loosen then case from the top shell.
Next, insert the knife into the front seam and repeat the process. At this point the case should be free enough from the top cover to remove it.
Set the top cover aside for later cleaning.
Case open, top cover on left. Note the three antennae on the sides.
Now flip the base of the machine over. You'll see the DVD drive on top, an AirPort antenna on the right side, and two Bluetooth antennae on the left side.
The antennae are held in with plastic clips and springs, which if you pinch and pull up will free each antenna. Go ahead and do that now (carefully) and set the three captive springs aside for later.
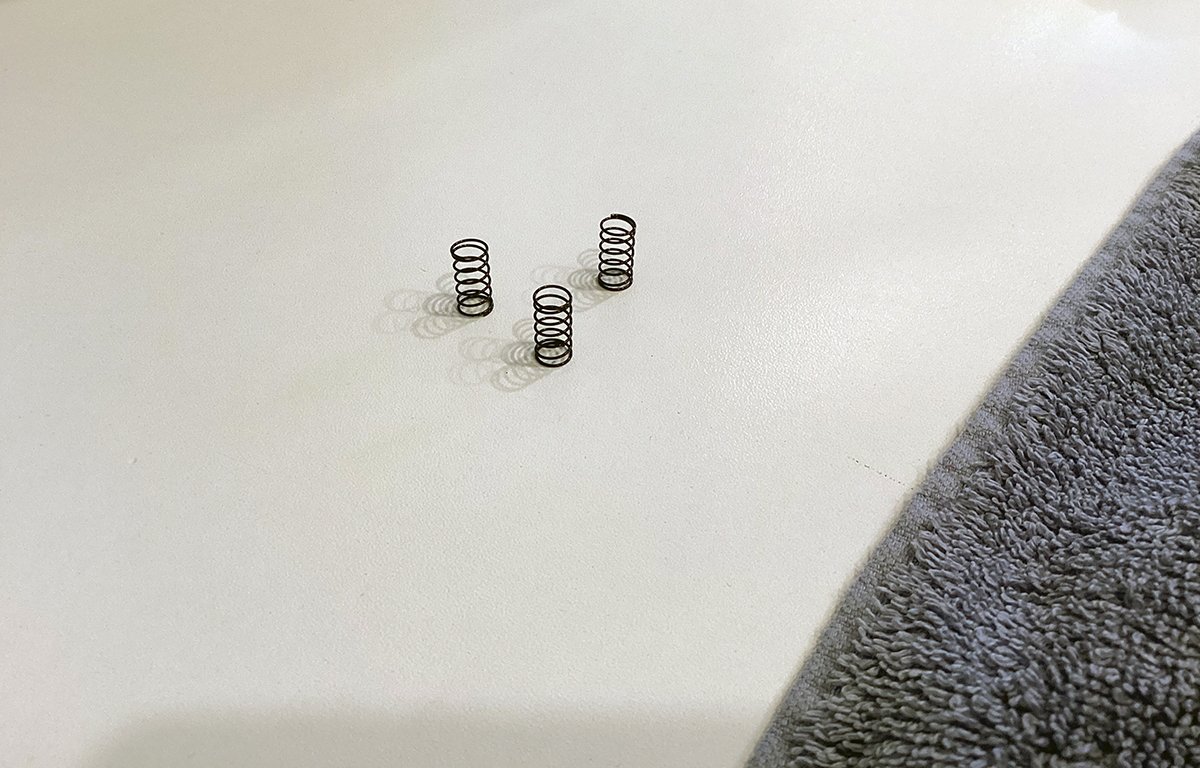
Antennae springs.
A cursory look around the machine shows four small screws holding the top DVD optical drive in, as well as two small screws at the rear of the drive which hold a small SATA board on.
There's also a very small audio ribbon cable on the SATA drive board at the rear. This is one of the improvements Apple made to later mini models: the audio cable is held in by nothing but friction and you can remove it easily with a small plastic spudger or screwdriver.
Gone are the two-part plastic ribbon cable clips which were prone to damage and very difficult to re-seat properly.
Go ahead and remove the audio cable and set it aside also now.
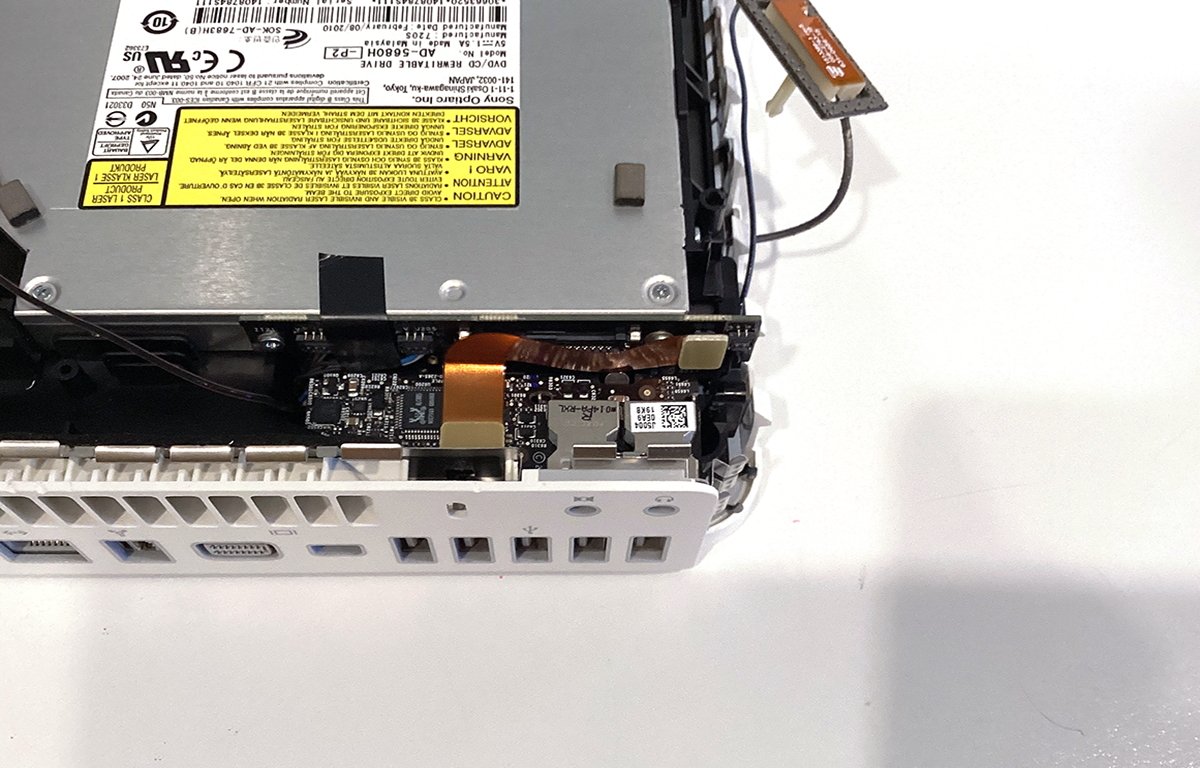
Rear DVD drive board with audio cable.
Step 2: Remove the DVD-R drive
Next, using a tiny screwdriver remove the four small screws which hold the DVD-R drive to the plastic drive carrier. Two of these screws are easy to access on the left side of the machine, but the other two are located in recessed holes on the other side.
Carefully remove the screws and set them aside.
DVD and hard drive screws.
Next, spin the machine around so the rear faces you, then remove the two tiny screws which hold the small SATA drive board to the rear of the DVD-R drive.
You should now be able to lift the DVD-R drive up and forward to free it from the carrier and the SATA board.
Note that the SATA board is attached to the drive carrier by a single wire so be sure not to disconnect the wire.
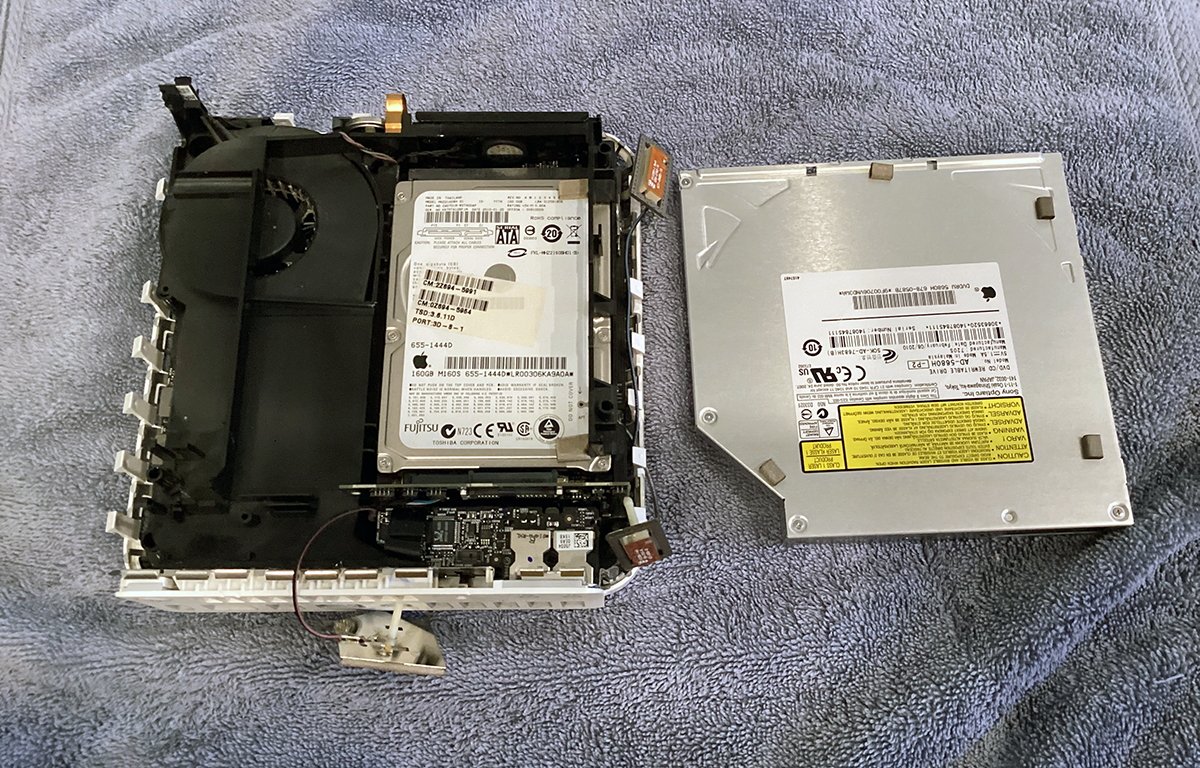
DVD-R drive removed from carrier.
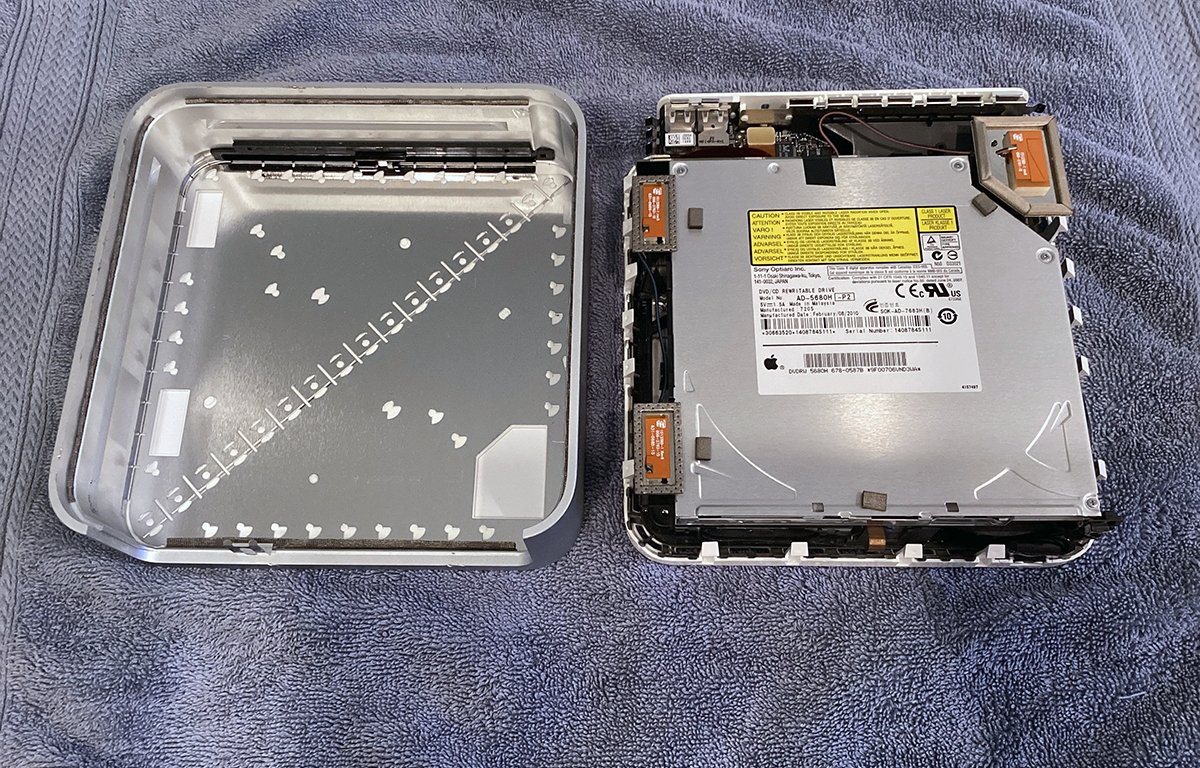
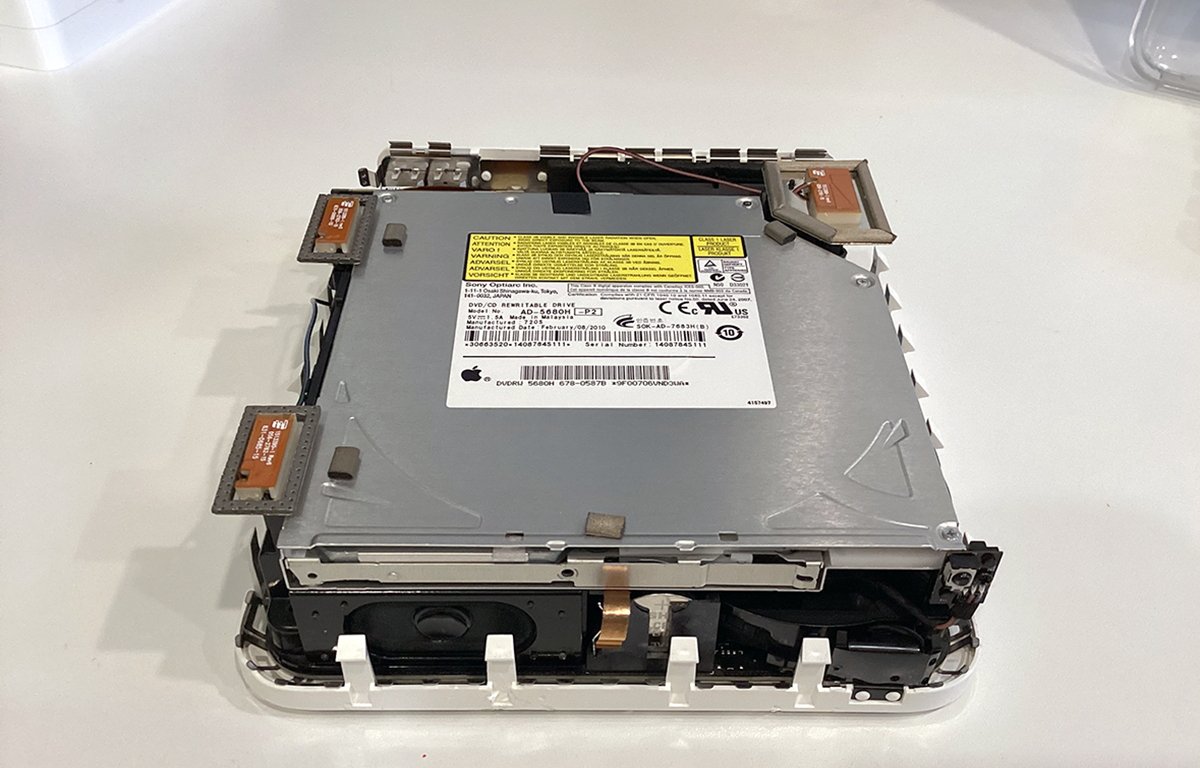
One of the improvements Apple made to the later model minis was a smaller, lighter DVD drive. Ours had Sony model AD-5680H-P2 in it.
These DVD-R drives are remarkably light, efficient, and are built from super-miniature parts. They're also more quiet and run cooler than their predecessors.
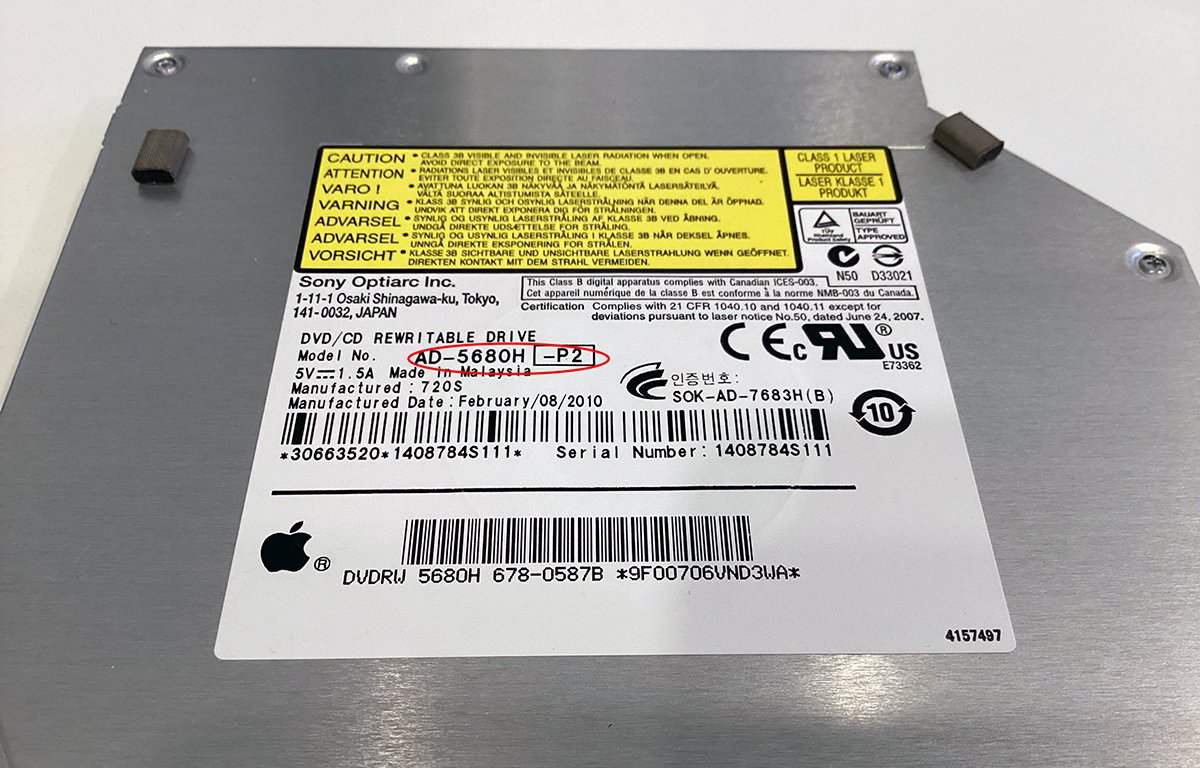
Sony Optiarc AD-5608H-P2 model.
The only downside to these drives seems to be the slow access time. Still, though, it is still faster than the access time in the drives found in the first Mac minis.
Step 3: Remove drive carrier from the base
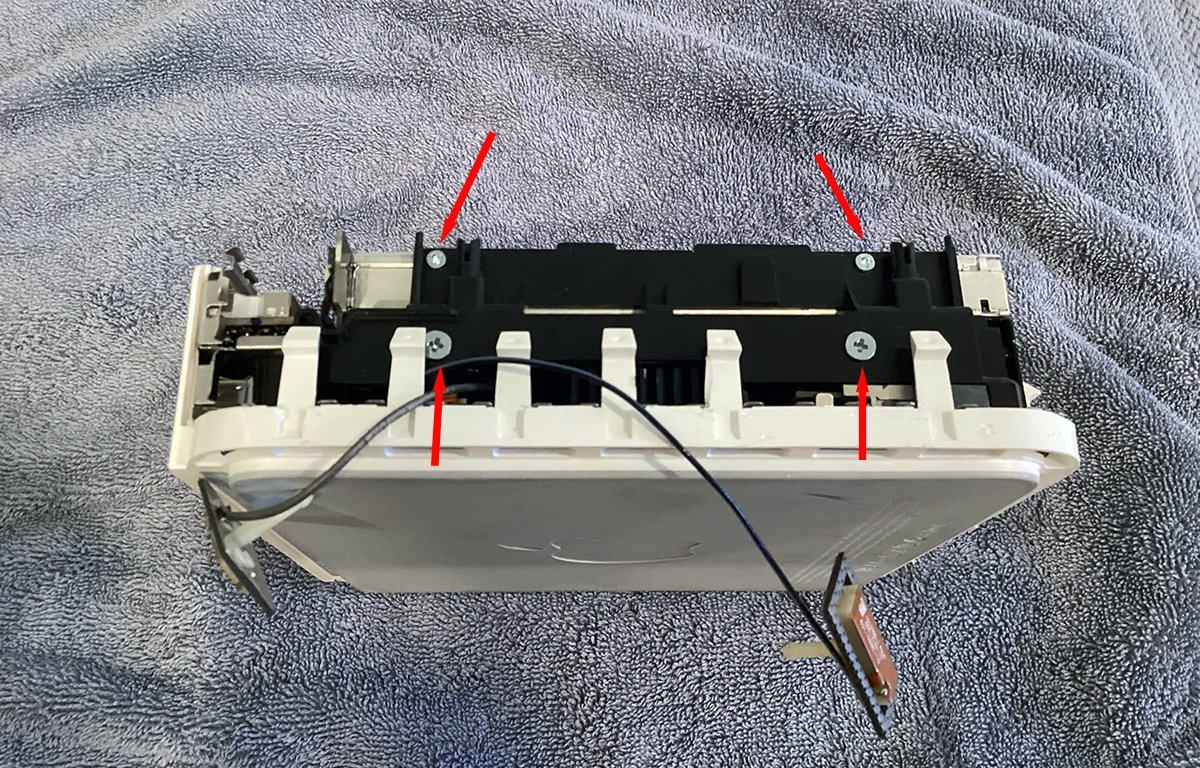
Now locate the four tiny black screws at the four corners of the plastic drive carrier. Two of these screws are recessed in round enclosures, and two of them are exposed on the carrier.
Remove all four screws and lift the drive carrier away from the machine's base. Note that the SATA board holds the carrier into a connector slot with friction so it may take a little force to remove the carrier.
Once the carrier is free of the base, set it aside for later.
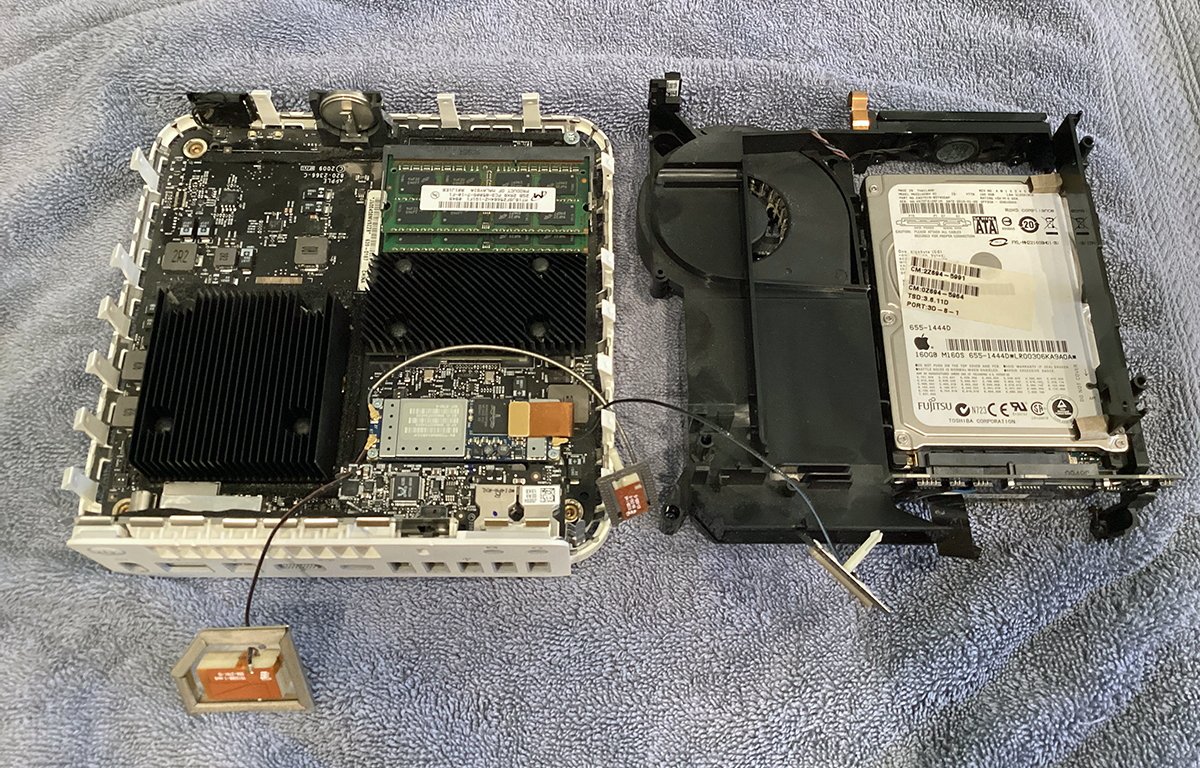
Drive carrier, right, and Mac mini base with motherboard, left.
Note the small copper clip at the front of the base. This clip has to contact the inside of the machine's metal cover or the machine won't boot when powered on.
Also notice the small coin-cell battery to the right of the clip on the base's front. This battery keeps the internal clock and VRAM settings intact when the machine is powered down.
Step 4: Clean the base, replace clock battery
Next, using compressed air or an air compressor, blast any dust from the base, including around the CPU heatsink, the WiFi board, and the rear vent ports.
You may also want to carefully remove the RAM DIMMs from their slots to clean under them. Be careful when removing the RAM since the sockets are plastic and can break easily.
The default RAM configuration for this model is 2GB. Our machine contained 4GB of Apple-installed RAM (2GB X 2).
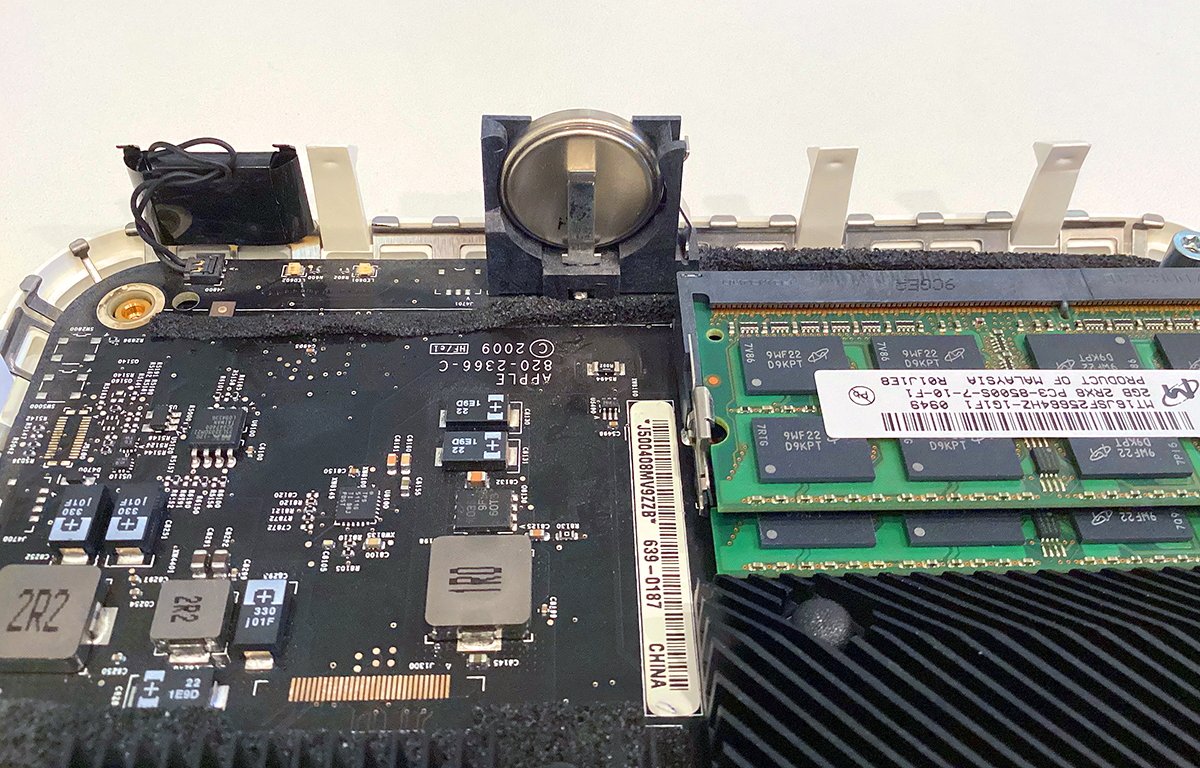
Mac mini base with motherboard. Note left to right: LED assembly, coin-cell battery, and RAM.
Note that the combo WiFi/Bluetooth board also has a small ribbon cable and the three external antennae attached to it with small pin clips.
These connectors are very easy to jar loose - so be sure you don't bump the antennae wires and disconnect one or more of the antennae. In fact, you may want to add small strips of Kapton tape to each of the antennae connectors to make sure they don't come loose:
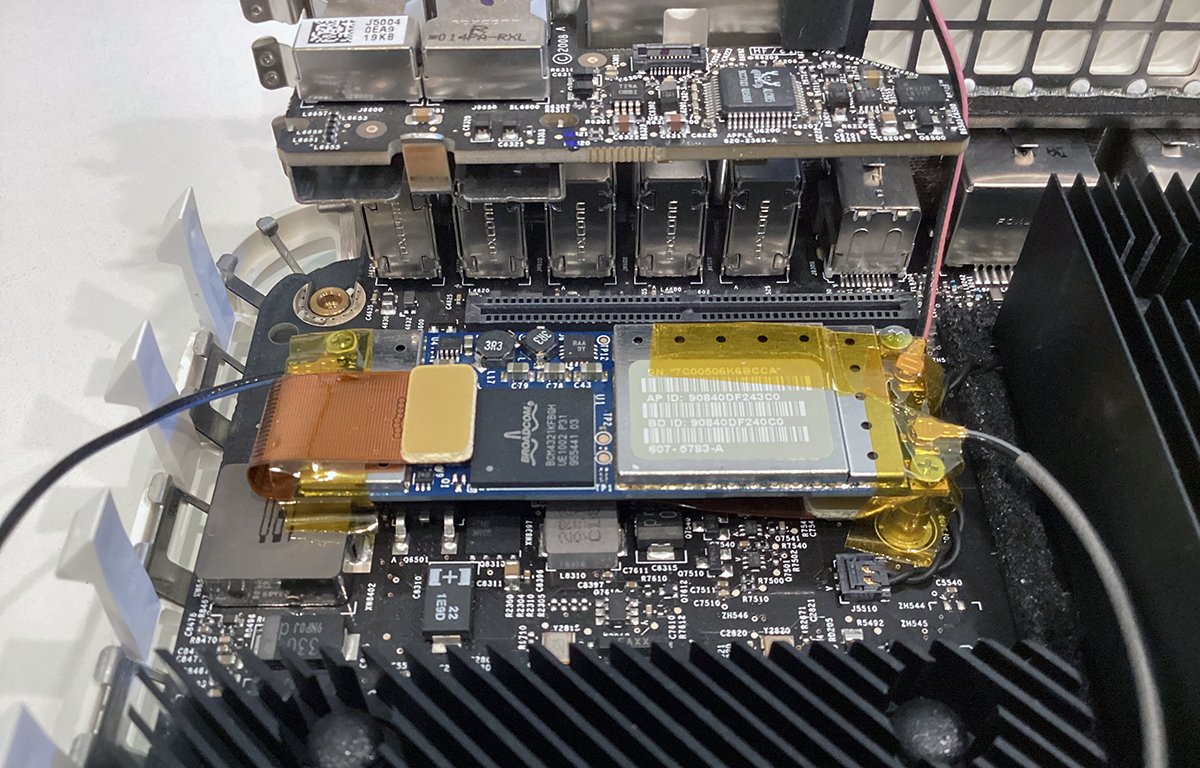
Mac mini combo WiFi/Bluetooth board with Kapton tape added.
In order to clean underneath it, you can remove the WiFi board by removing its small screws if you like. Unless your machine is exceptionally dirty you probably don't need to.
Compressed air should suffice.
You may also want to use a small dry paint brush to wipe away any excess dust from around the base edges and the on the motherboard. Don't use too much force as the components may be fragile.
At the front of the base is the CR2032 coin-cell battery. To remove it, carefully lift up on the clips on the right and top of the battery holder, and pull the battery away from the holder to the rear.
Replace the battery with a new identical one by dropping it down into the holder and pressing down and forward. Don't use too much force as the holder is plastic and can break easily.
Finally, clean all the rear ports on the machine, including the fan ports by using cotton swabs with 80% isopropyl alcohol. Cleaning the rear fan ports ensures there's no residual dust smell when you restart the machine later.
Step 5: Optional - Replace RAM
If you like you can also replace the RAM up to a maximum of 8GB by replacing the two existing 1GB SO-DIMMs with two 2GB, or 4GB models. You'll need PC3-8500 DDR3 DIMMs.
To do so, simply unclip the two existing DIMMs and replace them with two new ones. Memory upgrades are available at several online retailers.
Our model came with 4GB RAM standard at 2GB per DIMM. We decided to leave it at that.
But if you're planning on running the stock Mac OS X Snow Leopard (10.6.8), you likely won't need 8GB as the machine runs quite nicely with 4GB. The lower 2GB quantity is probably enough for most tasks.
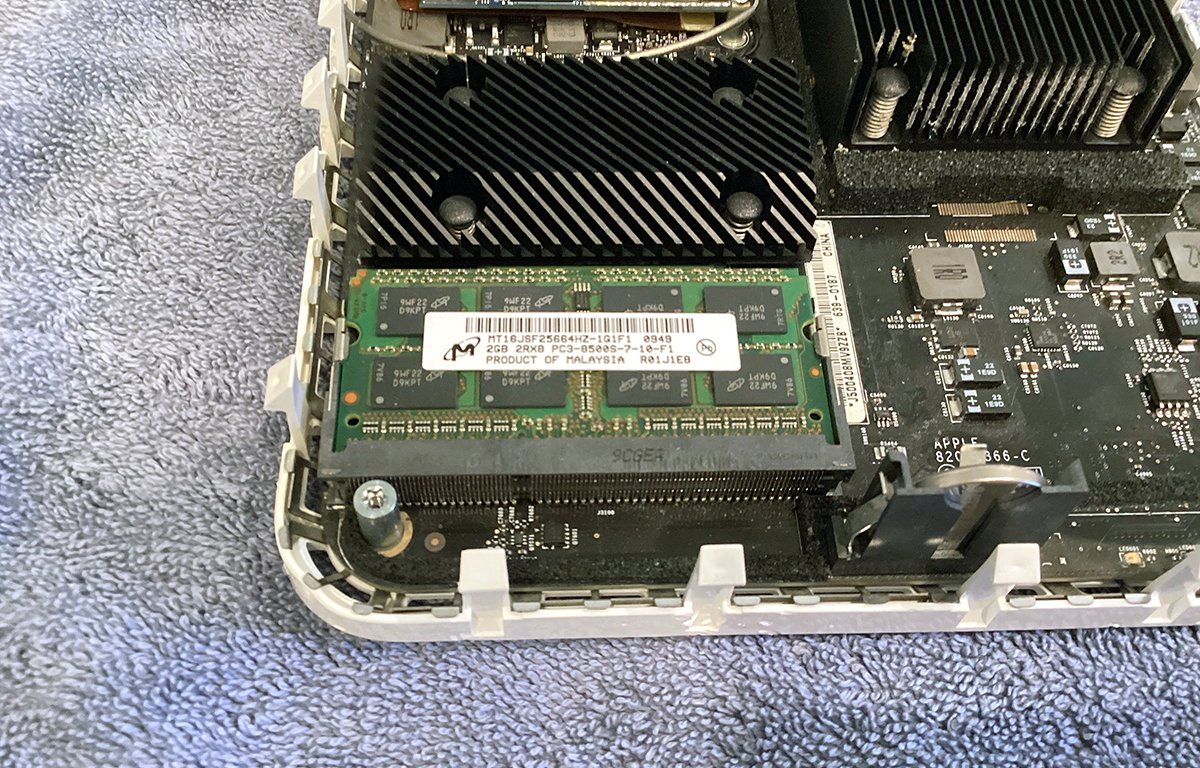
Original Mac mini SO-DIMMS - in this case 2GB X 2.
Step 6: Clean the drive carrier, fan, and replace the hard drive
The plastic drive carrier holds the internal hard drive, a small cooling fan, and a small thermal sensor which detects drive overheating.
The sensor is held on to the front of the hard drive with rubber cement, but you can likely just peel it off and reapply it to a replacement SSD without any additional glue.
To remove the drive, flip the drive carrier over, lay it face down, then remove the four screws on the bottom holding the drive in. You'll need to slide the drive out sideways, and disconnect it from the SATA board.
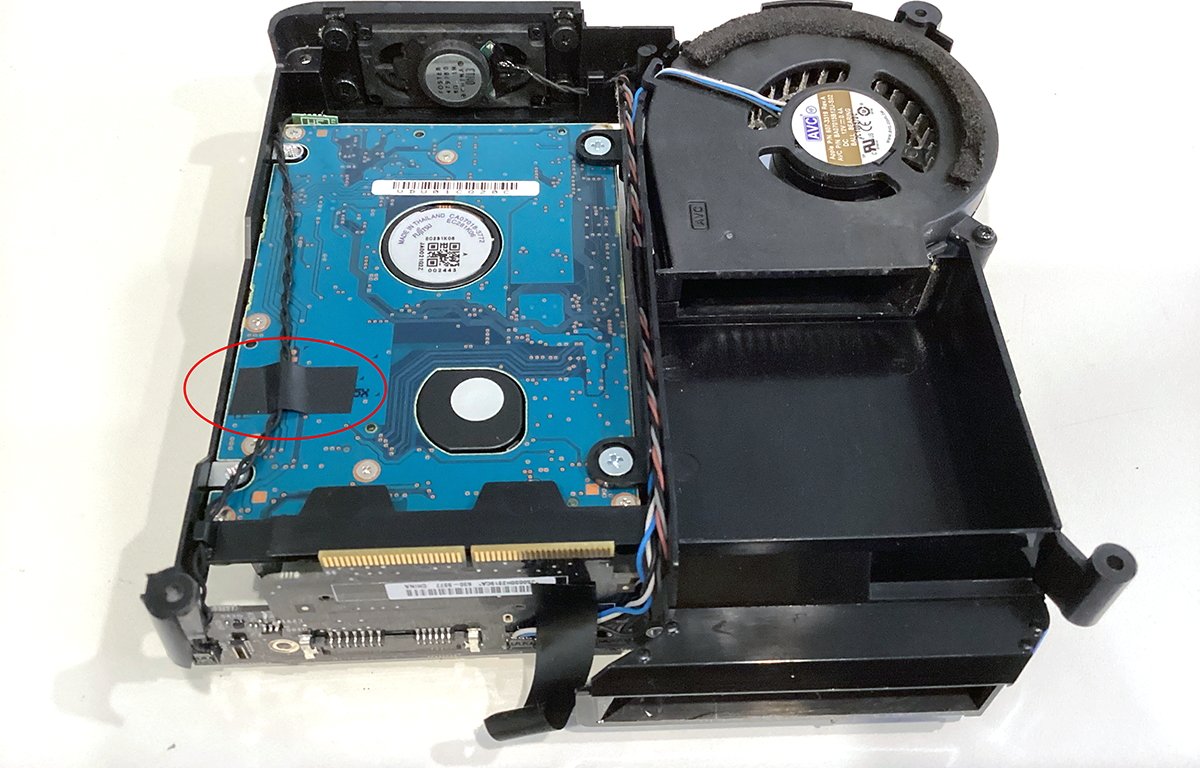
The drive carrier, with the hard drive on the left. Note the tape.
Be careful as the thermal sensor is still attached to the SATA board by its wire and you don't want to pull it loose.
Once the drive is free, take the drive carrier outside and blast the fan and and its outlet duct clean of any dust with compressed air.
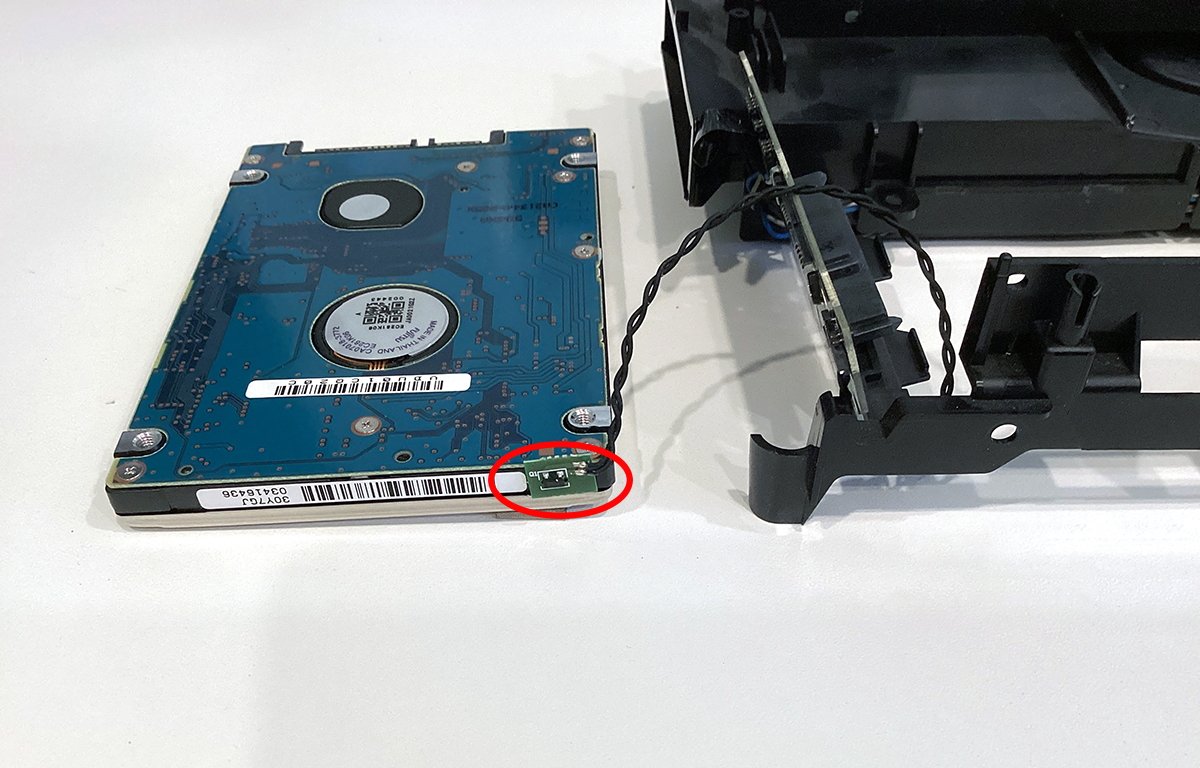
The hard drive's thermal sensor.
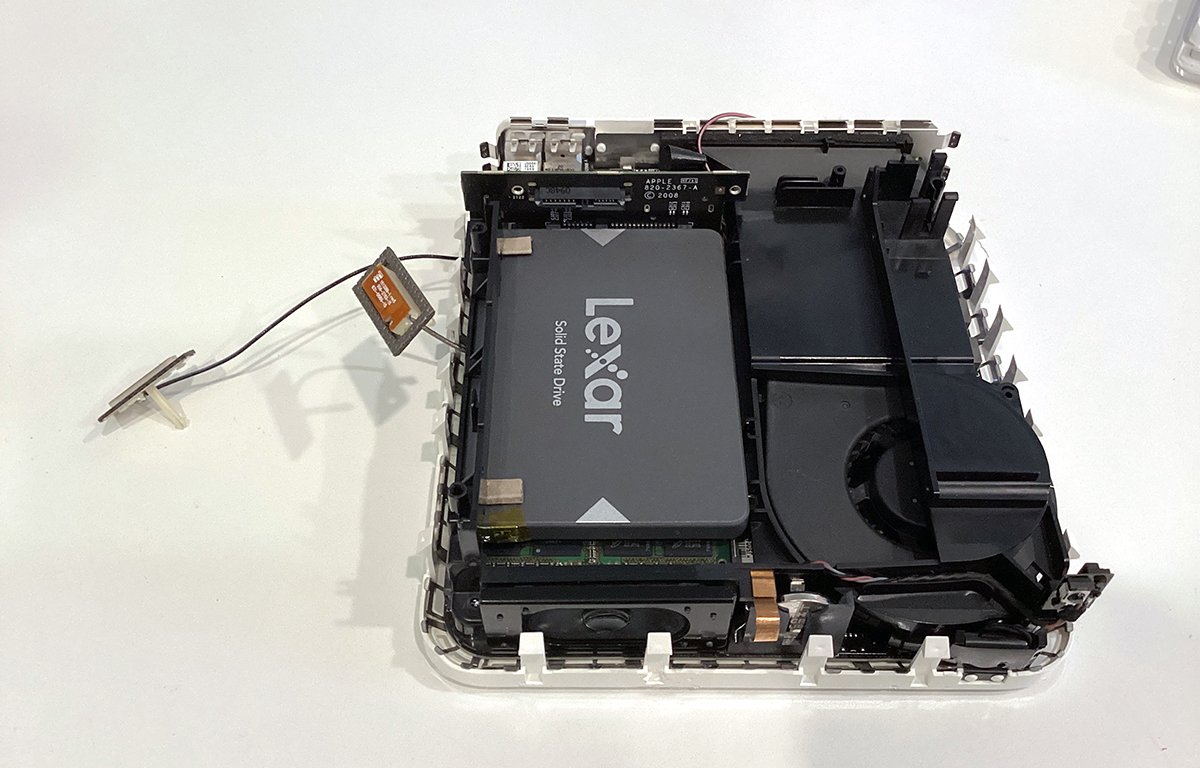
Once cleaned, replace the 2.5-inch hard drive with a new SATA SSD of your choice. We used an extra 128GB SSD but larger ones will work just fine. Amazon has 1TB SATA SSDs for less than $100, and they make a nice upgrade.
Mac OS X Snow Leopard installs fine onto a 128GB SSD so you won't need a large one.
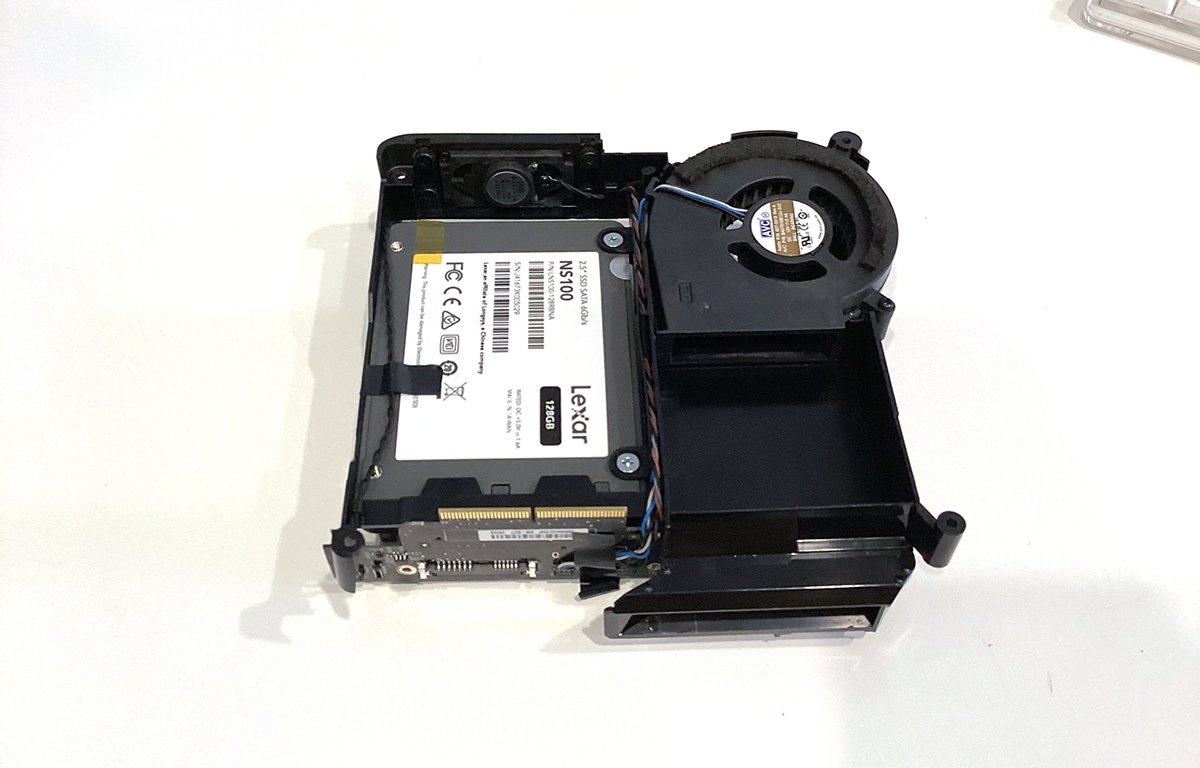
New SSD drive installed in Mac mini 2.26GHz drive carrier.
Once the new SSD is installed, reapply the thermal sensor and two small top pads from the old hard drive onto the new SSD. You won't need the thermal sensor for the SSD but reapply it to the drive anyway to prevent malfunction.
Plug the SATA drive board back into the rear of the new SSD. It's held in by nothing but friction.
If there was a small piece of black tape holding the thermal sensor wire to the bottom of the hard drive, reapply it now to the bottom of the SSD in the same position.

Fully cleaned and reassembled drive carrier with new SSD.
After everything is reassembled on the carrier, simply drop it back onto the base unit in place. Carefully press down on the top of the SATA board to lock it into the SATA connector on the base's motherboard.
Nothing else is needed to reinstall the carrier. Now simply re-install the four corner post screws to the carrier to secure it to the base.
Note that when reinstalling the carrier, be sure the three antennae wires are located correctly: the right-side WiFi antenna wire sits at the rear of the machine between the exhaust vent and the small audio board.
The two Bluetooth antennae wires exit on the left side of the base.
Fully reassembled base with drive carrier installed.
Step 7: Re-install the DVD-R drive
Next, reinstall the DVD-R drive to the top of the carrier by sliding it into place and re-attaching the rear SATA drive board to its rear connector. Reinstall the drive board's two small screws.
Secure the four side screws holding the DVD-R drive in place.
Reinstall the three antennae springs on their posts on the top of the carrier, then snap the three antennae back onto the posts, making sure the post clips capture the antennae.
Re-attach the small ribbon cable on the back of the drive board to reconnect the SATA drive board to the audio board.
This completes the drive upgrade and the carrier reassembly.
Fully reassembled Mac mini, except for the cover.
Step 8: Re-install the top cover
Make one final check of everything on the machine before you re-install the top cover.
If your machine was very dirty you may also want to tip the base on its side and blow out the bottom vent holes with compressed air. These holes are where air enters the bottom of the machine should the fan come on for cooling.

Fully cleaned and restored Mac mini - ready for final assembly.
Next, flip the base over and carefully re-insert it back into the top cover, but don't close it yet.
First make sure the metal security clip and the small metal clips along the rear of the base line up with the inside edge of the lid. If these clips don't line up, the lid won't close all the way and you'll be left with a gap in the case.
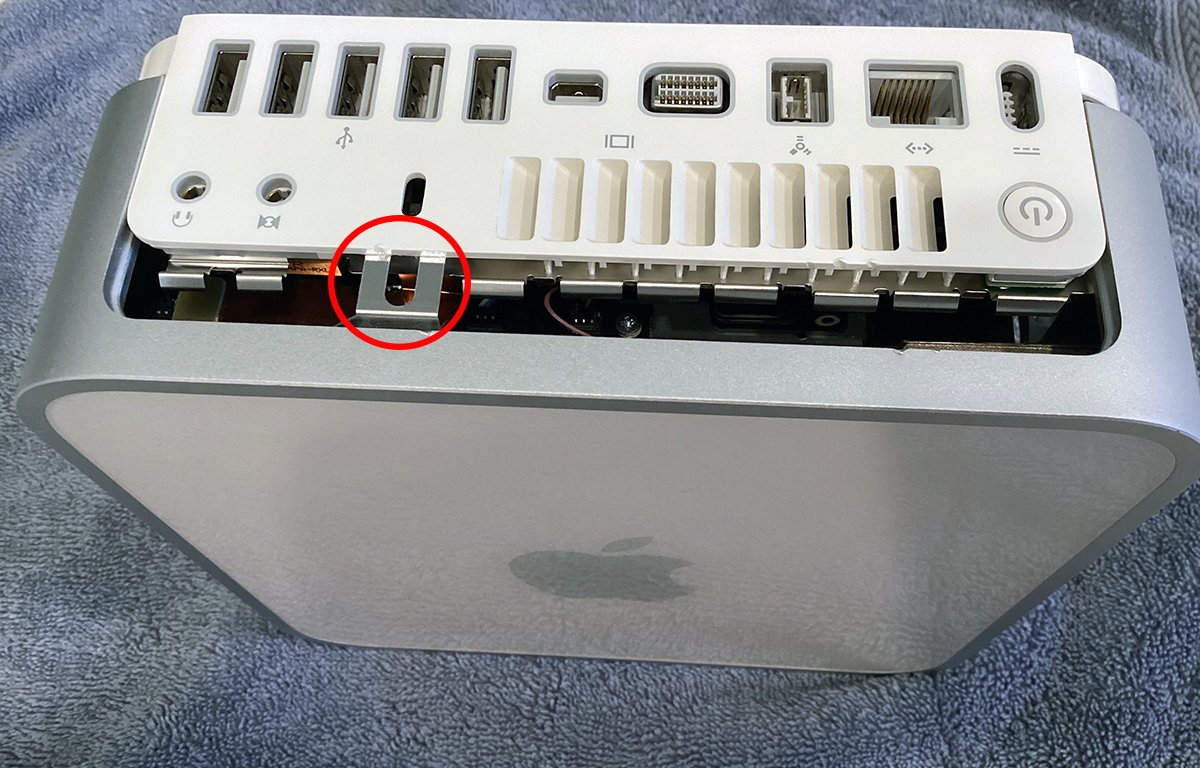
Make sure the clips line up.
Once everything is lined up, and from a standing position, with hands turned outward and palms facing down, give the base one solid push downwards into the lid. This should seal the case.
You should hear a sharp click as both the plastic clips and the metal clips engage with the inside of the lid.
Case position before final closure.
You should be left with no gaps whatsoever anywhere on the case.
If there is a gap at the rear of the case you'll need to pry the base loose again with the spackling knife and try again.
A well-sealed case should look something like this:

Correctly re-sealed lid: no gaps anywhere around the rear, or the bottom.
Step 9: Power on and install software
Once the machine is fully reassembled, it's time to test it.
Plug in the power brick, a display adapter, and a USB mouse and keyboard. In our example we're using the Apple mini DisplayPort to VGA adapter, but you can also use the mini DVI adapter if you have one.
Any USB mouse will do, but the minis were originally designed to be used with the clear and white Apple USB keyboard (A1048). We're lucky enough to still have one new, in mint condition:
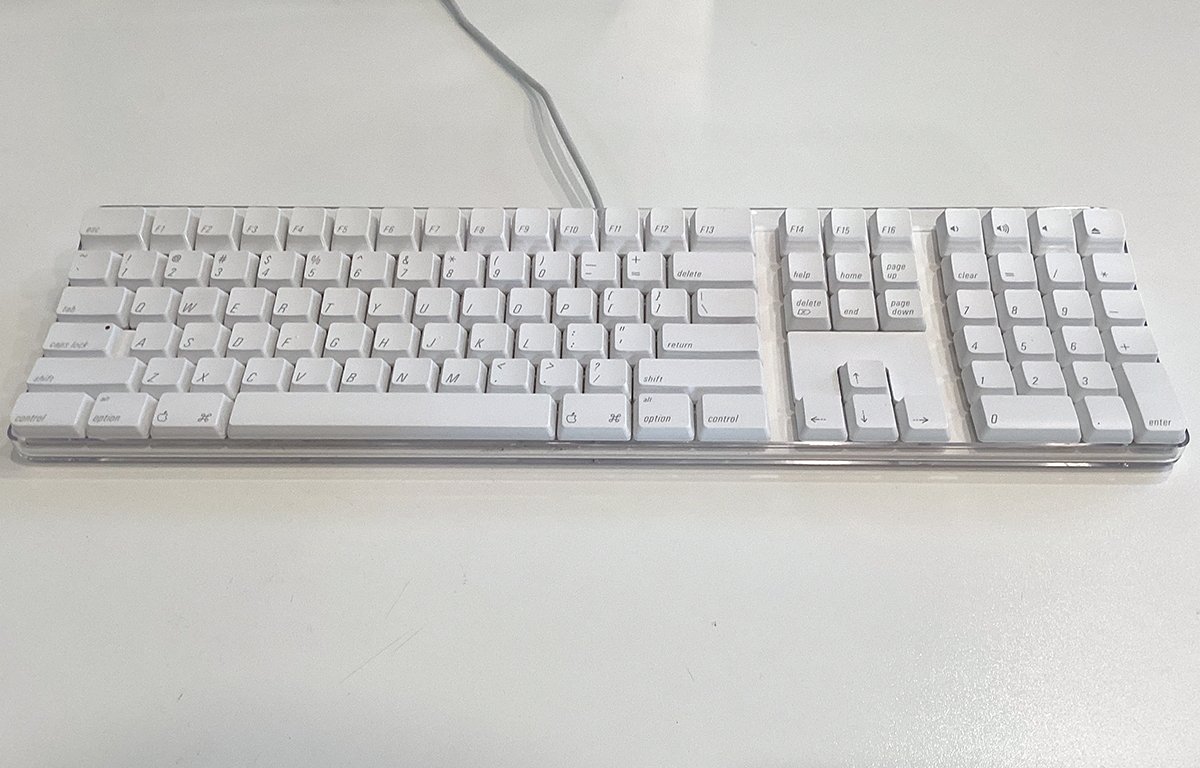
Apple wired USB keyboard.
You'll need the Apple keys on the USB keyboard to start up from a DVD or external drive.
Plug the other end of the video cable into a monitor. For our example we'll be using a recycled Acer V173 15-inch VGA monitor from Goodwill which only cost $10.
Smaller modern 16:9 monitors should also work fine, if they have VGA or DVI inputs.
You can connect two displays if you like. Once everything is connected, press the power switch and wait.
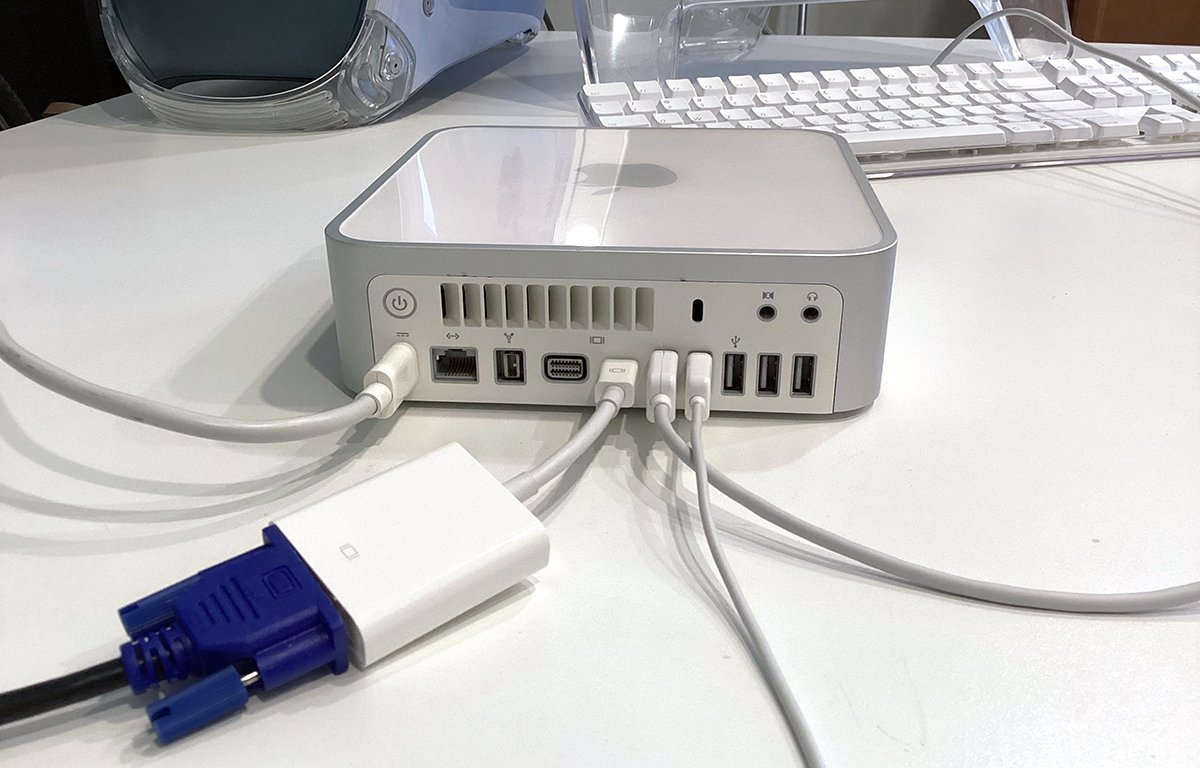
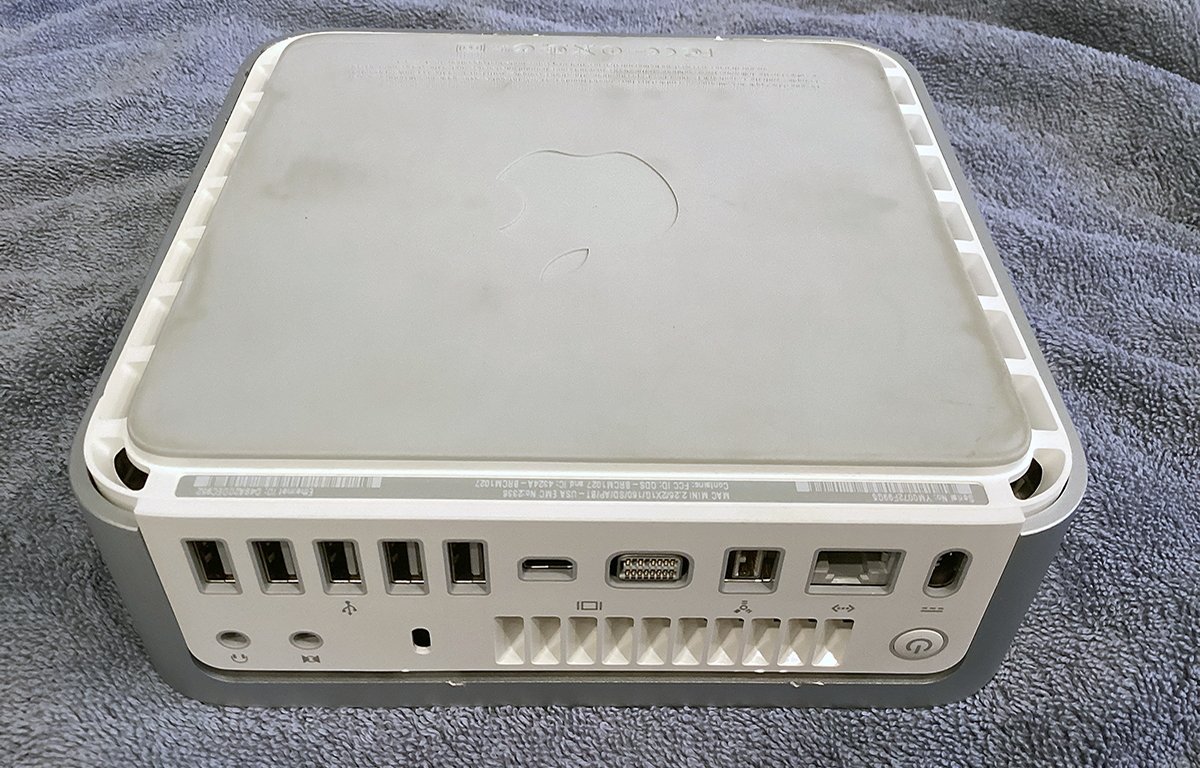
Rear connections: power, Ethernet, FireWire 800, mini DVI, mini DisplayPort, USB.
If everything goes according to plan, you should see a grey screen followed by the flashing folder icon indicating there is no OS to load.
Next, insert the Mac OS X install CD that came with the machine, or a retail copy of the Mac OS X DVD. As soon as you insert the DVD, it should spin up and Mac OS X should start to load.
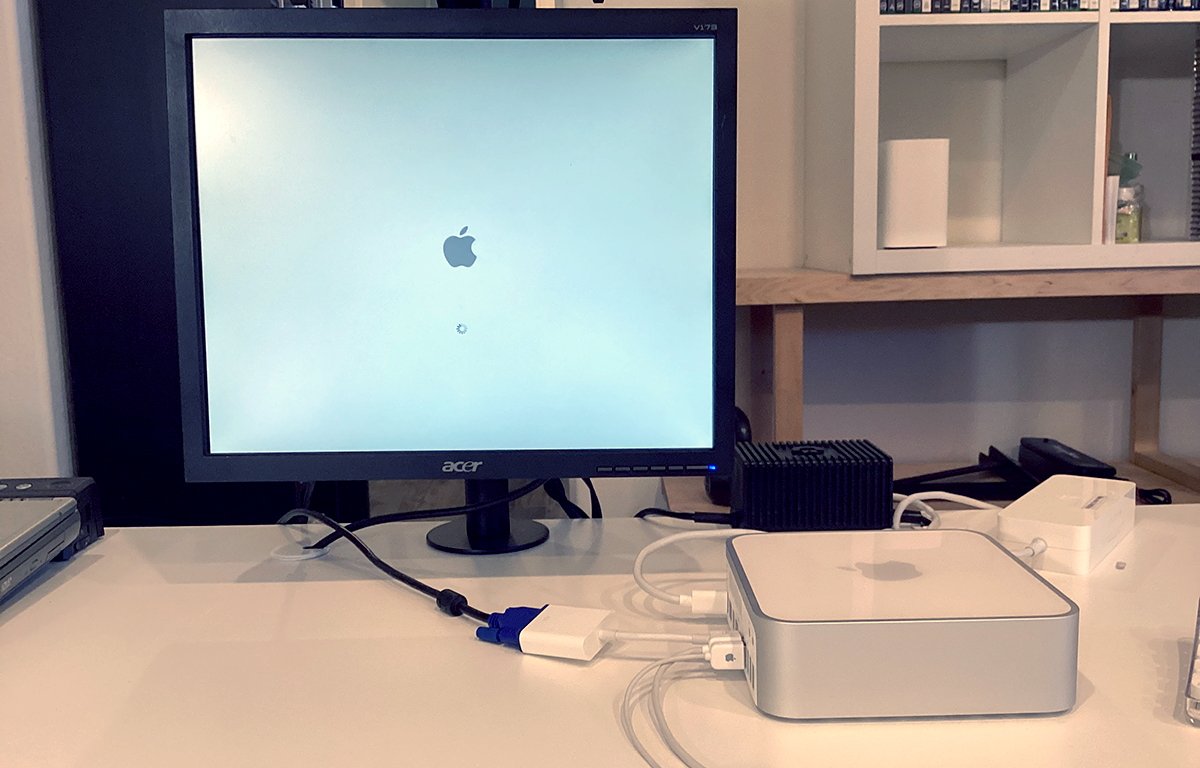
Booting: the soul of a new(ish) machine.
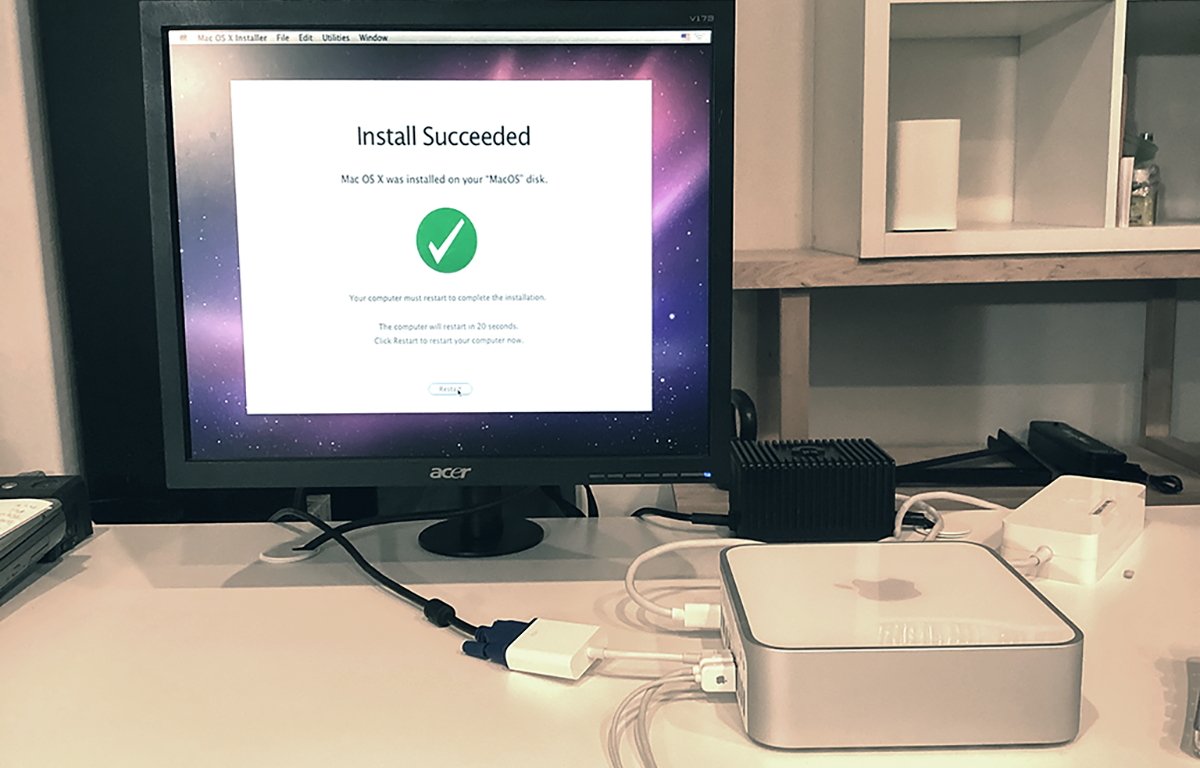
Once the Mac OS X installer loads, select Disk Utility from the Utilities menu, format the internal drive as Mac OS Extended (HFS+), and then exit Disk Utility.
Back in the installer you'll see the drive you just formatted. Select it and click to continue installation.
There's also an Options button in the installer which allows you to select additional components to install.
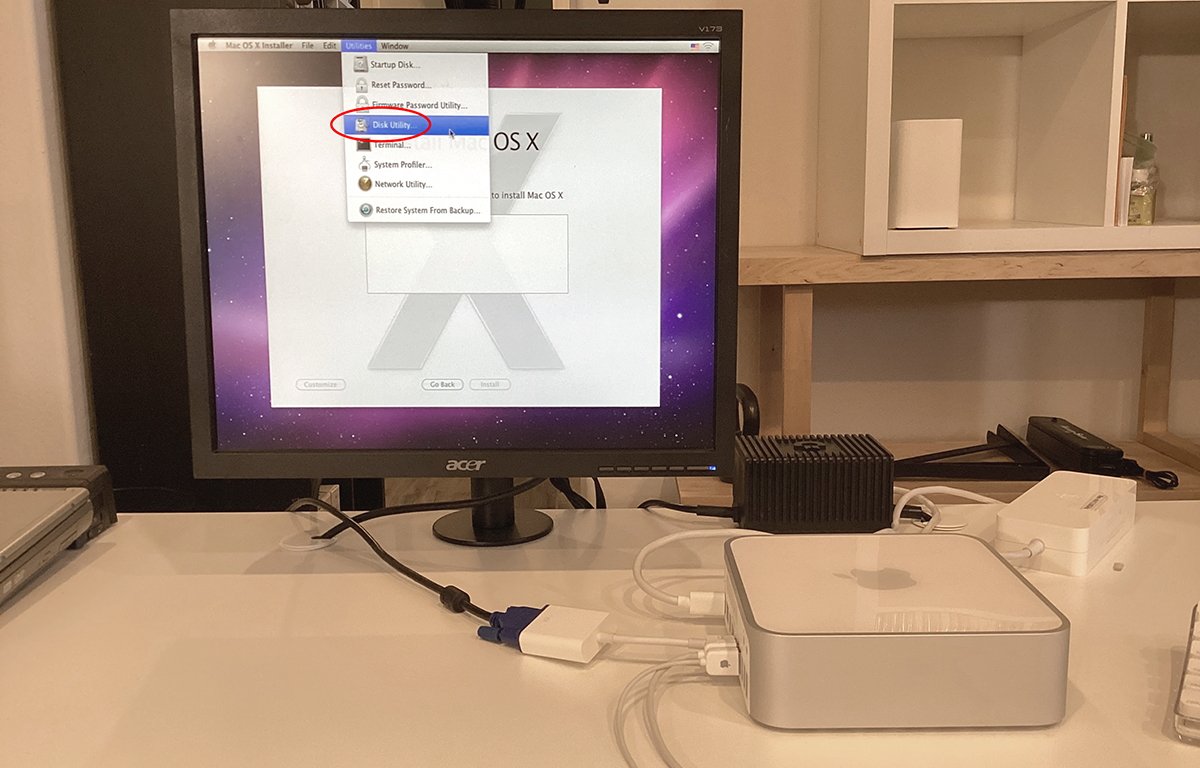
Select Disk Utility to erase the internal drive.
The installation can take anywhere from thirty to sixty minutes so be patient. Once the installer is done, you'll need to set up a user name and password for login.
Once that's done, restart the machine.
After restart you'll be asked to go through several steps to finish setting up Mac OS X, including connecting to a WiFi network.
Once you finish all these steps, you'll be left in the Finder.
Mac OS X install complete. Reboot.
Next, open System Preferences in the Dock, and run Software Update. Apple still maintains the Snow Leopard update servers so you can download and install any updates from there.
Once software update is done, Restart. Back in the Finder install the Apple Applications DVD that came with the mini and install any extra apps you want such as iMovie and GarageBand.
The 2.26GHz Mac mini can run up to Mac OS X El Capitan 10.11.6 released in 2018, so if you can find that installer on Apple's Support site, or the App Store you can install it for an upgrade.
El Capitan requires 2GB RAM minimum.
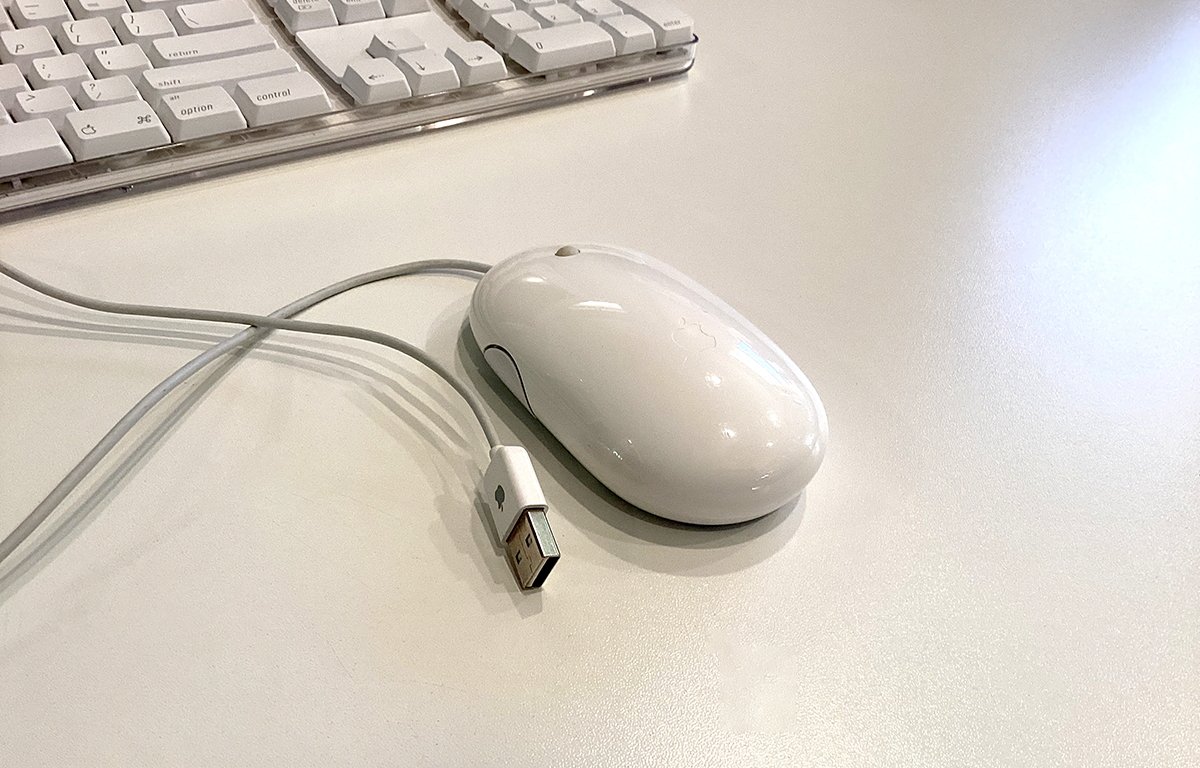
Apple's 2nd-gen white wired USB mouse (A1152 EMC No: 2058).
Step 10 (Optional): Run Windows
This model of Mac mini is capable of running either Microsoft Windows XP or Windows 7. The included Boot Camp utility in the /Utilities folder allows you to partition the internal drive and install Windows onto one of those partitions.
You'll need an authentic copy of the Windows XP or 7 installer, and a valid Windows serial number. You can also use a valid Windows installer .iso file in Boot Camp if you have one.
The Boot Camp Assistant may or may not also ask you to insert a USB thumb drive to download components to, so have one handy just in case.
Of course, if you wish you can run either of the Windows installers and take over the entire internal SSD and turn the mini into a Windows machine, but with the ability to boot both you'll probably want to install both.
To do so, run Boot Camp, select the internal drive, set the partitioning divider to size both partitions, then step through the installation process. Insert your Windows DVD install disk when prompted.
Boot Camp will re-partition the drive and reboot into the Windows installer. Windows gets installed onto the second partition, while your Mac OS X installation is left alone on the first.
Step through the Windows installer and enter your serial number when prompted.
Apple's Boot Camp Assistant.
Once Windows installs, reboot and hold down the Option key on the keyboard. This enters the boot volume selector where you can click either the Mac or Windows volume as the Startup Disk to boot from.
You can also set which volume to boot from in System Preferences in the Startup Disk pane so you don't have to hold down the Option key next time when starting up.
Having the ability to boot Windows from a Mac is handy, and initially it was one of the major selling points of the early Mac minis.
With an SSD drive installed, the 2.26Ghz Mac mini is actually quite fast. Ours booted into Mac OS X in under three seconds.
Shutdown is equally fast and took only two seconds.
Earlier versions of Mac OS X had less software bloat and so in general were fast.
There are also a number of interesting available third-party upgrades for sale online, such as the OWC Data Doubler which allows you to replace the internal DVD drive with a second internal SSD by using a special bracket.
For a totally complete retro experience, be sure to pick up some old VST FireWire drives such as a hard drive or external CD-R drive.
The later model Mac minis from the polycarbonate series were well-designed, and well made. Many of them are still running today - and with a little work can still be upgraded and restored to be quite useful.
Read on AppleInsider
Comments
I have also been refurbishing old laptops using Linux Mint.
Latest is a 2007 MacBook (white polycarbonate) The trick with these oldies is to prepare the install media on a DVD, as the boot from external USB isn't supported.
This includes LibreOffice, and various essentials such as Zoom, Skype and so on...
The nice thing is it's a fully supported recent OS and runs reasonably given the limitations of the ram, and slow spinning hard drive.
The end result is donated to newcomers that are in need of some basic computers for their family.