How to measure your Mac's network performance with iPerf3 in Terminal

iperf3 is a network throughput tool used to measure the performance of the network your Mac is using. Here's how to use it in the macOS Terminal app.
iperf is a UNIX memory, network throughput, and bandwidth tool first developed "by the National Laboratory for Applied Networking Research (NLANR)". iPerf is a fully compatible rewrite of the older Test TCP (ttcp) app originally written at the US Army's Ballistic Research Lab for DARPA sometime around 1983.
There are also modern versions for Windows and Linux.
There are three major revisions of iPerf, and the third revision (iperf3) is not backward compatible with earlier versions. iperf3 was first released in 2014 and also includes a developer library so other programs can use it.
Unlike earlier versions, iperf3 is single-threaded whereas the earlier versions were multi-threaded. However, multi-threading was added in iperf3, version 3.16.
Multi-threading simply means more than one code path can run simultaneously on computers that have multiple CPUs or multi-core CPUs. Multi-threading is used in parallel processing and improves performance.
The iperf3 rewrite was undertaken by the US Dept. of Energy's Energy Sciences Network (ESnet) and Lawrence Berkeley National Lab in Berkeley, CA to improve performance. ESnet connects several research and commercial labs worldwide.
iperf3 source code can be found on GitHub at esnet / iperf.
The original iperf2 codebase written by Robert McMahon can be found on Sourceforge.
There is also a very detailed Iperf 2 & Iperf 3 Comparison Table at SourceForge.
Purpose
iperf3 is a memory-to-memory measurement tool, but it is commonly used to measure network and router performance, and even storage devices. Unlike iPerf2, version 3 also provides output in JSON format.
All iPerf variants require both a server and a client component for testing. iperf3 uses TCP and UDP (connection-less) protocols for testing and communication.
Although iperf3 is not backward compatible, iperf2 and iperf3 commands are very similar. ESnet has an iperf2/iperf3 command chart.
ESnet has a comparison chart which summarizes the option differences between tools. There is also a macOS tuning page which describes how to optimize your network and settings to use iperf3.
The main uses for iperf3 are to measure memory performance between systems, and network connections, bandwidth, disk performance, and throughput across networks.
Installation on macOS
iperf3 is not included with macOS by default. The easiest way to install it is to use the Homebrew package manager and the Homebrew iperf3 formula.
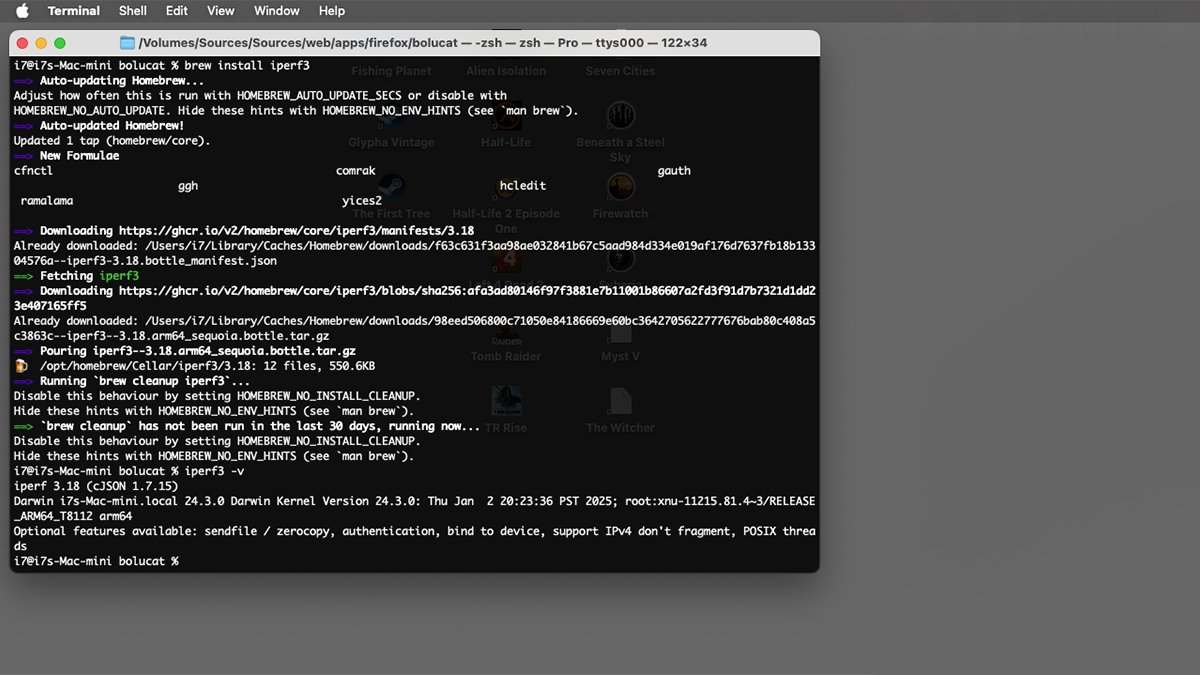
Installing iperf3 using Homebrew.
Once Homebrew is installed on your Mac, open Apple's Terminal app located on your Startup Disk in the /Applications folder and simply type:brew install iperf3 and press Return on your keyboard.
The Homebrew implementation of iperf3 relies on several other Homebrew packages which will be installed automatically:
- cfnctl
- comrak
- gauth
- ggh
- hcledit
- ramalama
- yices2
You can read about these on their respective Homebrew formula pages. You can check the installed version of iperf3 in Terminal with:iperf3 -v
Running iperf3 in Terminal
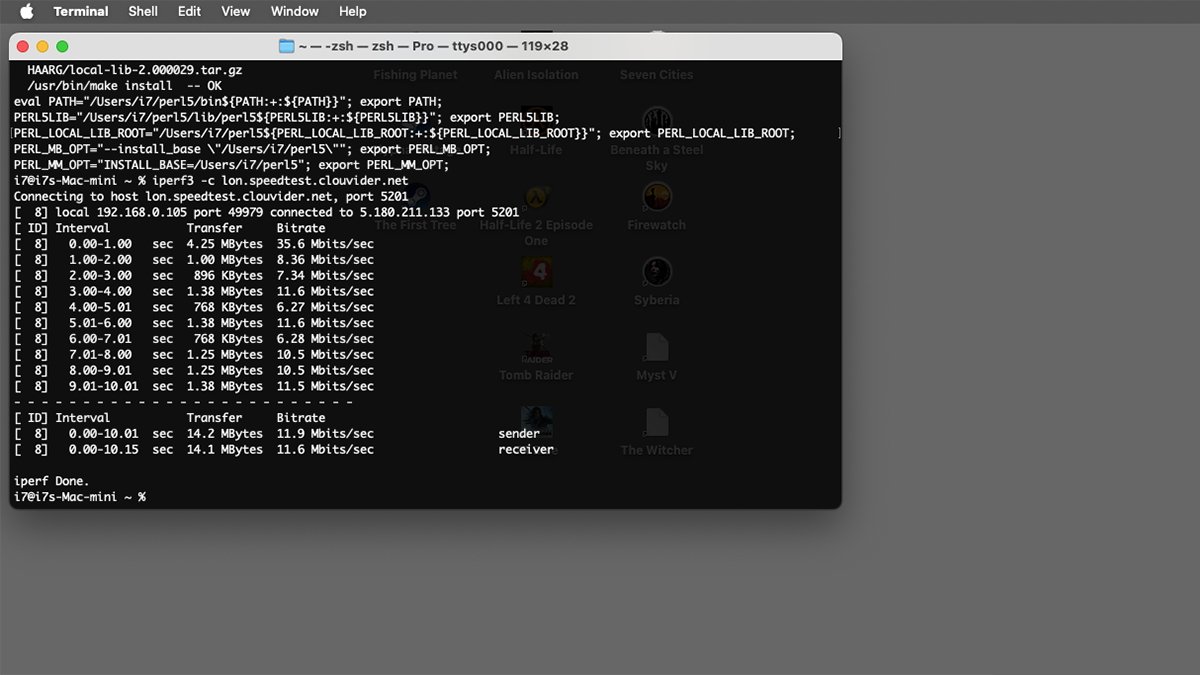
There are a wide array of options when running iperf3 in Terminal on macOS, but the simplest command is:iperf3 -c remotehost
where 'remotehost' is the IP address or name of the server you want to connect to. Remember, the iperf3 server component must be running and listening on the computer you're trying to connect to.
The -c option tells iperf3 to run in client mode and to connect to the specified server. To connect to the remote computer using UDP instead of TCP, use the -u option along with -c:iperf3 -c -u remotehost
Additional options
There are dozens of other options including:
- -p (port number)
- -f (speed label format)
- -i (interval in seconds)
- -B (bind to a specific network interface)
- -V (verbose output)
- -J (JSON output)
- -l (log file output)
- -d (debug mode)
- -h (show help)
If you are running your own iperf3 server, use the -s or -D (daemon) flag to start the server. When running in server mode there is also a --authorized-users-path flag to set what users to allow.
By default, the iperf3 server listens on TCP port 5201 for connections from an iperf3 client. A different port can be specified using the -p flag followed by a space, then the port number. For example:iperf3 -s -p 5002
This command starts iperf3 in server mode and listens on UNIX port 5002 for incoming requests from clients.
You might want to use an alternate port instead of the standard port to create a private server. This can alsoo help secure your server against bad actors who regularly target standard server ports as a way to break into a machine.
For a complete list of iperf3 usage and options in Terminal use the man (manual) system:man iperf3 followed by a Return on your keyboard.
Terminal output
Once running, iperf3 will display test results in the Terminal with each test line showing the test interval (delay in seconds), amount of data, and overall throughput. To stop the tests press Command Z or q on your keyboard.
If you used the UDP (-u) option the tests will also show any packet loss.
Running an iperf3 test in Terminal.
There is also an iperf3 Development page.
iperf.fr in France also has a lot of great info, including a list of test servers.
A dedicated list of free iperf3 test servers is available at iPerf3 Server List, but sometimes the load on the site is so great it's unreachable.
For another useful networking tool check out NetPipe.
iperf3 is simple to install and use (and is so easy to run) the next time you need a quick bandwidth test across a network you'll wonder how you got along without it.
Read on AppleInsider

Comments
number of parallel client streams to run. iperf3 will spawn off
a separate thread for each test stream. Using multiple streams
may result in higher throughput than a single stream.
I'm going to take that as humorous poke at Apple's naming conventions, because no one calls it iPerf.
Thanks for the informative article.