How to refurbish a fifth-generation Time Capsule

Apple's 5th generation Time Capsule allows you to wirelessly back up your hardware. Here's how to refurbish the combined base station and NAS device.
Apple launched the Wi-Fi revolution in 1998 when it released its first AirPort base station (access point) and optional AirPort cards for new Macs and notebooks when the original iMac was released that year.
Apple's original Wi-Fi lineup included the first iMac, PowerMac G3 tower, G3 iBook model, and the professional PowerBook G4. These models all used an optional AirPort card which could be added to them to add Wi-Fi capabilities.
Mainstream acceptance of the internet was just getting started back then, and Apple wanted to see what user reception to wireless networking would be.
The public loved Wi-Fi and AirPort and it is still the ubiquitous wireless computer networking standard today.
That same year Apple released its first AirPort base station - a "UFO" like model with a round shape, grey and clear plastic, and three simple LEDs on its front.
Two more UFO-design models followed, the third model being dubbed the first "AirPort Extreme" which featured a newer, faster Wi-Fi standard.
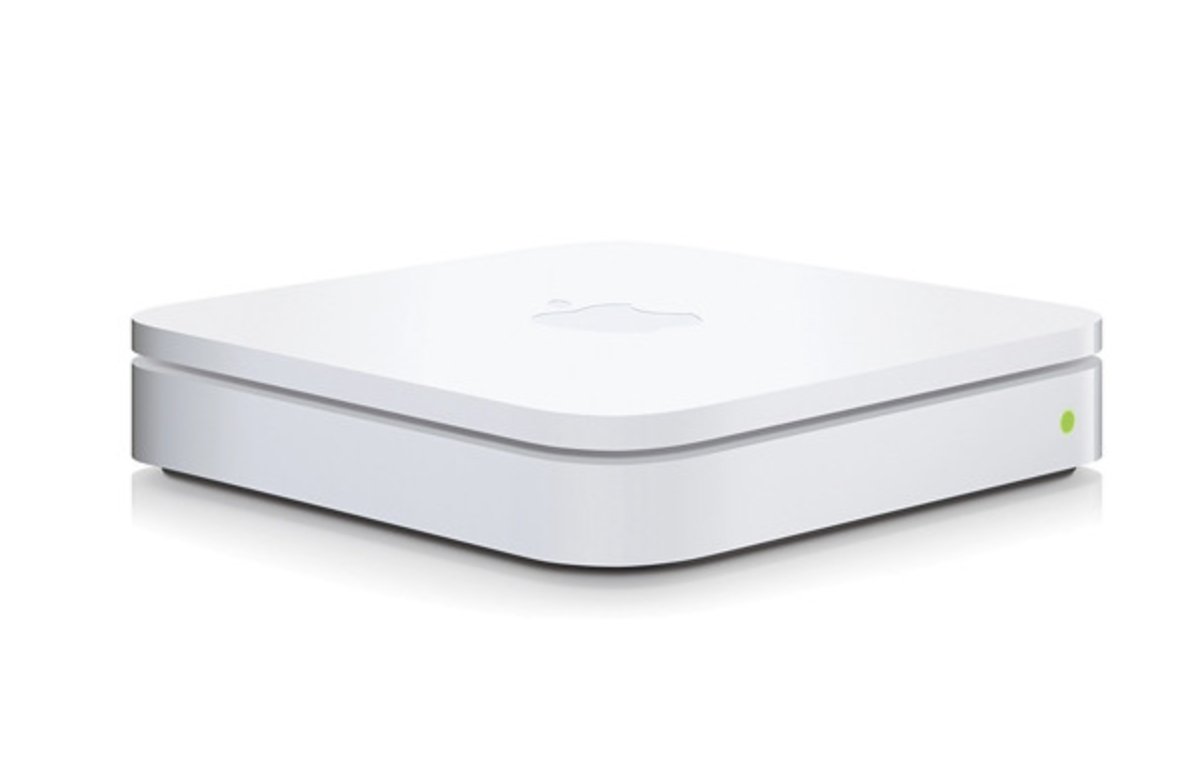
3rd generation AirPort Extreme.
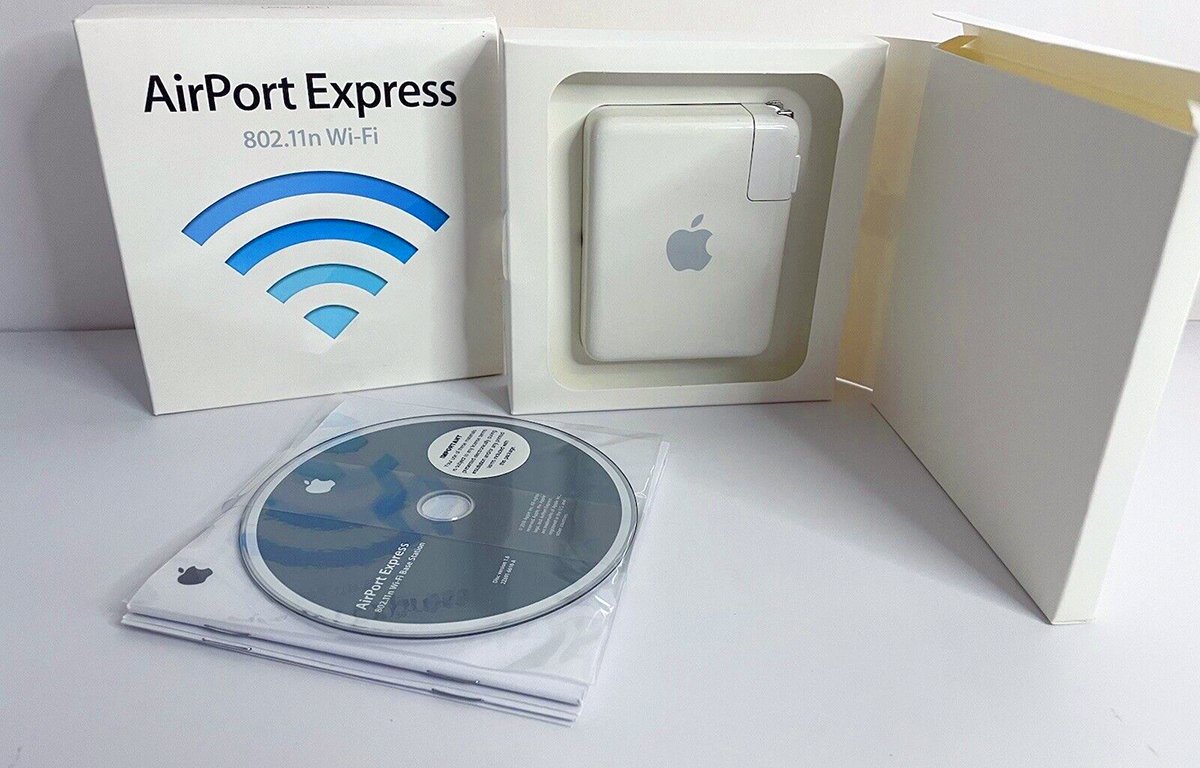
AirPort Express and Extreme
The following year Apple released the first of the compact AirPort Express models. Its first design was a simple small white plastic box with a folding A/C power plug on one end, and Ethernet ports and a status light on the other.
With AirPort Express, you could gain a Wi-Fi access point simply by plugging it into any standard house outlet and a cable or DSL modem.
After AirPort Express Apple released several AirPort Extreme base stations with upgraded Wi-Fi and additional features such as the ability to add an external USB drive as a sharable network drive over wireless networks. You could also use AirPort Extremes as a bridge from a wireless network to devices without Wi-Fi capability.
The original AirPort Extreme models had a small square form factor similar to a Mac mini, but with an all-white plastic case.
Time Capsule and Time Machine
In January of 2008, Apple introduced the AirPort Time Capsule device. Essentially a combination of AirPort base station and network-attached storage (NAS) containing an internal hard drive, Time Capsule allowed users to do easy backups and use the Time Capsule as both a LAN gateway router and as a shared storage solution over networks.
Time Capsule also provided a USB port for adding an additional external USB drive for more storage.
Along with the release of Mac OS X 10.5 Leopard in October 2007, Apple also introduced a new app included with Mac OS X called Time Machine, which still ships with macOS today.
Time Machine allows you to add specific disks for backup, and if you have one of Apple's Time Capsule devices to use that device as the target device for your backups over a network.
Time Capsule models
Apple discontinued all Time Capsule sales in 2018, mainly because there are less expensive and more readily available generic network backup solutions available, and because Wi-Fi switches and routers are now extremely inexpensive.
Oddly, Apple's website still has the "Buy" page for the final Time Capsule model online, but you can no longer purchase new Time Capsule units from Apple.
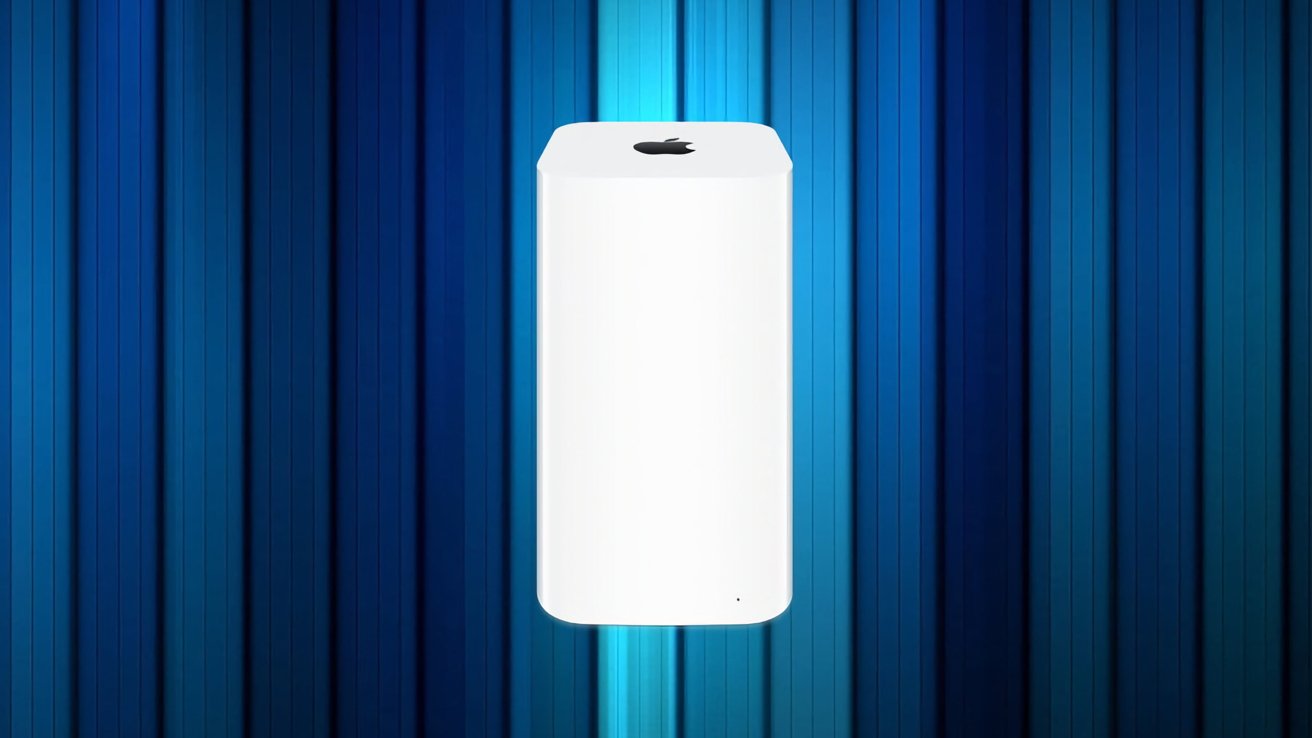
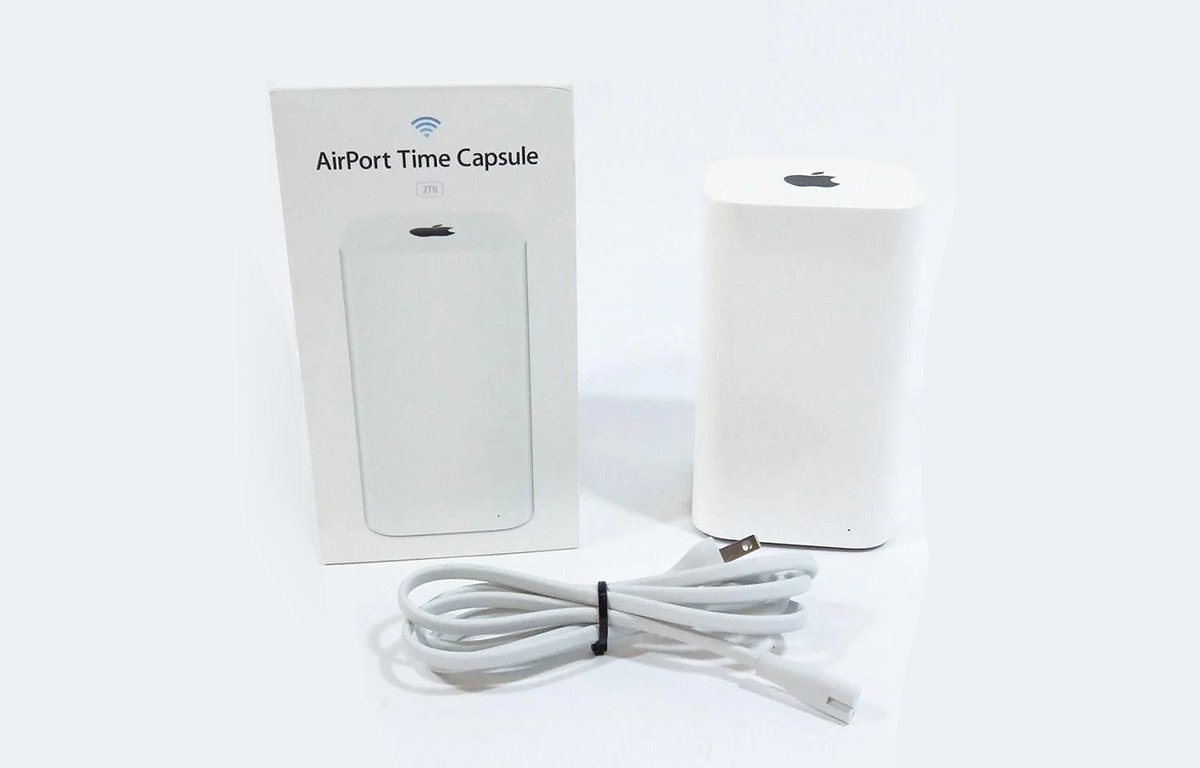
There were five Time Capsule models in all - the first four of which had the same physical form factor as the original flat AirPort Extreme models, but the fifth model (A1470) introduced in 2013 had the same taller "tower" form factor as the final AirPort Extreme: a small white plastic tower with ports on the back and a single large rubber foot on the bottom for air circulation.
The fifth and final model also moved the power supply inside the device - eliminating the need for an external AC to DC power supply.
5th generation AirPort Time Capsule.
Most of the Time Capsule models had a full-sized 3.5" SATA hard drive, and the final model had a 3.5" drive of either 2GB or 3GB capacity for NAS.
All the models supported Gigabit Ethernet, and the final model supported the 802.11ac Wi-Fi standard. All models of Time Capsule and AirPort Extreme, except the very first models of both, supported both 2.4GHz and 5GHz network speeds.
All Time Capsule models were based on a Marvel 1850 CPU and a variety of either Marvell, Atheros, or Broadcom Wi-Fi chips. All had 128MB of RAM, 16MB of Flash storage, and a custom operating system created by Apple.
The final Time Capsule model supported a maximum of fifty network users at once.
Restoring a 5th generation Time Capsule
In this article, we'll show you how to refurbish a 5th generation Time Capsule, and optionally replace its internal 2GB or 3GB hard drive, should yours fail.
One word of caution: this refurb is extremely challenging. There are many tiny parts and cables which must be removed and reassembled.
Only attempt this process if you are fully confident in your repair and computer skills. It is very easy to damage your Time Capsule and render it unusable if repairs are not completed perfectly.
For the restoration you will need:
- One 5th generation AirPort Time Capsule
- Power cord
- An Ethernet cable and an Ethernet switch or router
- Internet connection
- Small multi-bit screwdriver set including Torx bits
- A small flat-head screwdriver
- A plastic spudger tool or thin flat metal ruler
- A jeweler's or photographer's lupe for magnification
- A flashlight
- An electronics mat or small hand towel to place the unit on
- Compressed air or air compressor
- Apple's AirPort Time Capsule Setup Guide
If you want to replace the Time Capsule's internal hard drive you will also need a 2TB or 3TB 3.5" SATA hard drive. You can use a replacement SSD drive but if you do, you'll need a solid 2.5-inch to 3.5-inch SSD SATA adapter because the shock absorber on the top of the drive requires a rectangular shape to fit onto.
You could use a metal sled-style drive adapter, but the shock absorber would likely be loose and not sit properly when you reassembled the drive.
Orico makes such a 2.5-inch to 3.5-inch adapter for $8, which has the same form factor as a real 3.5-inch hard drive, so it may or may not be suitable. We haven't tried it so if you go that route, proceed at your own risk.
We also haven't verified that the Time Capsule's custom SATA connector will fit on the ORICO adapter so it may or may not be possible to use it at all.
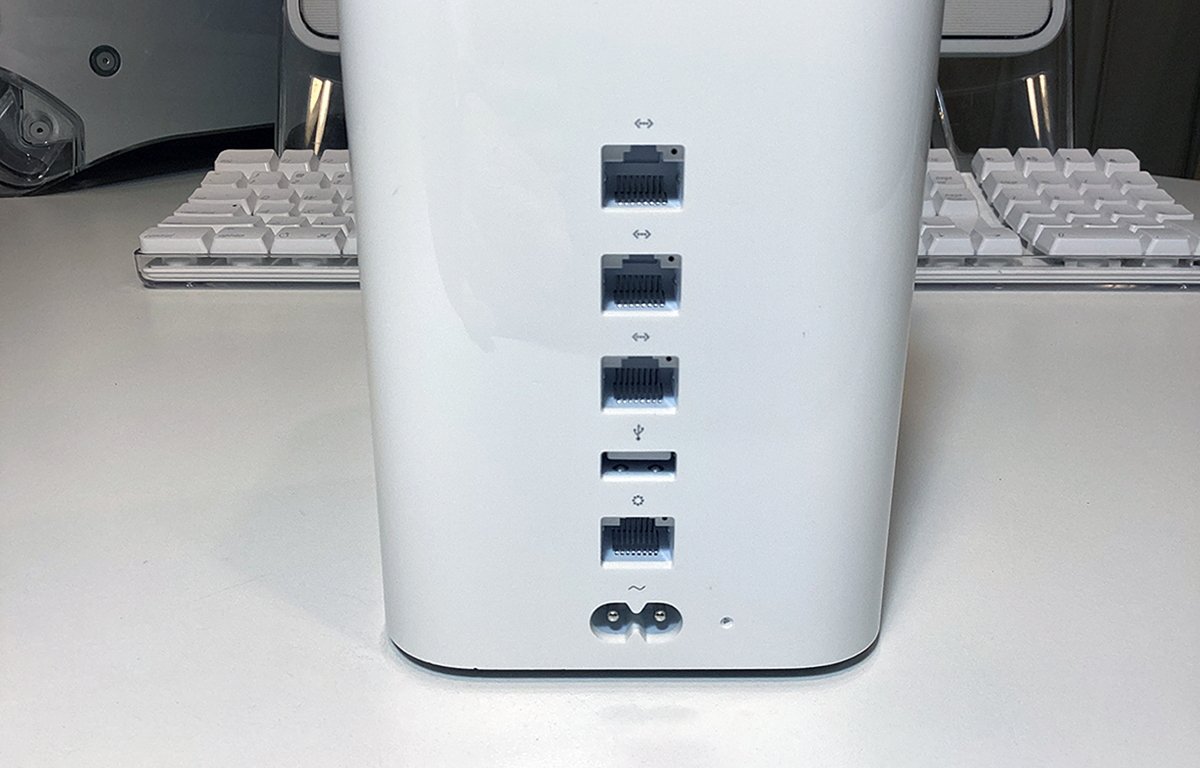
Time capsule rear ports. Note the small reset button on the lower right.
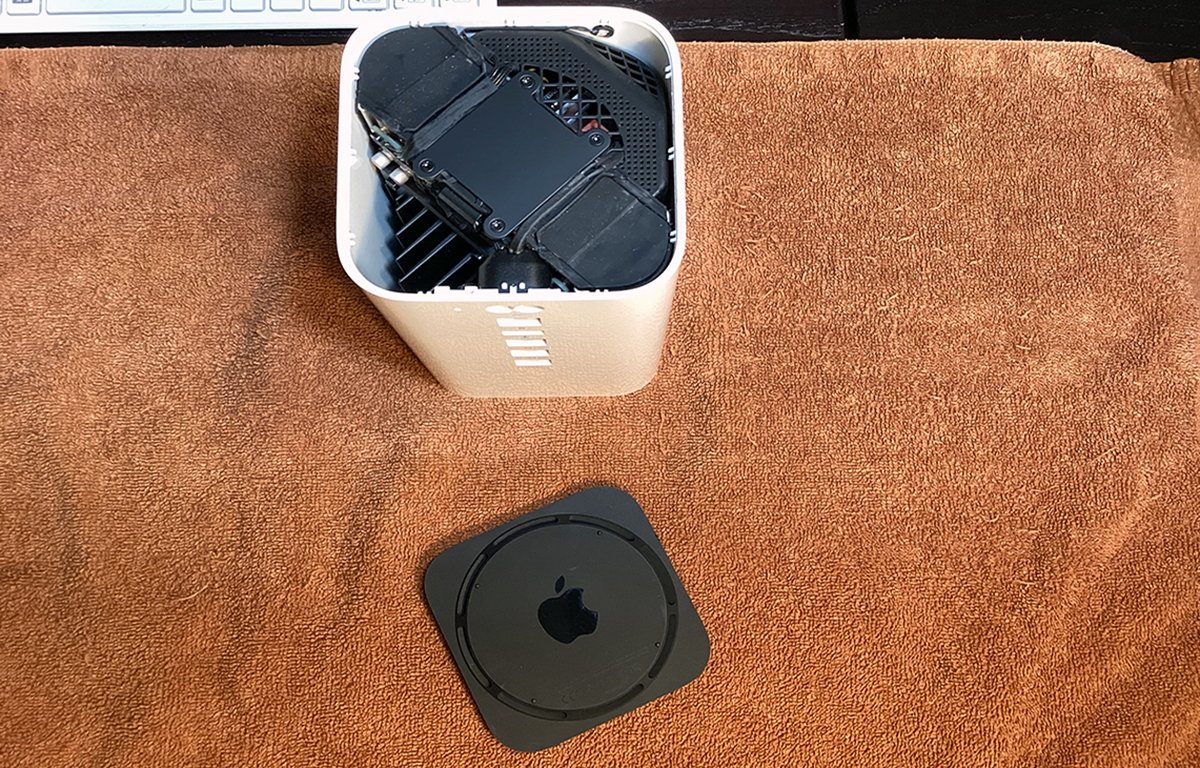
Getting started
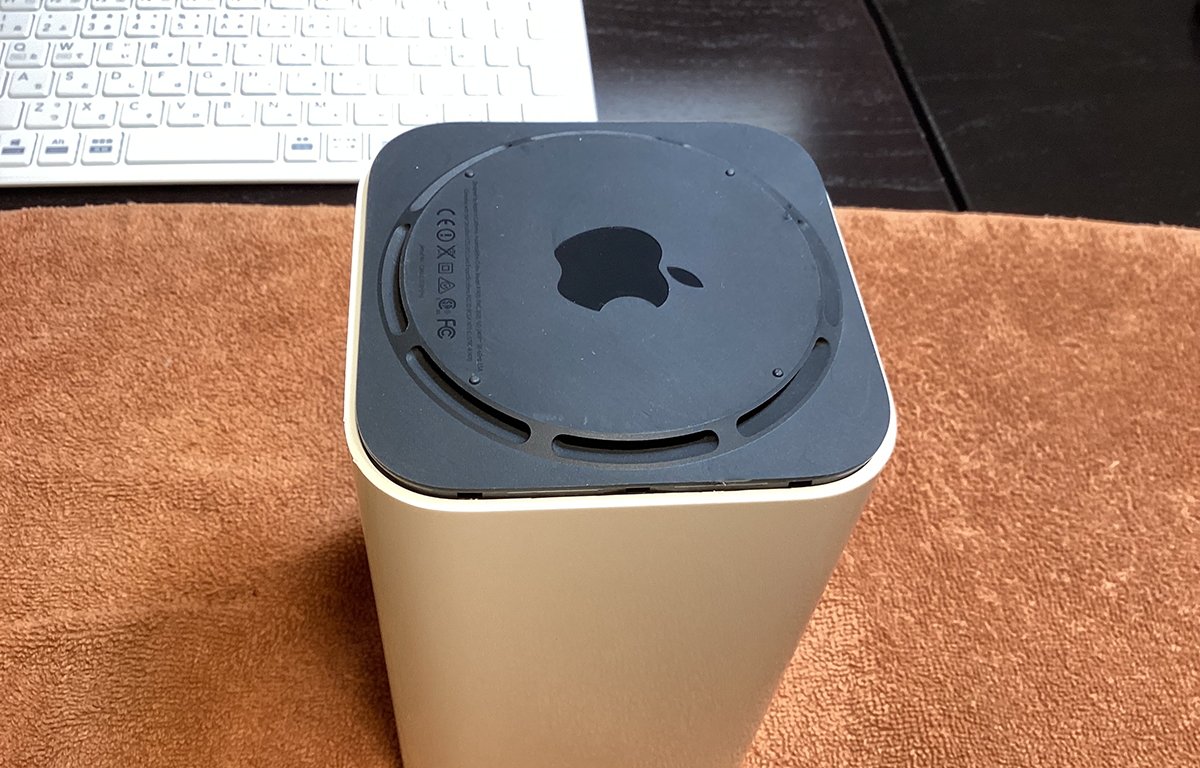
To get started, first turn your Time Capsule over and set it on an electronics mat or small hand towel on a flat surface. The bottom should be facing up with the black bottom cover visible.
The bottom cover is made of a soft rubbery plastic and is held in by nothing but friction. There are small square openings all the way around the bottom cover which snap onto small plastic clips on the inside of the unit's main enclosure.
A word of caution: even if you use all non-metallic tools, it's likely there will be some minimal damage to the bottom cover, and likely one or two of the small clip holes. This is because the tolerances between the cover and the enclosure are extremely tight.
If you don't want any damage whatsoever to the bottom cover, don't attempt this repair.
Having said that, the damage to the bottom cover will likely be hardly noticeable and it won't interfere with the unit's operation or reassembly.
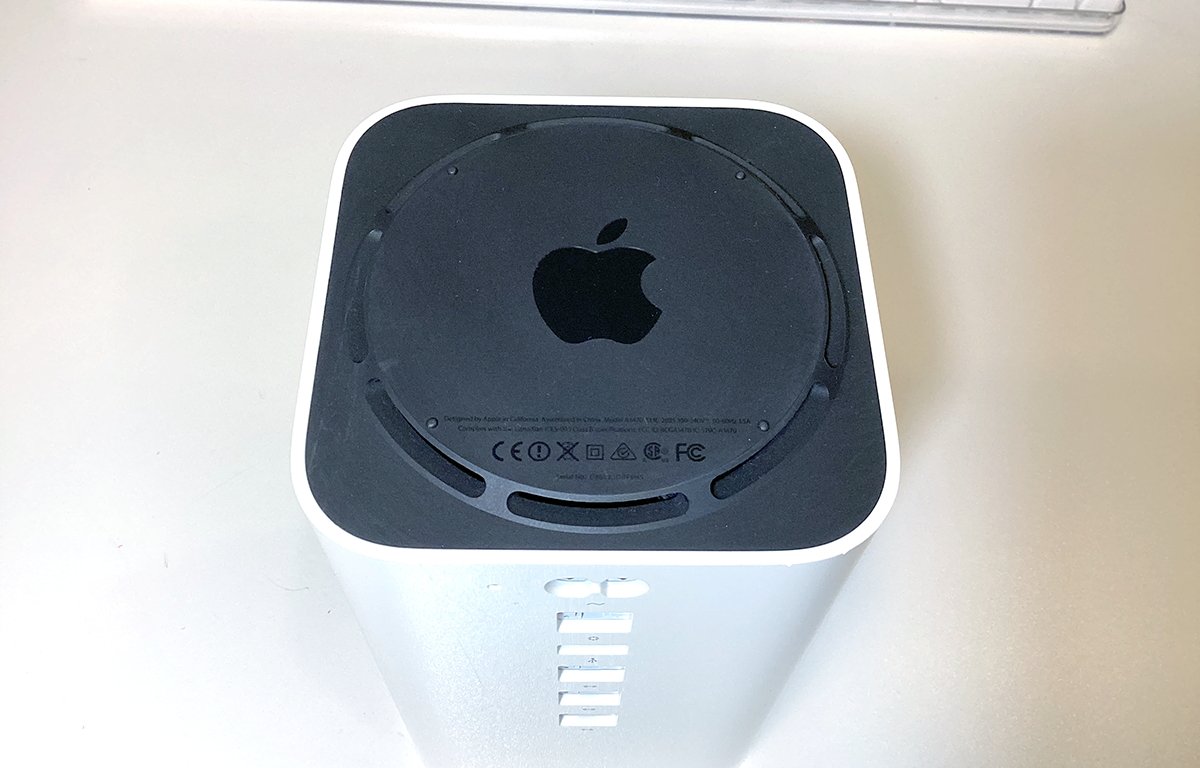
Time capsule bottom cover.
Remove the bottom cover
To remove the bottom cover from the unit, use either a very thin plastic spudger, or a very thin small metal ruler. A two-inch wide spackling knife will also work, and so will a metal guitar pick - although you may not be able to get enough leverage with a pick.
Starting from one side of the unit (not from the front or rear), insert the tool into the seam between the cover and the unit's enclosure. You may have to wiggle it a bit to get it in.
Once inserted, gently pry down with the tool, forcing one side of the cover out of the enclosure. Once one side is free, insert a small flat-head screwdriver and very gently pry up one side of the cover.
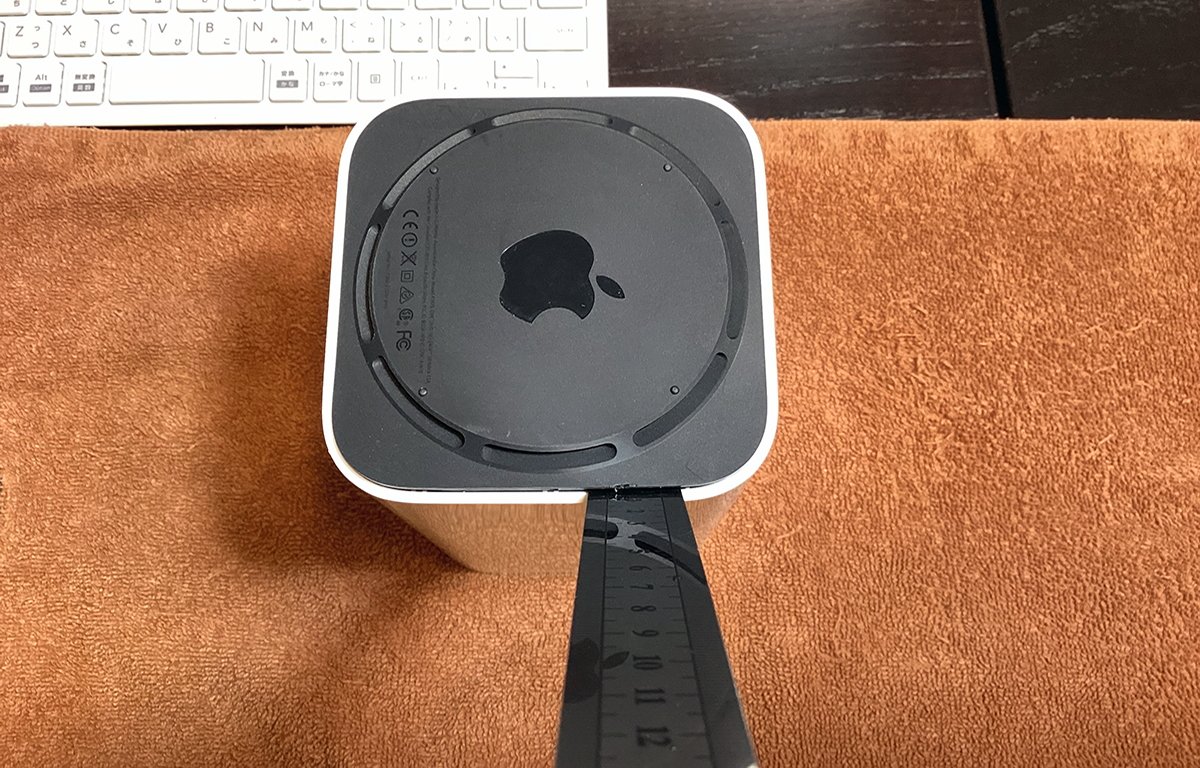
Begin prying at the edges.
After you have one side of the cover pried up far enough to get a finger under its edge, use your fingers or a small screwdriver to pry the cover off the unit entirely.
Go slow and be careful. You may want to walk the screwdriver, or your first tool around the edges to free more of the cover before removing it with your fingers.
Don't pry or insert any tool into the front or back edges of the device - there are wires and sensors in those areas and if you insert a tool there you'll likely damage them.
Also note that the inside of the cover has a small notch on one side. This is important because the notch has to go over the power port or the cover won't fit when you reinstall it.
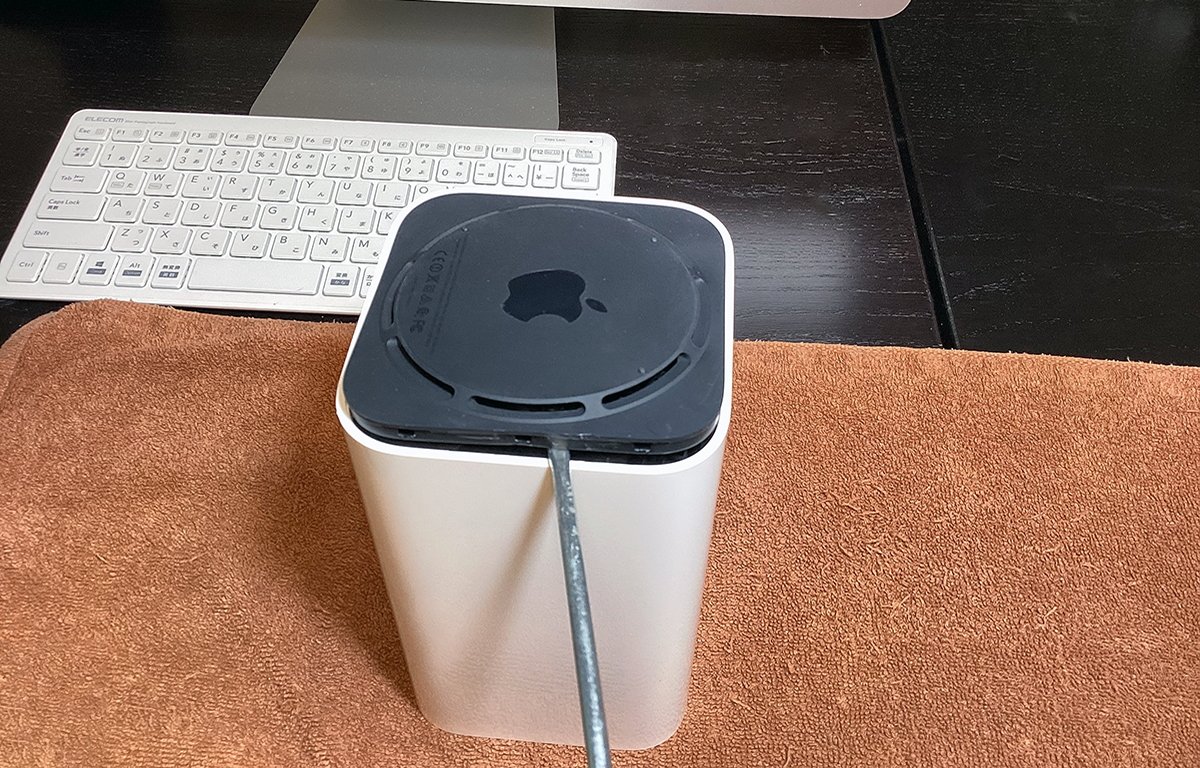
Pry the cover off.
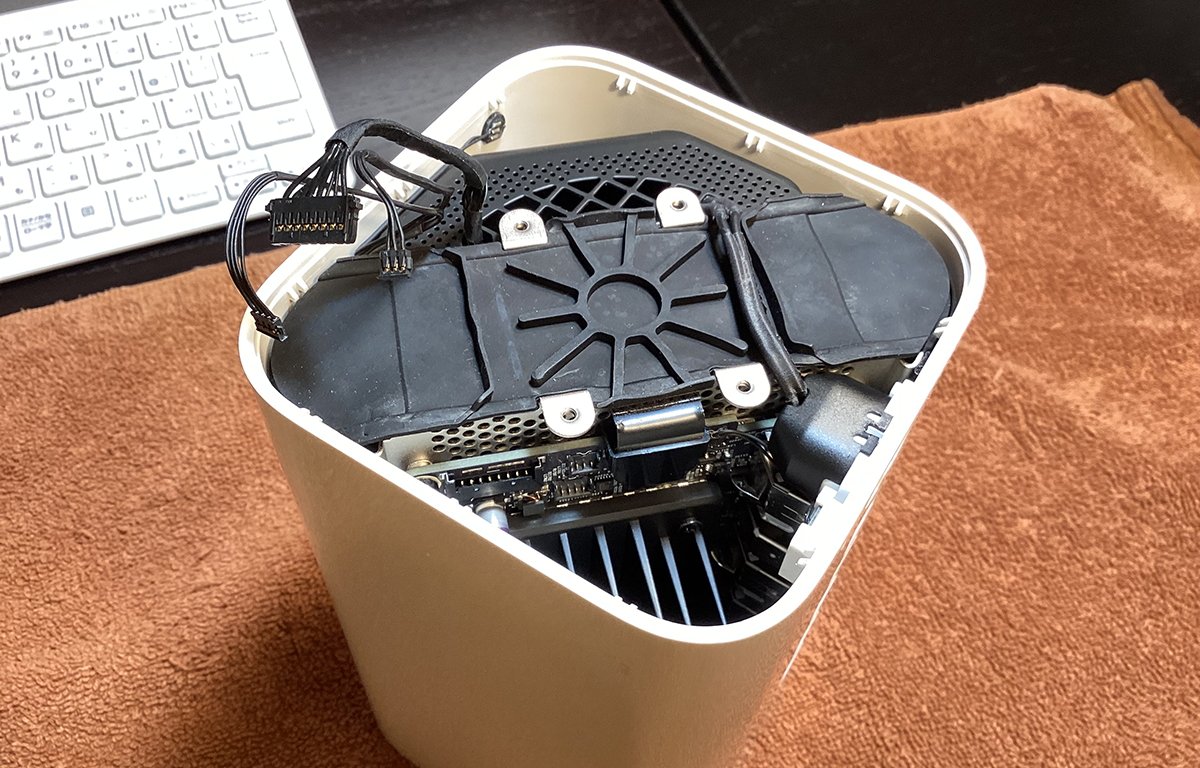
Internal parts
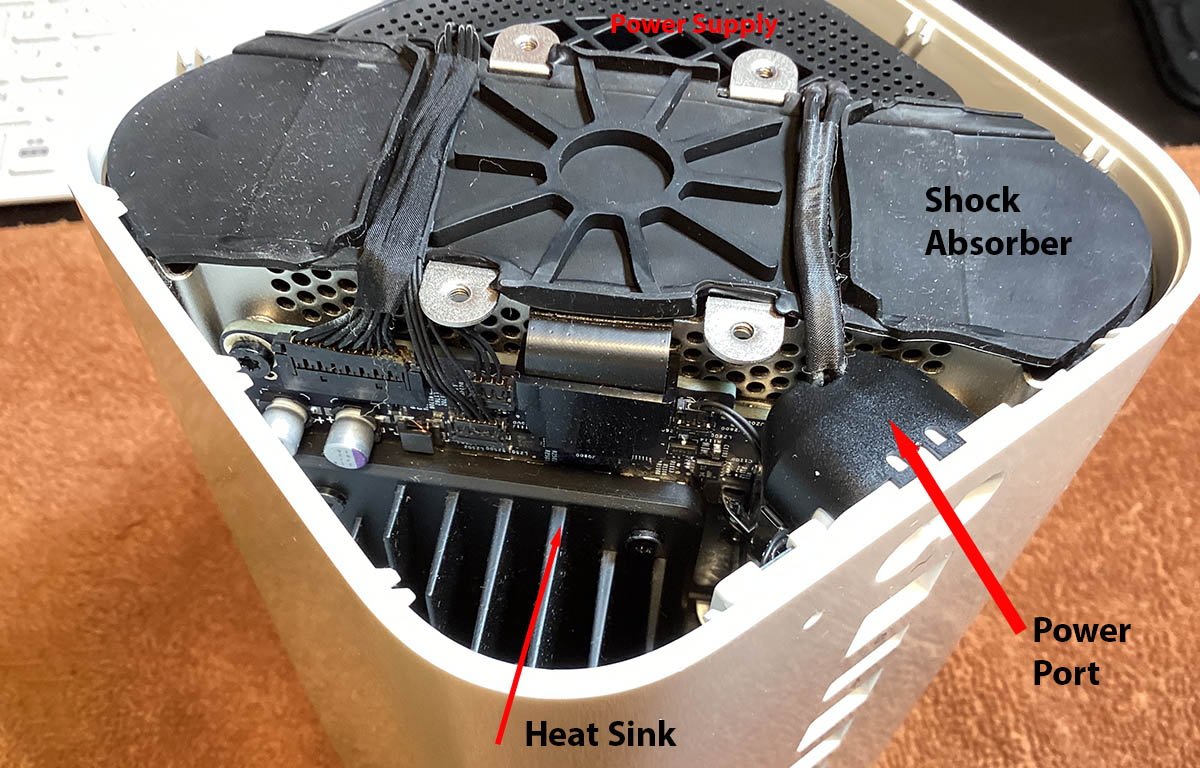
Once the bottom cover is removed, note the main parts of the Time Capsule:
- Small central heat sink plate and four screws
- Small power port at the top on the rear
- Large heat sink board on one side
- Power supply cage on the opposite side
- Large rubber shock absorber diagonally across the center
- Four small wires crossing over the shock absorber
- Small reset switch connector and wire next to the power port
- Custom motherboard under the large heat sink
The Time Capsule's design is ingenious: the power supply, heat sink, and motherboard are on the sides, and the main 3.5" hard drive is mounted in the center diagonally under the main shock absorber.
Bottom cover removed. Note heat sink in center.
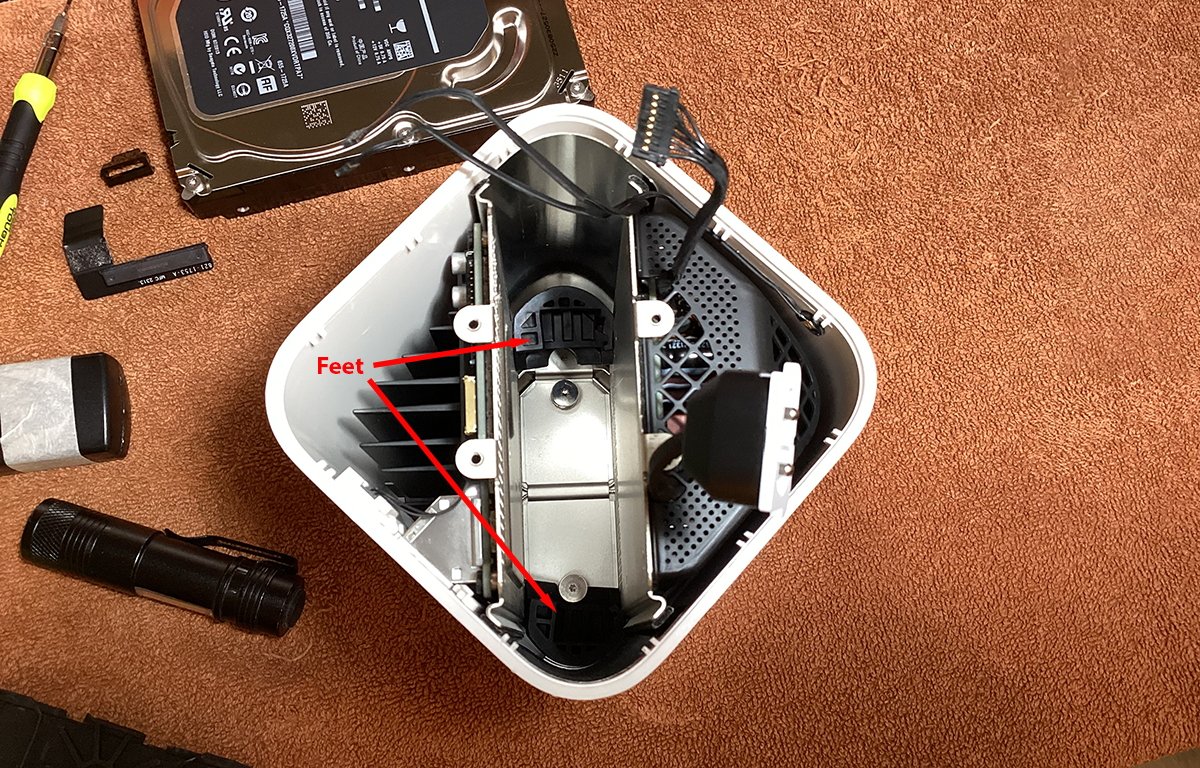
Underneath the hard drive, but not visible from the top while it is installed are two more smaller rubber shock absorbers on the other end of the hard drive - each held in by one large screw and spring.
The power supply also contains a nearly silent tiny fan, which isn't visible from the outside or top. The fan only comes on if the Time Capsule's temperature rises above a certain threshold.
Time capsule internal parts.
Air circulates around both sides of the unit, cooling both the power supply and the hard drive before being sent back out the bottom openings in the bottom cover around the large plastic foot.
Once the hard drive is removed (which we'll get to below), it is possible to remove the entire internal assembly from the outer enclosure, but unless your Time Capsule is extremely filthy inside, we don't recommend it.
This is because there are six small antennae wires on the bottom (normally the top when upright) of the unit and when you remove the internal assembly you risk loosening or damaging the antennae wires.
Unless your device has some failed part on the motherboard that needs replacing, there's no real need to remove the main assembly from the unit.
If your unit is that damaged, it may just be easier to buy another replacement off eBay or other online outlets since they usually cost under $50 as of this writing.
Also be aware that if you do remove the hard drive from the unit, the two rubber shock absorbers at the bottom of the drive can easily come loose and it's extremely frustrating to have to put them back in place. At a minimum, you'll need a pair of long needle-nose pliers to maneuver them back into position under their screws.
Clean everything
Using compressed air or an air compressor, blast any dust and dirt out of the unit. Most dust will accumulate inside the power supply cage, and on the main heat sink.
If you are removing the internal drive, also clean under it with compressed air before you reinstall it or replace it.
In general, your Time Capsule shouldn't be too dirty as the fan almost never turns on - unless you live in a high-dust area or in a very humid area.
If you do live in a very humid climate it's likely mold will have formed inside the unit, in which case you will want to remove the main assembly and wash the entire enclosure and bottom cover in water and dry them thoroughly.
Disassembly
Once everything has been cleaned, you can begin disassembly.
Begin by removing the small metal heat sink and four Torx screws in the middle of the unit. Set them aside.
Next, you'll need to loosen the power port connector and the three small cables on the left side of the motherboard.
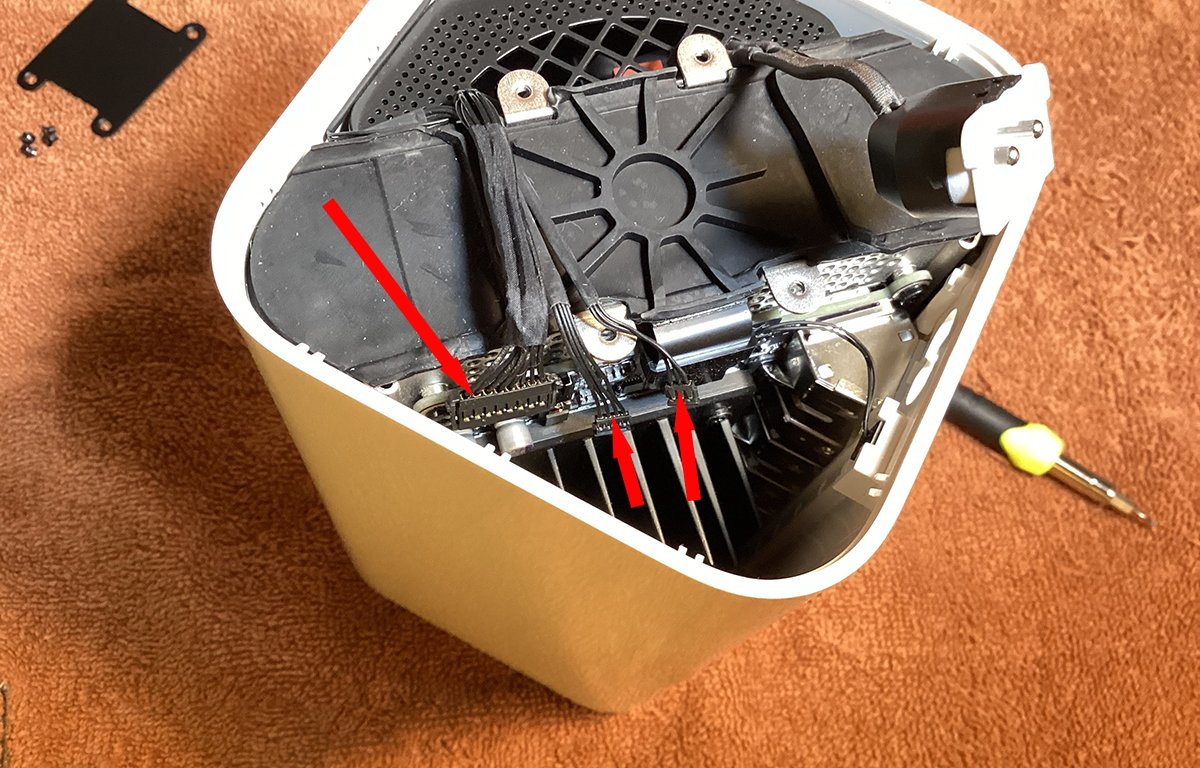
Disconnect the three small wires.
The power port isn't held in by anything - it simply sits in place held in by two small plastic grooves on the inside of the enclosure.
To remove it from its position, simply press up from underneath it with a plastic tool to slide it out of position. It will still be connected to its small cable.
The other three small cables are on the opposite side. To remove the larger of the three, very gently place a plastic tool underneath its wires, and press up.
Don't use too much force as the connector for the cable is very small and the plastic is easy to damage.
You may want to inspect all three connectors with a flashlight and lupe first to understand how they fit together.
The remaining two tiny connectors hold small wires onto the motherboard.
Note these connectors do not disconnect by pulling them straight up as you might expect. Instead, they come loose by prying them forward - from underneath.
To do so insert a small plastic tool underneath the wires at the base of the connector and press forwards, away from the motherboard. You'll feel a slight click as they come free.
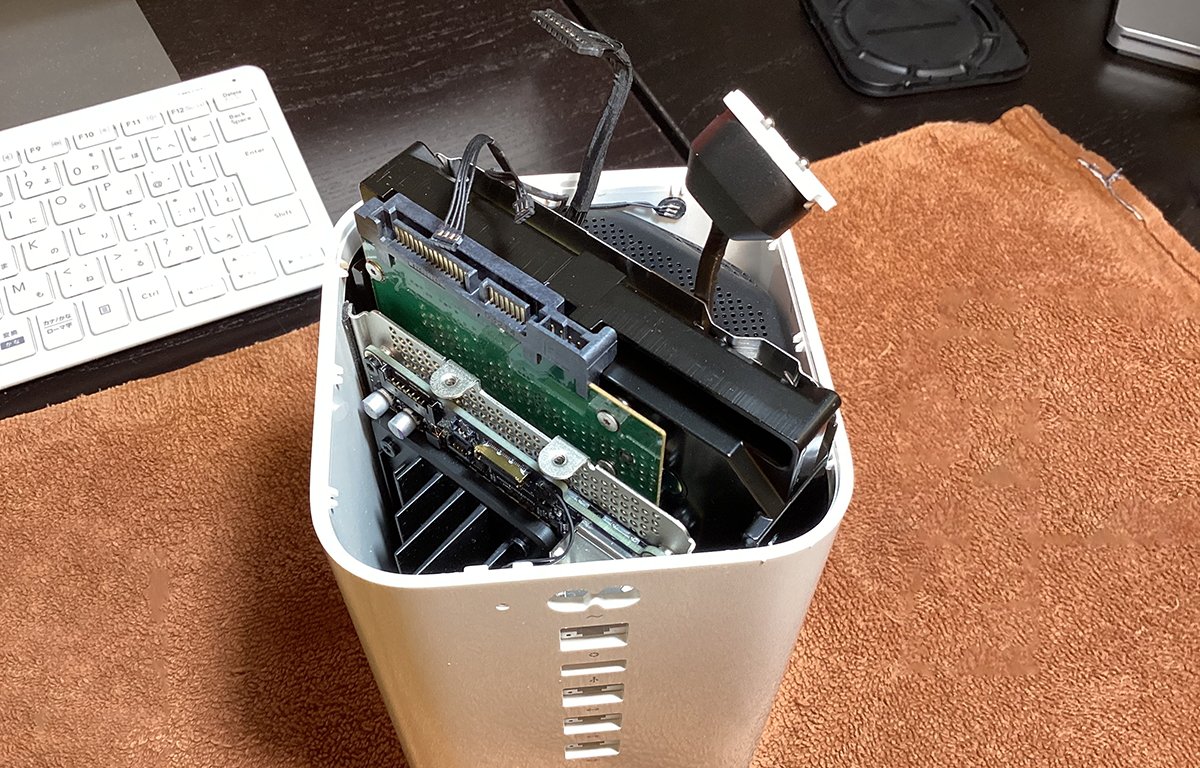
Now that all four cables are free, you can remove the main rubber shock absorber by prying it up at both ends.
The shock absorber is held in with friction by four small white clips at either end of the enclosure. Once it's free you can remove it.
This exposes the 3.5" internal drive, its SATA connector, and the top of the motherboard.
Remove the shock absorber.
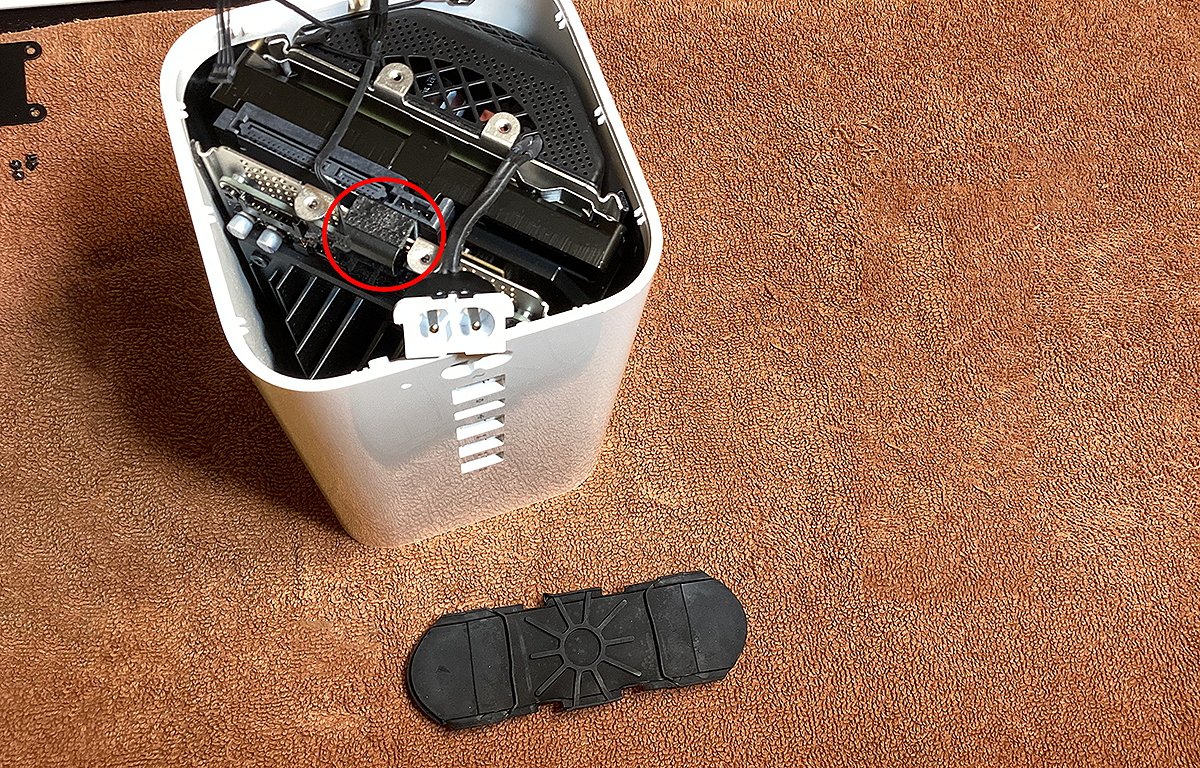
Remove the SATA connector
You only need to do this step if you're removing the hard drive.
To remove the drive's SATA connector, first note that there is a small black square collar-like clip over it.
The clip works differently than you might expect: instead of it attaching to the motherboard on its face, the clip slides over the cable end of the SATA connector and clips over the edge of the motherboard.
The motherboard end of the SATA connector is a tiny multi-pin connector that simply presses in place on the motherboard. Nothing else holds it in except the plastic clip.
On the drive end of the SATA connector, is a tiny board with the two drive connectors. It simply snaps onto the back of the drive.
Once you've removed the SATA connector's clip and motherboard connector, you can simply lift it off the end of the drive and set it aside.
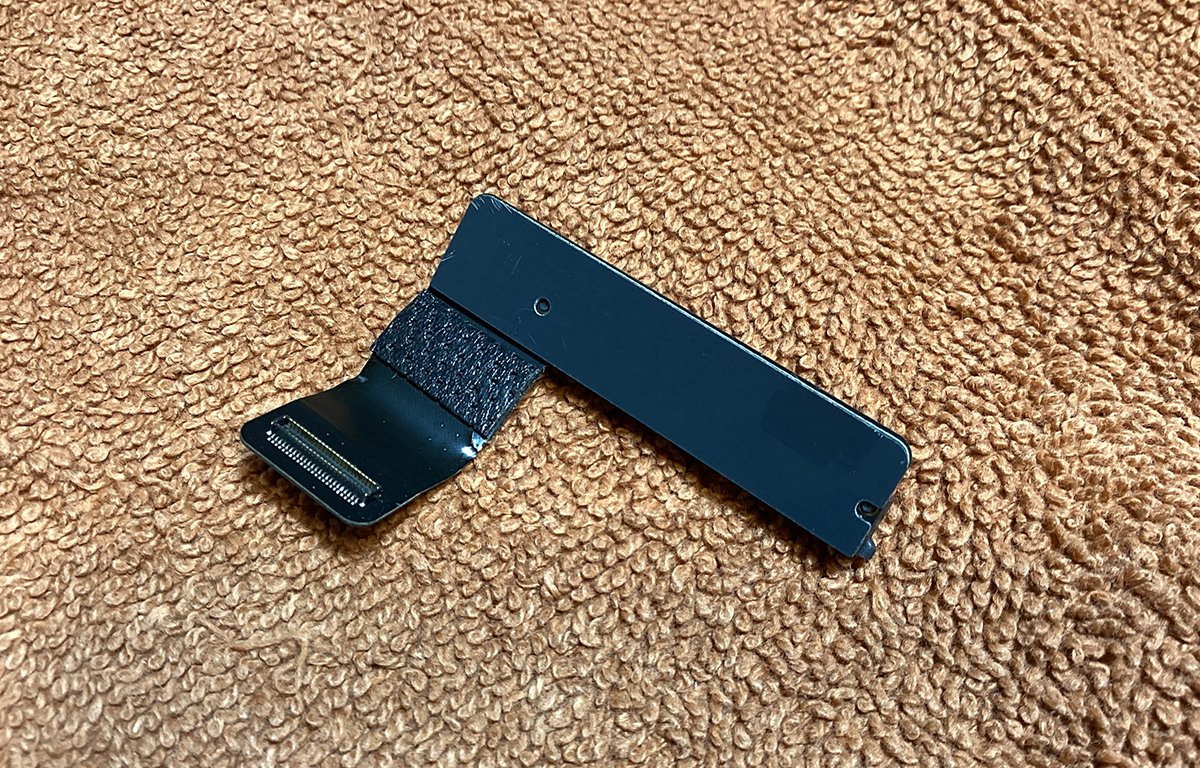
SATA connector removed. Motherboard end is on the left.
Be sure to use only plastic tools on the SATA connector - its cable is a combination of metal and a special coating and if you use metal tools on it you can easily damage the cable portion of the connector.
In general, you shouldn't need to use any tools at all on the SATA connector.
Remove the hard drive
Once the SATA connector is free from the drive, you can remove the hard drive. To do so simply lift up on its edges with your fingers and pull it straight up and out of the enclosure.
There's nothing else other than the two lower rubber shock absorbers holding the drive in place so it should come out without too much force. If either of the lower shock absorbers become dislodged from their place you'll need to reinsert them with a needle nose pliers.
Pull straight up on the hard drive to remove it.
Clean and install new hard drive
If there is any remaining dust at the bottom of the hard drive bay, remove it with compressed air.
If you are installing a new replacement drive, install it in reverse order, just as you removed the original drive.
One thing to note while the original hard drive is removed is a rounded metal frame around it. Note where the edges of the frame are and its general shape.
When you go to reinstall the main shock absorber over the new hard drive, its edges have to fit entirely inside this metal frame or else the bottom cover won't fit on the unit tightly and a gap will be left around the cover's edges.
Hard drive rubber feet.
Reinstall in reverse order
Once the new hard drive is installed, next you'll reconnect the SATA cable.
Place the plastic collar clip over the motherboard end of the cable, slide it forward, and while holding it in place snap the drive end of the cable onto the new hard drive.
Once attached to the drive, reconnect the motherboard end of the SATA cable by pressing its connector down and in place on the motherboard. Once both ends of the cable are connected, snap the plastic clip collar down onto the edge of the motherboard until you feel a click.
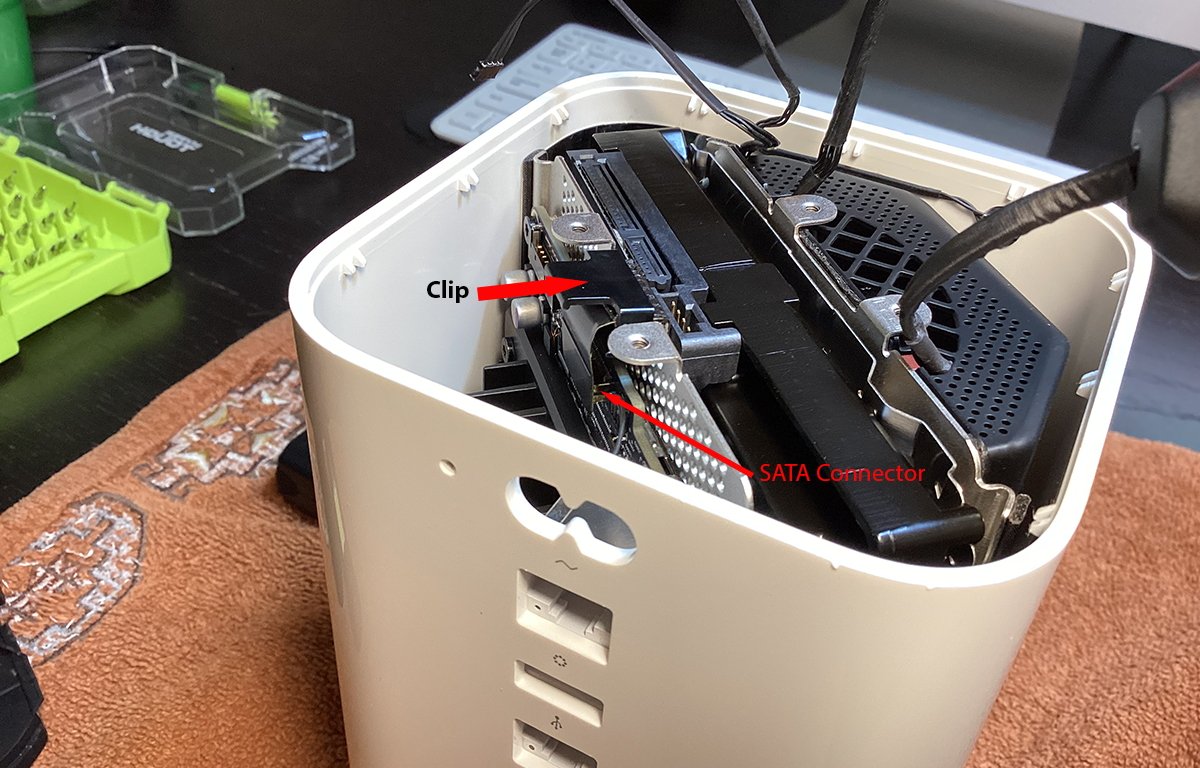
SATA connector with clip.
Reinstall the rubber shock absorber by starting at one end, pressing it down under the two small white plastic clips on the inside of the enclosure, and pressing the same end down into the metal frame ensuring the shock absorber's edges are fully inside the metal frame.
Next do the same for the other side of the shock absorber until it is fully seated inside the hard drive's metal frame and on top of the hard drive.
Shock absorber reinstalled. Make sure the edges are seated.
Reconnect wires
Now that the shock absorber is reinstalled, reconnect the three small wires you removed at the start onto the motherboard.
Start with the smallest of the three wires and gently press it straight down onto the motherboard with your finger. You'll feel a very slight click as it snaps in place.
Do the same for the next smallest wire, then finally snap the largest of the three wires into its socket on the left side of the motherboard.
Check all wire connections to make sure they're in place.
Finally, fold the power port's wire back over the top of the shock absorber and slide it down into place in its opening on the inside of the enclosure.
Quick test
Before you reinstall the bottom cover, and with the unit still upside down, plug the Time Capsule's Ethernet cable into its WAN port, and the other end into an Ethernet switch or router on your network.
Now plug in the power cord.
If everything works as expected, you should see the tiny LED on the front of the Time Capsule go green first, then switch to a flashing amber color.
If the status LED flashes amber very quickly it means there's a hardware error. In that case, you'll need to recheck all your cable connections and make sure everything is connected properly.
Reset
Next, reset the Time Capsule to its factory settings by first unplugging it, then pressing and holding the small recessed reset button on the rear of the unit next to the power port.
You'll need to hold the reset button in using a thumbtack or bent paper clip for six seconds while plugging the power back in. The status LED on the front of the Time Capsule will flash briefly - starting green, then slowly flashing amber once reset takes effect.
Once the six seconds is up, release the reset button.
The front panel status light should now either flash green, or flash amber - but slowly, not quickly.
This indicates the device has been reset and is ready to be set up using the Apple AirPort Utility.
It may be easier to use a power strip when reapplying the power as holding the reset button and plugging the cord in at the same time may be difficult with two hands.
Once the device is powered on, plug it into a wired LAN by connecting an Ethernet cable to the bottom WAN port on the device. This is the port with a round icon next to it.
Erase new drive
If you installed a new hard drive in your Time Capsule you'll next need to run macOS's AirPort Utility located on your Startup Disk at /Applications/Utilities/Airport Utility.
Double-click AirPort Utility in Finder to run it.
If you did a full hardware reset of your Time Capsule using the Reset button, you'll need to set it up using the next section first. After you do that, come back here to set up its internal disk, otherwise continue from here.
When AirPort Utility opens, wait a few seconds for the Time Capsule to show up in the list of Airport Devices. Select it, then click the Edit button in the popover that appears next to the Time Capsule.
Next, click the Disks tab in the main window.
In the Disks pane, you'll see a list of drives attached to the device including the internal drive. Select it by clicking it, then click the Erase Disk button below it.
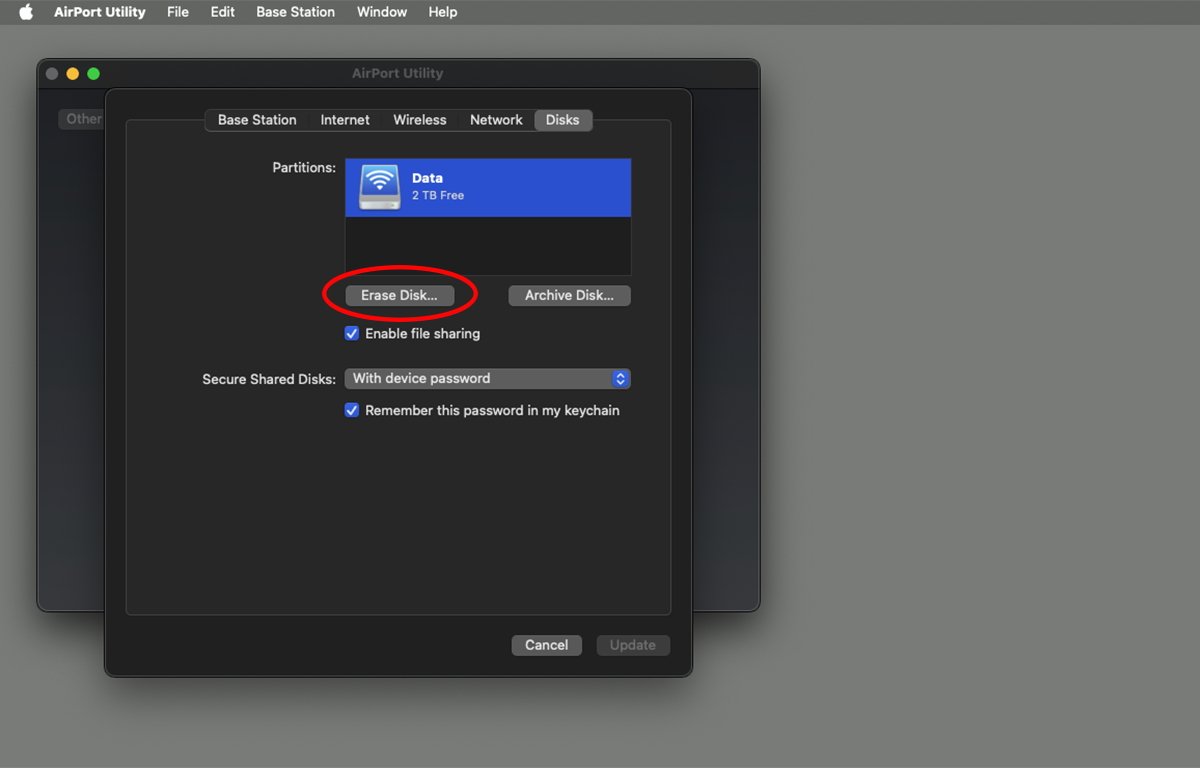
Erase the disk.
Enter a new name for the drive, then click the Erase button. You'll get a warning sheet next asking if you are sure you want to erase the drive.
Click the Continue button and AirPort Utility will erase the drive and install a new filesystem onto it.
You can also click the Shared Disk checkbox in the Erase pane before erasing to enable networked file sharing on the new drive when the erase completes.
While the disk is being erased, the status light will blink amber. When the erase completes, the status light will turn back to solid green, and its indicator light in the Apple AirPort utility should also go green.
The restore and upgrade is now complete.
Time Capsule initial set up
If you did a hardware reset using the Reset button on your Time Capsule, next you'll need to run Apple's AirPort Utility to set it up.
Run macOS's AirPort Utility located on your Startup Disk at /Applications/Utilities/Airport Utility.
If you see your Time Capsule in the list of devices on your network, select it. If you don't see your Time Capsule listed, click the Other Wi-Fi Devices button in the upper left corner of the main window.
When you do you'll see a list of recognized Airport Devices on your network that AirPort Utility can set up. From the device list select your Time Capsule.
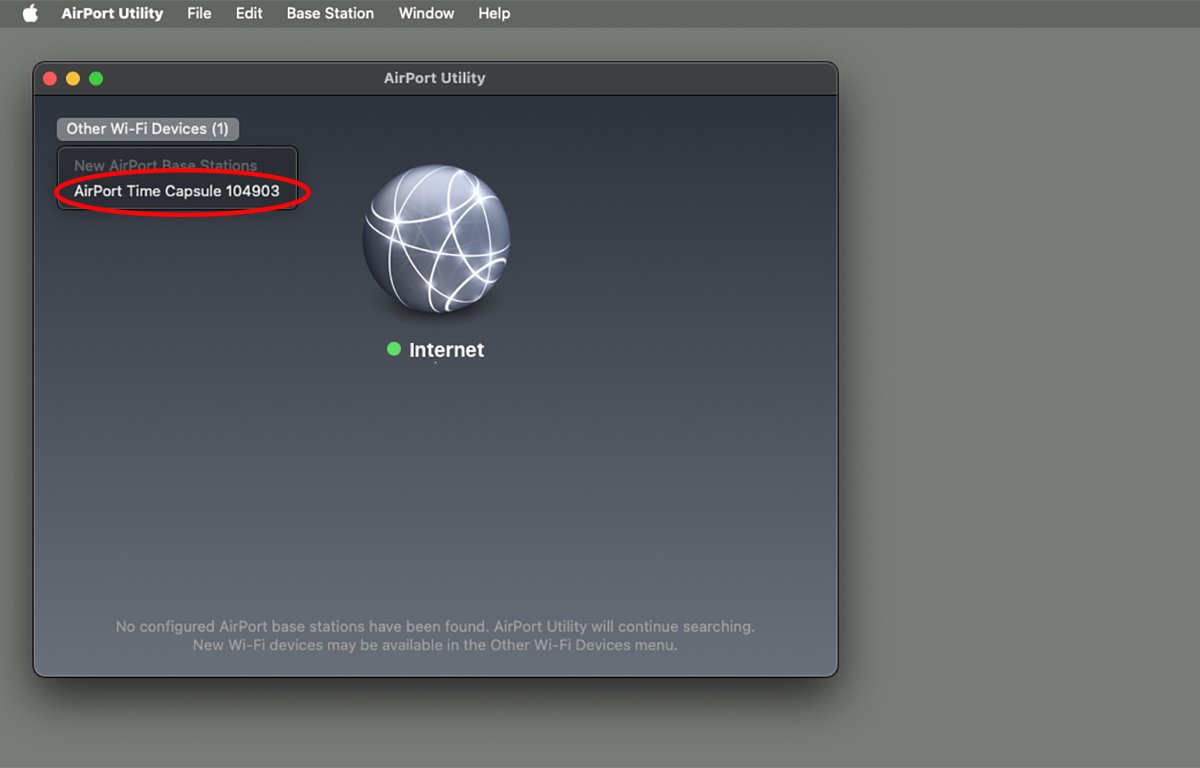
Select your Time Capsule device.
AirPort Utility will probe your LAN and the Time Capsule you selected and attempt to join your Mac's default network. Once connected, AirPort Utility will display a setup sheet titled "This AirPort Time Capsule will create a network".
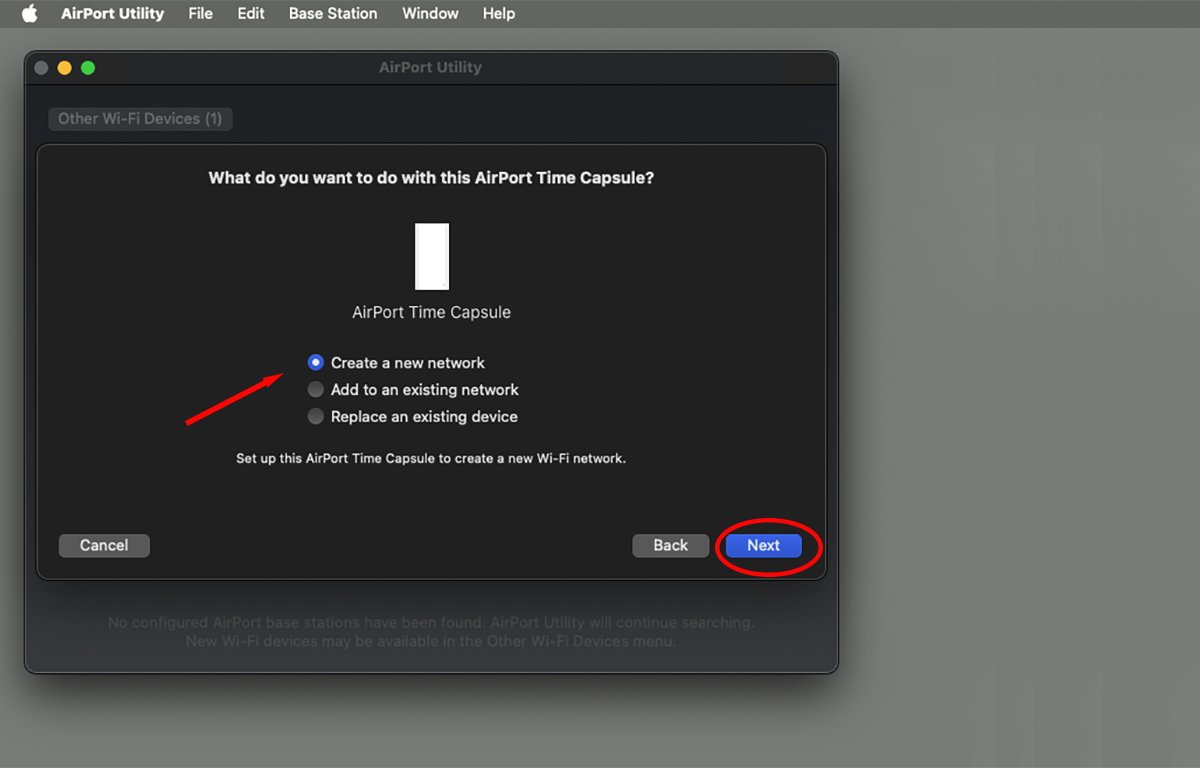
Choose how to set up your Time Capsule.
It does this because remember - Time Capsule devices are also AirPort base station devices - so AirPort Utility assumes you also want to set up the Time Capsule as a Wi-Fi network access point.
If you don't want to do this, click the button Other Options in the lower left corner. This causes the setup sheet to change to a sheet asking you how you want to use your Time Capsule.
When setting up, you get three choices:
- Create a new network
- Add to an existing network
- Replace an existing device
If you want to create an entirely new Wi-Fi network, with a unique name and password, select the first option. This lets you set up the Time Capsule as an AirPort Wi-FI access point much like you would in the default setup.
If you want to use the Time Capsule solely for backup or as a NAS drive only, then select the second option. This sets up the Time Capsule as a networked backup drive, but not as a Wi-Fi access point.
The third option allows you to transfer settings from an existing AirPort or Time Capsule device on your network, and use the new Time Capsule as a replacement device for the original device.
Unless you want to create a new Wi-Fi network or subnet on your existing network, or unless you want to replace an old device, you usually want the second option.
If you select the second option and complete the setup, the Time Capsule will join an existing LAN as if it were a bridge or router, or as a shared NAS device. You can use the first option to create a new network, for example, to isolate a group of users to only this device or any devices it bridges to - instead of giving those users access to your entire network.
In most cases, you will only want to use the first option if the Time Capsule is going to be used as a network connected directly to your cable or DSL modem. For subnetworks or to use the Time Capsule as a Time Machine backup device or shared disk, choose the second option.
At any rate, selecting either the first or second option allows you to specify a network name, a base station name, and a network password for users to use when they log in.
Enter the new network info in the Airport Utility setup sheet and click Next.
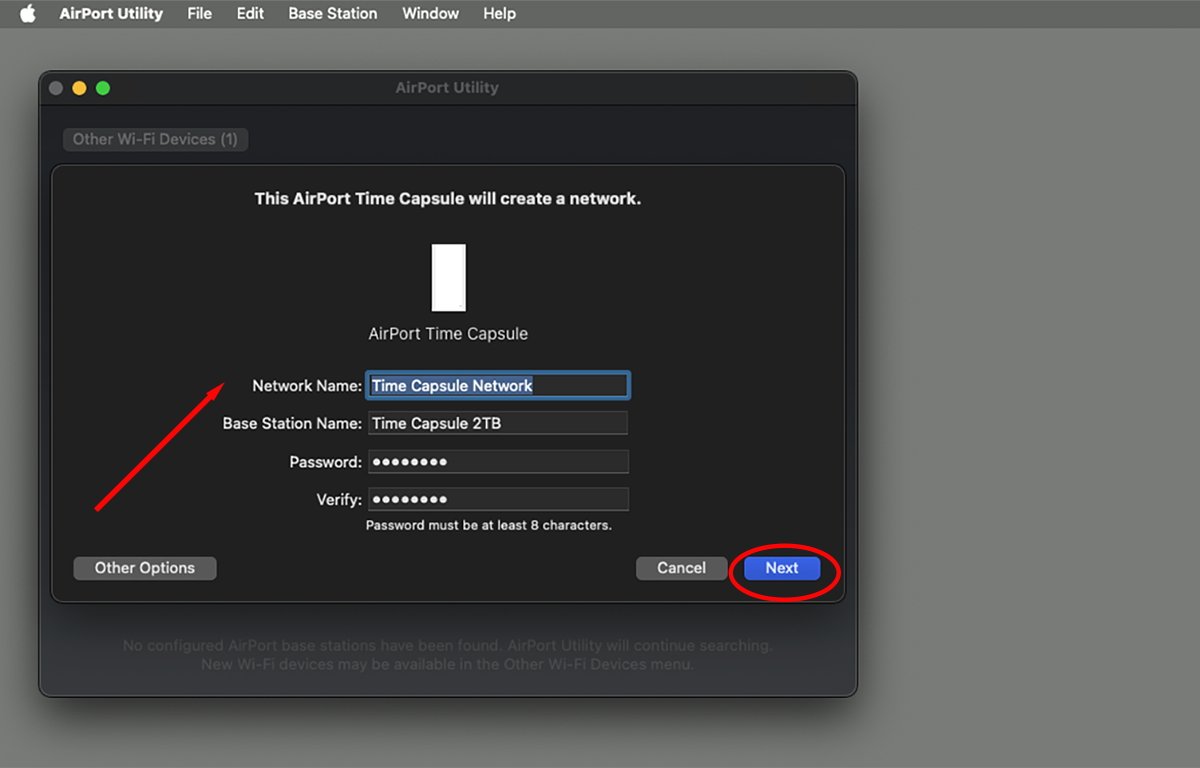
Enter a network name and base station name. Click "Next".
Next, you'll be asked whether you want to send AirPort Analytics to Apple or not. Choose Send or Don't send. Click Next.
If everything completes, Airport Utility displays "Time Capsule Network" is now available. Setup complete". Click Done.
At this point, the Time Capsule is now on your network and wireless users can connect to it by selecting the network you just created and logging into the device.
AirPort Utility should display the new Time Capsule in its main window.
If the device needs a firmware update, and an internet connection is available, Airport Utility will display an alert asking you if you want to update the firmware. Click Update.
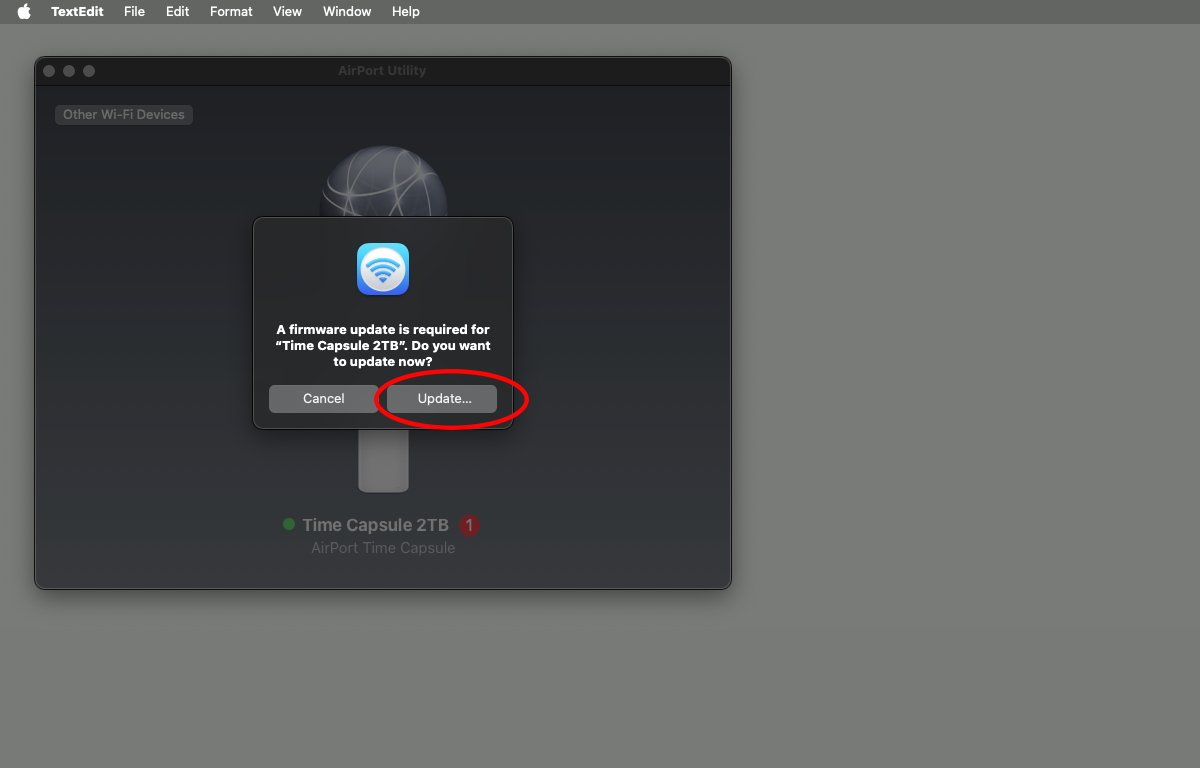
Update the firmware, if needed.
AirPort Utility will download, prepare, and begin updating the Time Capsule's firmware. This may take a few minutes. Don't turn the power off to the device during the update.
When the update completes, the Time Capsule will restart automatically. You should see the status light go amber, then green after restart.
If everything worked as expected, you should now see your Time Capsule listed as a device connected to the internet in AirPort Utility:
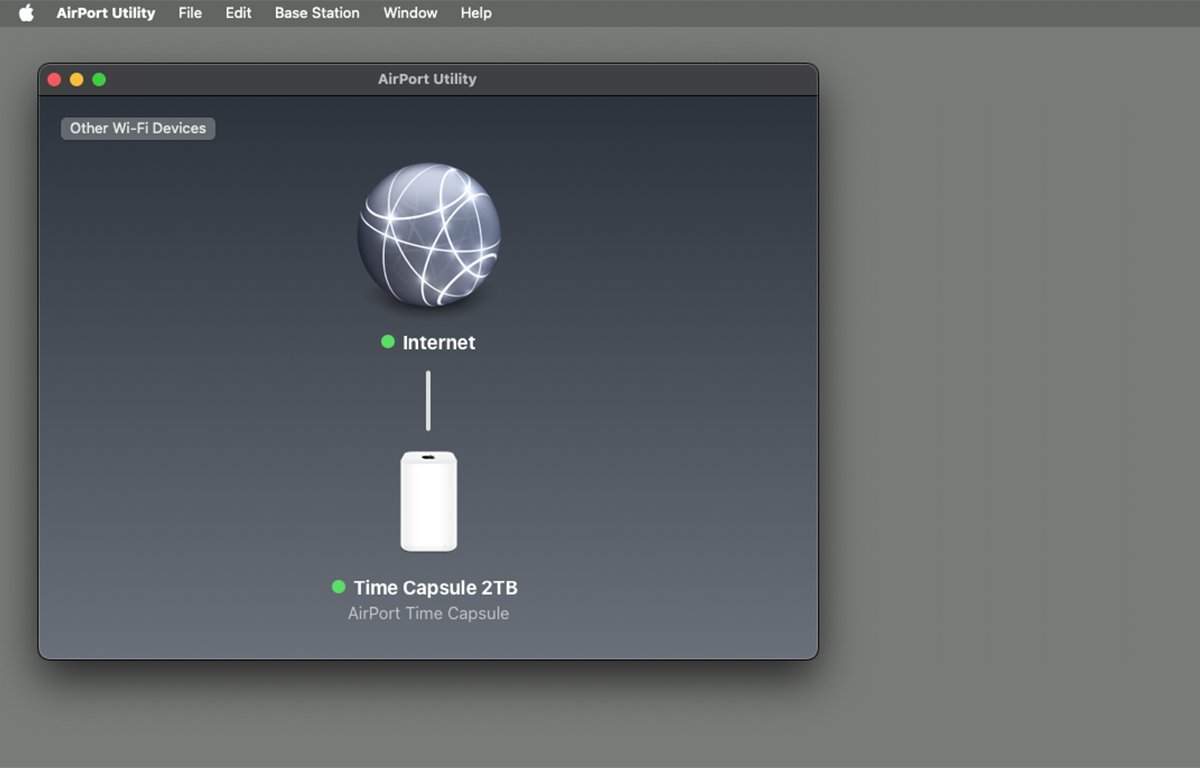
Setup complete.
If you click the Time Capsule in AirPort Utility, it will display a popover with connection details, serial number, version number, and an Edit button. To set up the Time Capsule's internal hard drive as a shared disk, click Edit, then proceed to the previous section titled "Erase new drive".
Finder access
If everything went according to plan, and you've turned on File Sharing in the macOS System Settings app, you should see your Time Capsule appear in the Finder window sidebars under the "Network" section.
To use the shared disk in the Time Capsule as a NAS drive, single-click Network in a Finder window's sidebar. When you do, you'll see your Time Capsule appear in the Finder window along with other network devices.
To access your Time Capsule in the Finder window, double-click it. It will connect - if you set a shared drive password when formatting or reformatting the Time Capsule's internal hard drive, enter it now in Finder when prompted.
After you enter a password if required, the Time Capsule's shared disk will mount in the Finder window as a shared folder:
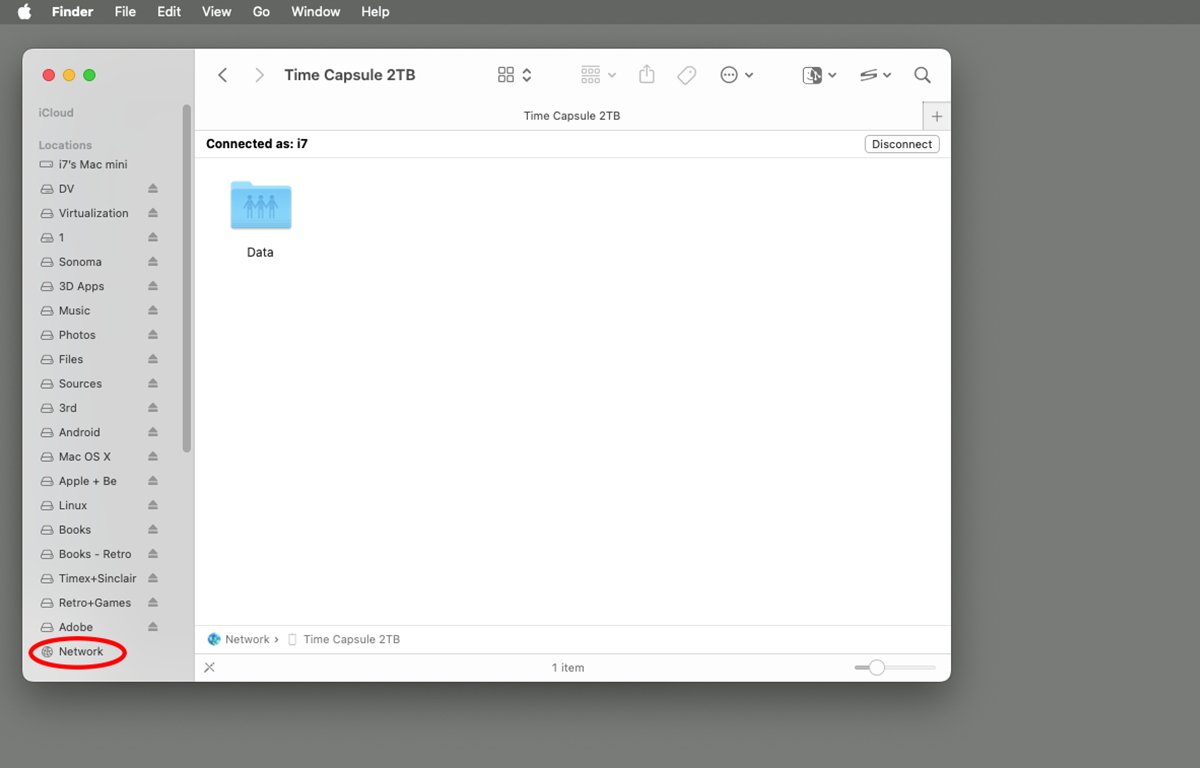
Connecting to your new Time Capsule.
Double-click the shared folder icon to access the Time Capsule's shared drive. You can now access the drive just as if it was any other networked drive on your Mac.
You can access the Time Capsule in the same way in Finder by selecting Go->Connect to Server from the Finder's menu bar at the top of the display, then clicking the Browse button in the Connect to Server window.
When you do, you'll see the same shared folder icon in the Finder's "Network" window. Double-clicking the shared folder mounts the Time Capsule's shared drive on the Finder's Desktop just as it would any other networked drive.
Final step
Now that your Time Capsule is fully refurbished - and all the software and firmware have been restored and set up, it's time for the final step: replacing the bottom cover on the device.
To do so, set the cover on the bottom of the device in its original orientation, then while standing over the device, give the bottom cover one firm solid push on both sides with the palms of your hands. This will firmly seat the cover back in its original position.
Prepare to reseat the cover.
There should be no seams or gaps on any side of the cover. If there are, you'll have to remove it again, check that the shock absorber is seated properly and that there are no protruding wires or connectors, and close the bottom cover the same way again.
Note that the notch in the cover for the power port must be on the correct side or else the cover won't close properly.
Time Capsules are still great devices for setting up small local NAS units on your LAN to share files between computers, do network backups, and store files you use often.
Although these devices are now almost a decade old or more, they're still useful - and their low cost on the used market makes them even more attractive.
You may want to add an external USB disk to your Time Capsule as 2TB or 3TB these days may be inadequate for some uses, but even without an external disk, they are still very useful.
In future articles, we'll look at how to do network backups on your LAN using a Time Capsule - with and without Apple's Time Machine app.
Read on AppleInsider

Comments
However, I've lost trust on Time Machine the software and Time Capsule the hardware. For the former, in particular, I just grew tired of having to throw backups away every few weeks and restart from scratch after the dreaded error message I'm too lazy to Google for now -- and this is even if backing up to "new" hard drives that are very unlikely to be defective. I also had a huge scare after trying to restore from a Time Machine-backed up hard drive to a new M3 Max MacBook Pro and having many, many, many (dare I say the majority) of my files missing. I simply can't and won't ever trust Time Machine again after this episode.
Currently I'm using a mixture of Carbon Copy Cloner, a GUI interface to BorgBackup called Vorta, and Arq Backup. By the way, if you have "small" amounts of data, an external high-performance SSD is something I just cannot recommend enough. I'm using the Crucial X6 (which is not super-high-performance, as there are faster models at a small cost increase) and couldn't be happier with it. I believe the diversity between mechanical and solid-state drives also reduces the chance of losing all your backups.
As for the other poster - Time Machine still provides exceptional backup for multiple computers (iMac, MBPs) even though they run a mix of MacOS. I've never had a catastrophic failure of Time Machine - but I have had hard drives fail, which is why I do a rotation on those (including off site for maximum safety/security). I'm currently using a 18Tb WD as my primary backup hard drive.
The device is ages old. I’d love some tips to bring it closer to a modern device.
Also, “You can't use a replacement SSD drive because the Time Capsule uses a custom SATA drive board that only fits 3.5" SATA hard drives,” doesn’t seem like an accurate statement. You can use a $10 adapter from Amazon to turn a 2.5” SSD into a 3.5” format. I would have loved to see some info on how that would work out. Is it faster? Does it even work?
It also functions as an Ethernet switch/router, I forget what I did to get it to do that (function as a dumb, pass-through Ethernet switch/router, but not as a Wi-Fi access point). The article addresses this, but I seem to remember having to adjust the settings a bit more than the article suggests. Probably due to the fact I was replacing my old, AirPort-based Wi-Fi access with a mesh network at the time, so I wasn’t starting with a clean installation…
This article looked exciting until I read this part: “You can't use a replacement SSD drive because the Time Capsule uses a custom SATA drive board that only fits 3.5" SATA hard drives.” Of course you can attach a large SSD to the USB port, but it’s not going to be very fast. But NAS devices are probably limited more by the network speed than the storage device so it would be more cost effective to use a high capacity hard disk, maybe even one specifically design for NAS.
ICLOUD IS NOT A BACKUP
DO NOT DO THIS
As you mentioned, iCloud+ is not a backup system, which raises some eyebrows when it comes to the higher end of the storage options available via iCloud+ subscriptions. I was getting close to the 200 GB limit and upgraded to the next tier, which is 2 TB. I will probably never need anywhere near 2 TB of file synchronization storage so I have a ton of unused allocation just sitting there. Why not use it as another tier in my backup strategy via a "Time Machine in the Cloud" or third part connector? I have a hard time imagining too many individuals who need 12 TB of file synchronization storage. Professional photographers and video photographers I suppose, but individual users who want a reliable backup, or a secondary off-premises backup, why not provide a way to use some of their excess iCloud+ allocation for another layer of safety net?