Review: Pioneer w6400nex offers easy-to-install wireless CarPlay
Pioneer's wireless CarPlay aftermarket units are routinely great, and the AVIC-W6400NEX is among the very best if you need a DVD/CD player.
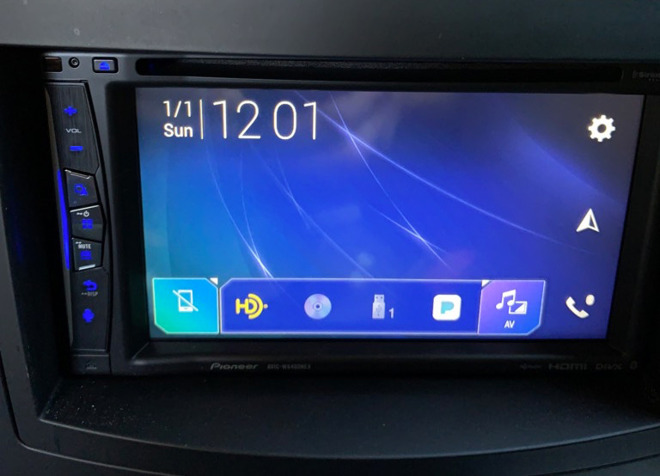
The home screen of the Pioneer AVIC-W6400NEX
The ending suffix, NEX, stands for Networked Entertainment eXperience. Basically, that means that it works with smartphones, iDatalink Maestro, Siri-Eyes Free, Pandora, has a 13-band EQ, built-in Auto EQ, and probably an HDMI input as well.
The hundreds place denotes generation: an AVIC-8000NEX was the top-of-the line first generation unit that was CarPlay-compatible via a firmware update for the radio. It retailed for $1400 when new in 2014, and even as recently as November 2018, it was still getting firmware updates.
Today, we have the AVIC-W6400NEX to put in the car.
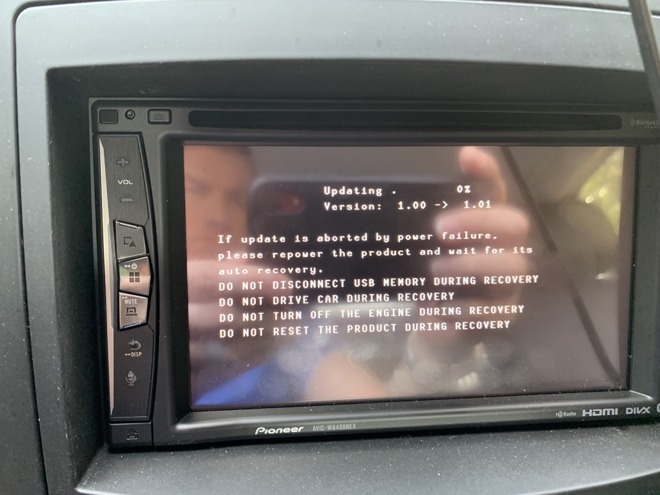
Upgrading the Pioneer AVIC-W6400NEX provides lots of DO NOT warnings
Do not use Happy Fun Ball on concrete, do not taunt Happy Fun Ball.
Essentially, AppRadio is a form of screen-mirroring Waze to the touchscreen and using the Pioneer's GPS antenna to provide better navigation services than the phone GPS antenna. Waze support was discontinued, and Pioneer have included their own navigation to fill that gap.
What we've got here is an In-Dash Navigation AV Receiver with 6.2" WVGA Touchscreen Display, DVD drive, CarPlay that works wired or wireless, AppRadio functionality, Siri Eyes-free, and for our Android friends, Wi-Fi Miracast mirroring. Notably, this unit is not Android Auto compatible.
For the 5th generation of this kind of product, things are starting to get pretty refined.
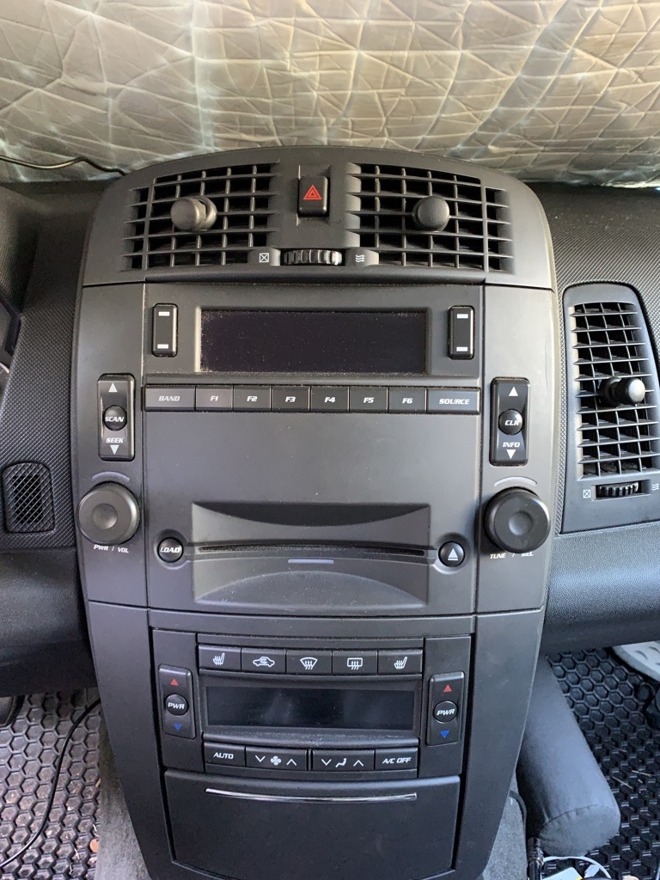
The 2005 Cadillac testbed
What we like about it (besides the ride) is the ease with which this generation's dashboard comes apart. It's pretty much "pop up the top vents, remove an ashtray screw, pop out the HVAC controls, remove the four screws that secure the radio.
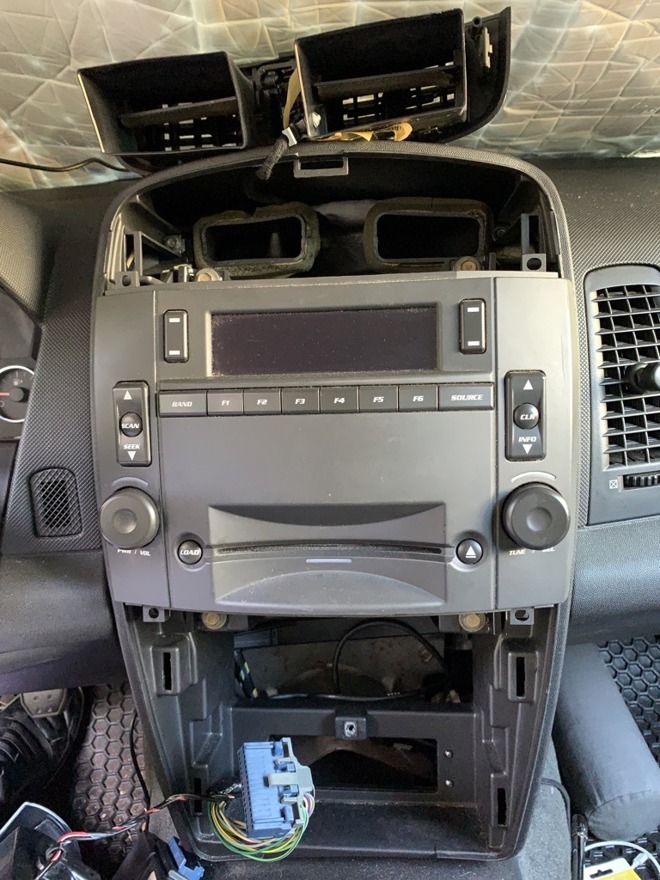
The center stack is easy to access for radio changes
It has CANBUS, but doesn't have a lot of useful support in Maestro's iDatalink products for bringing car features into aftermarket radios. It does have steering wheel controls and a Bose-branded amplifier and speakers, which were actually made by Alpine for GM.
For this installation, we use the PAC-AUDIO OS2C-CTS to integrate with the factory-equipped Bose system. The steering wheel controls are addressed by Metra's ASWC-1, which we like because it automatically programs itself for the car and radio.
Conveniently, the ASWC-1 also can be firmware updated with Android and iOS apps (when used with an USB-OTG cable for Android or an additional AX-HUB box for iOS.) This is way better than the old way of having to press a switch a specific number of presses, press a steering wheel button at just the right moment, and hope that it programs the way you wanted it to.
In the past, we've used PAC-AUDIO's CP-5 for steering wheel controls. It also works with an iOS app, but that unit doesn't auto-program itself, and it bricked during a firmware update. ASWC-1 will be the choice for this install, then.
It's worth planning out the install a little. Besides standard speaker mode, or using RCA low-level outputs to amplifiers as has been common for ages, Pioneer has a network speaker mode, where you give up rear speaker functionality and instead divide speakers into the frequency range they cover, instead of their location in the car.
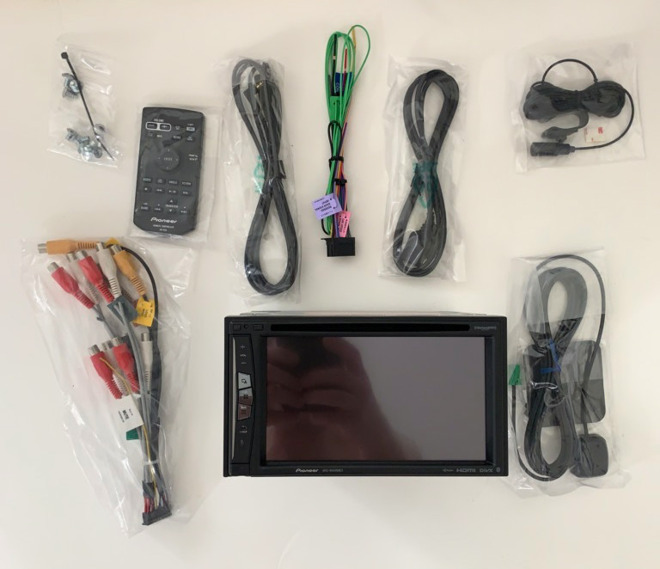
planning the install
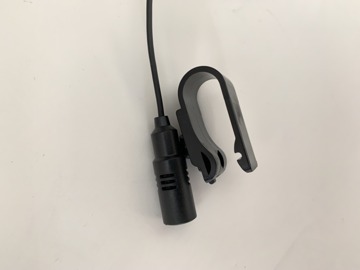
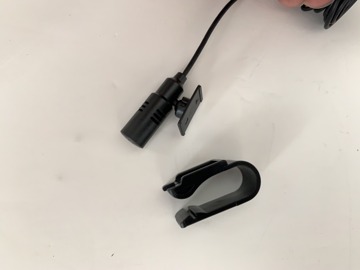
Note the microphone mount: it can be clipped to a sunvisor, but if you prefer to use 3M VHB (very high bond) double-sided tape, you can remove the sunvisor clip and stick it somewhere useful, like on the center stack, on the A pillar, or up by the rear view mirror.
There are two separate wiring harnesses here, one for power and audio, and another for all the RCA camera connections.
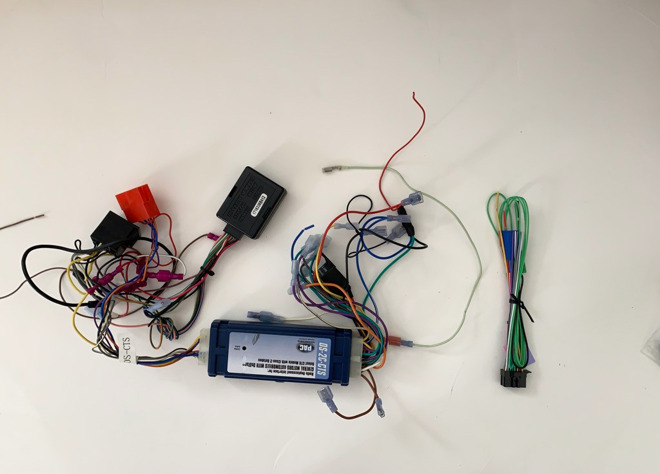
assembling the wiring harness
For our initial install, we ignored the camera connections and just got audio and steering wheel controls working.
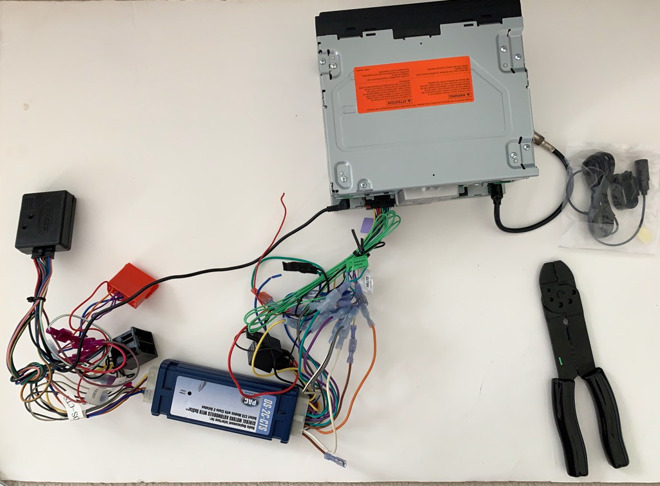
checking that everything connects
The install went relatively easily. We connected everything up and before we bolted the radio into place, we took this opportunity to update the firmware on the steering wheel controls and program them for the car and radio.
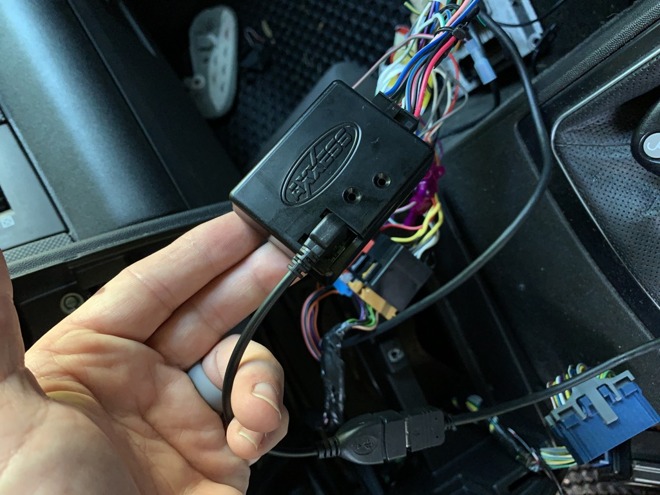
connecting the ASWC-1 steering wheel controls and programming them over micro-USB
Updating the firmware happens through an Android app and USB-OTG cable, because honestly, we don't budget for the AX-HUB device to make it work with iOS. Once the ASWC-1 is in programming mode, holding down Source (volume up for most cars) on the steering wheel identifies the car to the device and it programs for the radio.
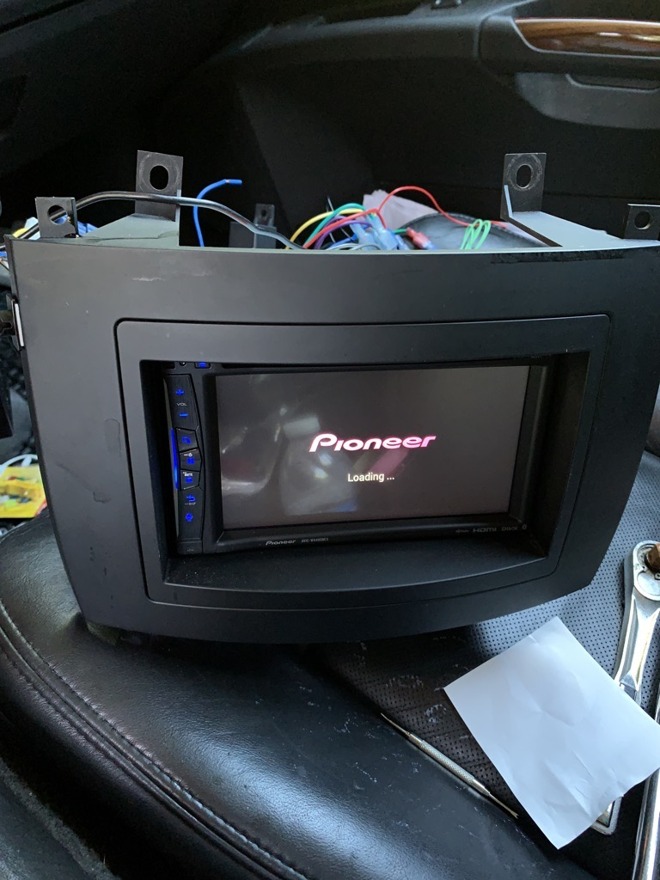
Applying power to test
With the radio sitting in the passenger seat, it's easy to verify that all the connections are working, that it's getting GPS signal. If we had connected cameras, it would be a good opportunity to check that they worked when we put the car in reverse.

The home screen for the Pioneer AVIC-W6400NEX
In previous models of NEX radios, tapping on the clock would allow you to set the time. In this model, it doesn't. How are you supposed to set time away from 1/1 12:01?
This is Pioneer attempting to make it easy on you. If you have the GPS antenna connected, it won't automatically set the time, but if you go for a short drive long enough for the GPS antenna to acquire signal, the clock will automatically update.
Honestly, we were good with just tapping on the clock to set time in the past.
The volume control in CarPlay is very out of place with the rest of CarPlay. It's kind of forgivable that Pioneer has this ugly interface if they were trying to support both Android Auto and CarPlay, but they aren't on this unit. They could do a lot better at making an interface that feels less jarring alongside iOS.
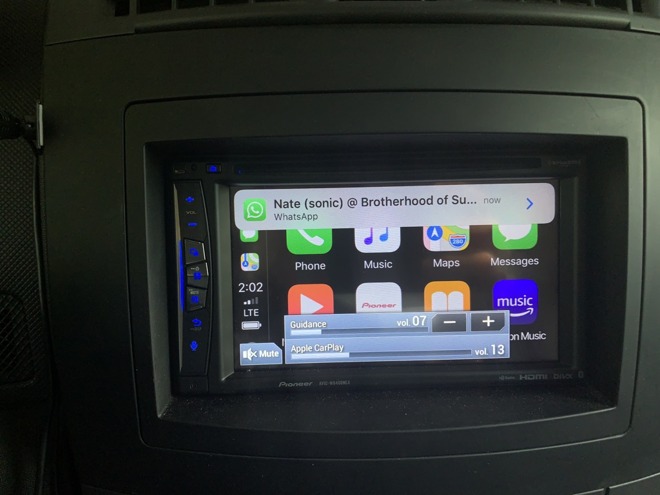
two volume controls in CarPlay
Volume controls for guidance is separate from CarPlay volume.
Pioneer does provide an overlay from one of the buttons on the left of the radio which gives a nice day/night mode button. It also gives another entry point into settings, which is a little silly. It's a button press and a tap from this display, and a button press and a tap from the home button then the settings gear.
Having it here is redundant, as it doesn't save time.
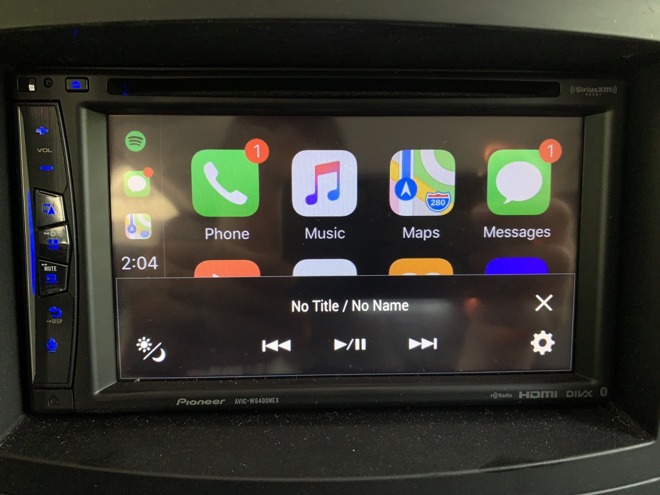
the Pioneer overlay in front of CarPlay
The FM tuner screen is likewise pretty busy, and not very well-designed. This is the same as it has been since 2014 for Pioneer. It isn't bad for what it allows the user to do, but there's unused space at the bottom of the screen, and the widgets are very ugly.
The interface widgets are a combination of squares and squares with cut corners (the FM / AM widget). The "i" button next to the station cover art changes the space below the station name to show what's playing as tracks on HD1 and HD2.
There's visual clutter by having the input name (HD Radio) as a gray bit of low contrast writing behind the FM/AM selector.
This isn't the worst FM interface we've seen, but it's not pretty. Basically, when we use it, we switch away to CarPlay's home screen just to have something not garish to look at.
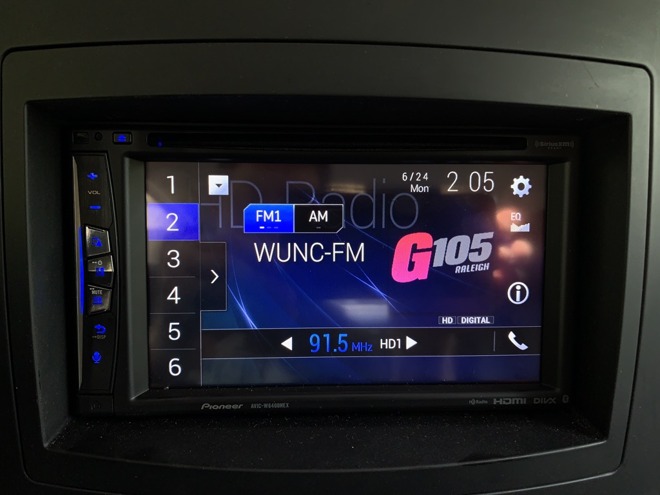
Also, the RDS data is cached weirdly in the headunit. The G105 logo is for a previously tuned station, not the currently tuned 91.5 FM.
If you have people who join your radio for CarPlay and tap through the menus, their phone will be forever in the phone switch menu... almost.
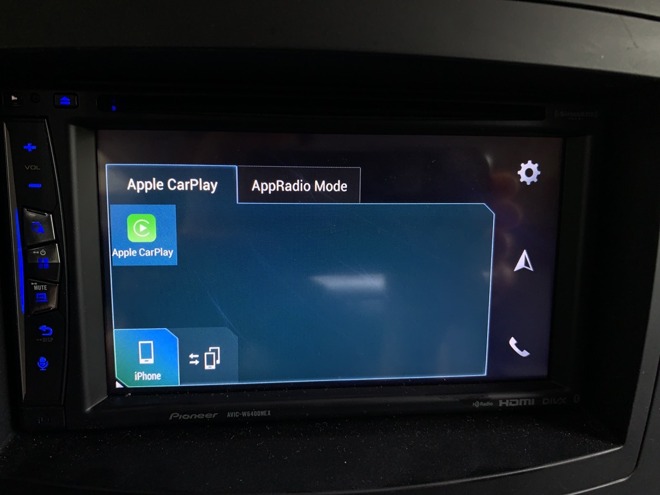
The interface for switching between multiple connected iPhones
The way to remove a phone from wireless CarPlay is through the Settings of the radio, then Bluetooth settings. This makes sense if you had actually paired the phone via Bluetooth, but wireless CarPlay doesn't show that as the process, so it's not obvious.
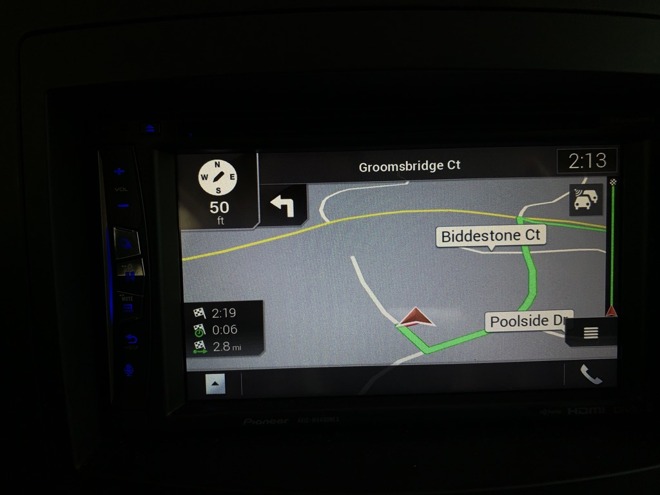
GPS navigation in the WVIC-W6400NEX
The maps interface is pretty plain. It's basically the same 2D / 3D perspective shift view that you'd get on a 2013 Windows Phone. This is unexpected, because Pioneer has used maps providers with more interesting interfaces in the past.
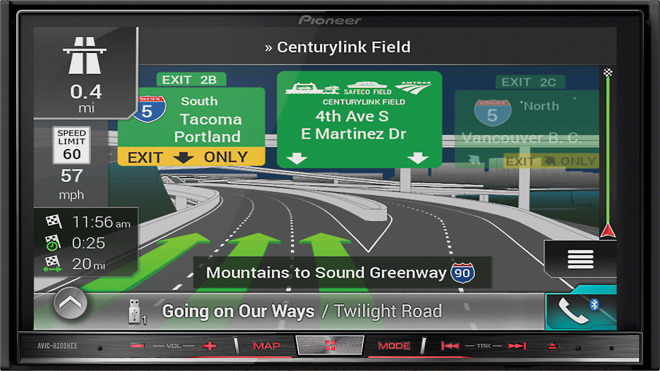
Look at those arrows on the road lanes
In the old navigation, lane guidance is on the road itself. In the current radio, the lane guidance is a white arrow on the highway roadsign - the other lane arrows are grayed out. This seems like a much more subtle way of guiding the driver, and maybe it's a worse approach.
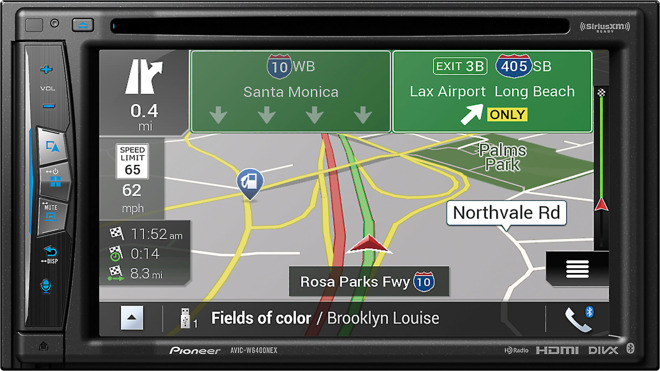
You have to know to look at the road sign to see the exit arrow is white
The difficulty is balancing how much information needs to be displayed versus how much is overwhelming. It also comes down to what their partners will provide. Even so, we will probably use Apple Maps in CarPlay versus the built-in navigation.
When it comes to privacy, Apple protects your maps history behind your passcode.
It's possible to select a destination from route history in Pioneer's Navigation, but it's a few levels deep to delete it. On the main UI where you would enter an address, there is a button that says History. Tap on that, and you're taken to another page where the address will be listed, tap on the little square box to the right of the address that you want deleted and a dialogue will pop up offering to Delete or Close. But that's not the end of it: then you have to tap on delete, and another box pops up and says "Do you want to delete this history item?", and only then when you tap OK will it delete the address from the history.
Other features include trip logging, which can be enabled automatically, or fuel mileage logging.
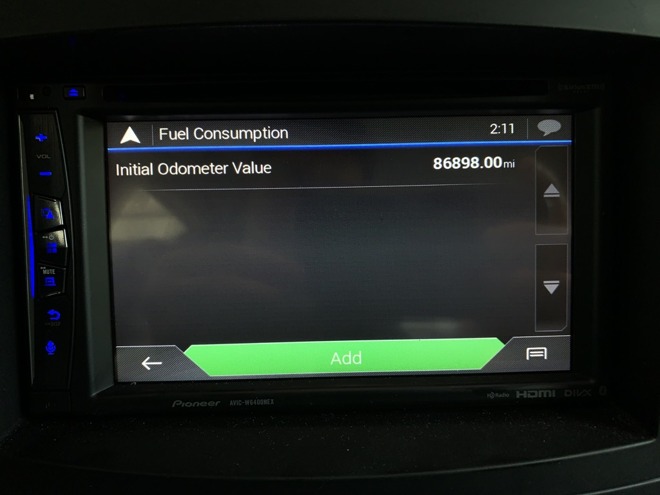
Fuel Mileage screen
You have to manually enter the first odometer reading, and then manually enter in the details when refueling.
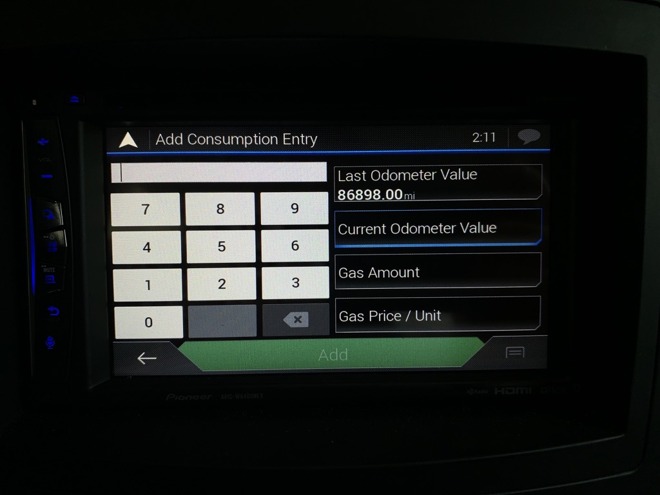
entering fuel mileage odometer readings
The trip computer has a nice enough display, although its graphics don't seem to match up well to the interface of the rest of the radio. Before, everything on the main screen is a flat interface. The FM radio interface and sources have that low contrast name of the source in the background.
Here, we get beveled edges on the gauges and a photorealistic compass gauge. It's weird and inconsistent.
What Pioneer needs to do is design interface guidelines that are neither Android Auto or iOS, but feels close enough to both as to not be jarring when moving between them.
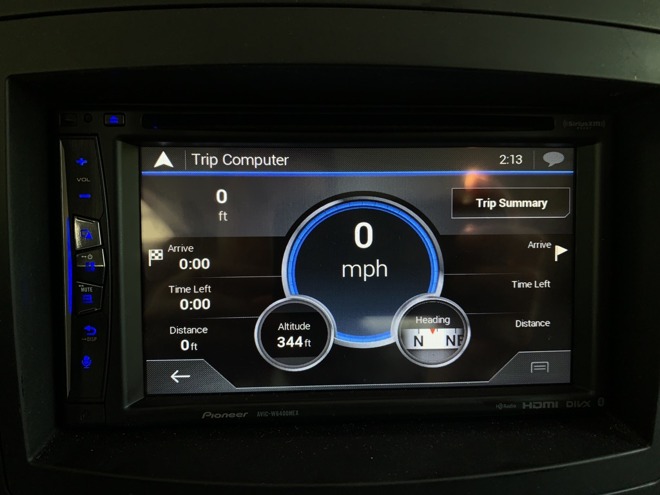
The Trip Computer interface doesn't look like any of the other interfaces
The Pioneer implementation of it is good. In fact, other than having an inconsistent interface, Pioneer's FM tuner is quite functional, especially at making it easy to use the HD radio subchannels. Other radios we've reviewed have had difficult to use interfaces, where Pioneer's works but is clunky and dated visually.
It's also worth noting that when you plan your installation and use a product like Maestro's iDatalink that you check the features of the car that the radio will support: for example, most CarPlay radios will retain rear view cameras installed by the factory in your car.
However, some radios support more features than others, including multiple cameras, dynamic parking overlay, or even integration with radar detectors. The AVIC-W6400NEX supports cameras, proximity sensors, and gauges on the radio among other features, but doesn't support the full set that of features that some other CarPlay radios may. Check installation accessories carefully in order to see which features are present.
The audio portion of the Pioneer AVIC-W6400NEX is competent. It has 50W by 4 channels. It's got 4V RCA preamp outputs, for use with aftermarket amplifiers. And like units of Pioneer's past, it's got a time alignment and EQ measurement system: you plug a microphone into the aux jack, it plays white noise through the different speaker channels, and creates an EQ and time delay of the channels suitable for your listening position.
The Pioneer AVIC-W6400NEX is a solid offering if you want wireless CarPlay and need a CD/DVD player. It's got HD radio, and retains many of the features of OEM radios it replaces, when installed with compatible accessories. It's got built-in navigation based on HERE maps, if you don't want to rely on the options available via CarPlay (Maps, Google Maps, Waze, and more.)
In spite of the mixed interfaces, it remains one of the easiest to install and use CarPlay offerings.

The home screen of the Pioneer AVIC-W6400NEX
A Little History
Pioneer organizes their range like this: There's a main series of device, denoted by AVH, DMH, AVIC or similar, then there's a four digit numeral, which denotes the place in the model lineup. The 1000 series is at the low end of the model lineup, the 4000 series is a flagship disc-less model, 6000 is a flagship DVD-equipped model, and 8000 series is as top-of-the-line as you'll find.The ending suffix, NEX, stands for Networked Entertainment eXperience. Basically, that means that it works with smartphones, iDatalink Maestro, Siri-Eyes Free, Pandora, has a 13-band EQ, built-in Auto EQ, and probably an HDMI input as well.
The hundreds place denotes generation: an AVIC-8000NEX was the top-of-the line first generation unit that was CarPlay-compatible via a firmware update for the radio. It retailed for $1400 when new in 2014, and even as recently as November 2018, it was still getting firmware updates.
Today, we have the AVIC-W6400NEX to put in the car.

Upgrading the Pioneer AVIC-W6400NEX provides lots of DO NOT warnings
Do not use Happy Fun Ball on concrete, do not taunt Happy Fun Ball.
What It Is
The AVIC-W6400NEX is a wireless (the W in the product name) DVD (the 6000 series), 5th-generation NEX product. It's got built-in navigation, whereas earlier units used Waze via Pioneer's AppRadio functionality.Essentially, AppRadio is a form of screen-mirroring Waze to the touchscreen and using the Pioneer's GPS antenna to provide better navigation services than the phone GPS antenna. Waze support was discontinued, and Pioneer have included their own navigation to fill that gap.
What we've got here is an In-Dash Navigation AV Receiver with 6.2" WVGA Touchscreen Display, DVD drive, CarPlay that works wired or wireless, AppRadio functionality, Siri Eyes-free, and for our Android friends, Wi-Fi Miracast mirroring. Notably, this unit is not Android Auto compatible.
For the 5th generation of this kind of product, things are starting to get pretty refined.
Installing the AVIC-W6400NEX
Our usual car testbed is a 2005 Cadillac CTS. The car is right at the threshold of being dead-simple and more-complex, but the installation itself is fairly routine.
The 2005 Cadillac testbed
What we like about it (besides the ride) is the ease with which this generation's dashboard comes apart. It's pretty much "pop up the top vents, remove an ashtray screw, pop out the HVAC controls, remove the four screws that secure the radio.

The center stack is easy to access for radio changes
It has CANBUS, but doesn't have a lot of useful support in Maestro's iDatalink products for bringing car features into aftermarket radios. It does have steering wheel controls and a Bose-branded amplifier and speakers, which were actually made by Alpine for GM.
For this installation, we use the PAC-AUDIO OS2C-CTS to integrate with the factory-equipped Bose system. The steering wheel controls are addressed by Metra's ASWC-1, which we like because it automatically programs itself for the car and radio.
Conveniently, the ASWC-1 also can be firmware updated with Android and iOS apps (when used with an USB-OTG cable for Android or an additional AX-HUB box for iOS.) This is way better than the old way of having to press a switch a specific number of presses, press a steering wheel button at just the right moment, and hope that it programs the way you wanted it to.
In the past, we've used PAC-AUDIO's CP-5 for steering wheel controls. It also works with an iOS app, but that unit doesn't auto-program itself, and it bricked during a firmware update. ASWC-1 will be the choice for this install, then.
It's worth planning out the install a little. Besides standard speaker mode, or using RCA low-level outputs to amplifiers as has been common for ages, Pioneer has a network speaker mode, where you give up rear speaker functionality and instead divide speakers into the frequency range they cover, instead of their location in the car.

planning the install
Note the microphone mount: it can be clipped to a sunvisor, but if you prefer to use 3M VHB (very high bond) double-sided tape, you can remove the sunvisor clip and stick it somewhere useful, like on the center stack, on the A pillar, or up by the rear view mirror.
There are two separate wiring harnesses here, one for power and audio, and another for all the RCA camera connections.

assembling the wiring harness
For our initial install, we ignored the camera connections and just got audio and steering wheel controls working.

checking that everything connects
The install went relatively easily. We connected everything up and before we bolted the radio into place, we took this opportunity to update the firmware on the steering wheel controls and program them for the car and radio.

connecting the ASWC-1 steering wheel controls and programming them over micro-USB
Updating the firmware happens through an Android app and USB-OTG cable, because honestly, we don't budget for the AX-HUB device to make it work with iOS. Once the ASWC-1 is in programming mode, holding down Source (volume up for most cars) on the steering wheel identifies the car to the device and it programs for the radio.

Applying power to test
With the radio sitting in the passenger seat, it's easy to verify that all the connections are working, that it's getting GPS signal. If we had connected cameras, it would be a good opportunity to check that they worked when we put the car in reverse.

The home screen for the Pioneer AVIC-W6400NEX
Interface
Using the basic NEX interface for 2018-2019, the AVIC-W6400NEX is pretty easy to understand. The phone icon lets you select which phone of phones that have been paired with the unit. The audio sources are along the bottom, and the settings, navigation and phone are across the right.In previous models of NEX radios, tapping on the clock would allow you to set the time. In this model, it doesn't. How are you supposed to set time away from 1/1 12:01?
This is Pioneer attempting to make it easy on you. If you have the GPS antenna connected, it won't automatically set the time, but if you go for a short drive long enough for the GPS antenna to acquire signal, the clock will automatically update.
Honestly, we were good with just tapping on the clock to set time in the past.
The volume control in CarPlay is very out of place with the rest of CarPlay. It's kind of forgivable that Pioneer has this ugly interface if they were trying to support both Android Auto and CarPlay, but they aren't on this unit. They could do a lot better at making an interface that feels less jarring alongside iOS.

two volume controls in CarPlay
Volume controls for guidance is separate from CarPlay volume.
Pioneer does provide an overlay from one of the buttons on the left of the radio which gives a nice day/night mode button. It also gives another entry point into settings, which is a little silly. It's a button press and a tap from this display, and a button press and a tap from the home button then the settings gear.
Having it here is redundant, as it doesn't save time.

the Pioneer overlay in front of CarPlay
The FM tuner screen is likewise pretty busy, and not very well-designed. This is the same as it has been since 2014 for Pioneer. It isn't bad for what it allows the user to do, but there's unused space at the bottom of the screen, and the widgets are very ugly.
The interface widgets are a combination of squares and squares with cut corners (the FM / AM widget). The "i" button next to the station cover art changes the space below the station name to show what's playing as tracks on HD1 and HD2.
There's visual clutter by having the input name (HD Radio) as a gray bit of low contrast writing behind the FM/AM selector.
This isn't the worst FM interface we've seen, but it's not pretty. Basically, when we use it, we switch away to CarPlay's home screen just to have something not garish to look at.

Also, the RDS data is cached weirdly in the headunit. The G105 logo is for a previously tuned station, not the currently tuned 91.5 FM.
Wireless CarPlay
CarPlay is excellent. Wireless CarPlay is even better, and we're pleased to see it on several of Pioneer's models. Like Wireless CarPlay on the Alpine ILX-107, and on the AVH-4400NEX, CarPlay uses Bluetooth to establish the initial connection and then join the radio's Wi-Fi network.If you have people who join your radio for CarPlay and tap through the menus, their phone will be forever in the phone switch menu... almost.

The interface for switching between multiple connected iPhones
The way to remove a phone from wireless CarPlay is through the Settings of the radio, then Bluetooth settings. This makes sense if you had actually paired the phone via Bluetooth, but wireless CarPlay doesn't show that as the process, so it's not obvious.
The Navigation
Navigation is a big feature for Pioneer in this radio. It has a menu icon front and center on the radio, above Phone. The maps are provided by Here, which used to be a part of Nokia. It's currently owned by a joint venture composed of Audi, BMW, Daimler, and Intel.
GPS navigation in the WVIC-W6400NEX
The maps interface is pretty plain. It's basically the same 2D / 3D perspective shift view that you'd get on a 2013 Windows Phone. This is unexpected, because Pioneer has used maps providers with more interesting interfaces in the past.

Look at those arrows on the road lanes
In the old navigation, lane guidance is on the road itself. In the current radio, the lane guidance is a white arrow on the highway roadsign - the other lane arrows are grayed out. This seems like a much more subtle way of guiding the driver, and maybe it's a worse approach.

You have to know to look at the road sign to see the exit arrow is white
The difficulty is balancing how much information needs to be displayed versus how much is overwhelming. It also comes down to what their partners will provide. Even so, we will probably use Apple Maps in CarPlay versus the built-in navigation.
When it comes to privacy, Apple protects your maps history behind your passcode.
It's possible to select a destination from route history in Pioneer's Navigation, but it's a few levels deep to delete it. On the main UI where you would enter an address, there is a button that says History. Tap on that, and you're taken to another page where the address will be listed, tap on the little square box to the right of the address that you want deleted and a dialogue will pop up offering to Delete or Close. But that's not the end of it: then you have to tap on delete, and another box pops up and says "Do you want to delete this history item?", and only then when you tap OK will it delete the address from the history.
Other features include trip logging, which can be enabled automatically, or fuel mileage logging.

Fuel Mileage screen
You have to manually enter the first odometer reading, and then manually enter in the details when refueling.

entering fuel mileage odometer readings
The trip computer has a nice enough display, although its graphics don't seem to match up well to the interface of the rest of the radio. Before, everything on the main screen is a flat interface. The FM radio interface and sources have that low contrast name of the source in the background.
Here, we get beveled edges on the gauges and a photorealistic compass gauge. It's weird and inconsistent.
What Pioneer needs to do is design interface guidelines that are neither Android Auto or iOS, but feels close enough to both as to not be jarring when moving between them.

The Trip Computer interface doesn't look like any of the other interfaces
What we think
Wireless CarPlay is, as you might expect, awesome. One of the great things about CarPlay is that as you update your phone, CarPlay upgrades as well, making the radio have a longer life and become more convenient over time.The Pioneer implementation of it is good. In fact, other than having an inconsistent interface, Pioneer's FM tuner is quite functional, especially at making it easy to use the HD radio subchannels. Other radios we've reviewed have had difficult to use interfaces, where Pioneer's works but is clunky and dated visually.
It's also worth noting that when you plan your installation and use a product like Maestro's iDatalink that you check the features of the car that the radio will support: for example, most CarPlay radios will retain rear view cameras installed by the factory in your car.
However, some radios support more features than others, including multiple cameras, dynamic parking overlay, or even integration with radar detectors. The AVIC-W6400NEX supports cameras, proximity sensors, and gauges on the radio among other features, but doesn't support the full set that of features that some other CarPlay radios may. Check installation accessories carefully in order to see which features are present.
The audio portion of the Pioneer AVIC-W6400NEX is competent. It has 50W by 4 channels. It's got 4V RCA preamp outputs, for use with aftermarket amplifiers. And like units of Pioneer's past, it's got a time alignment and EQ measurement system: you plug a microphone into the aux jack, it plays white noise through the different speaker channels, and creates an EQ and time delay of the channels suitable for your listening position.
The Pioneer AVIC-W6400NEX is a solid offering if you want wireless CarPlay and need a CD/DVD player. It's got HD radio, and retains many of the features of OEM radios it replaces, when installed with compatible accessories. It's got built-in navigation based on HERE maps, if you don't want to rely on the options available via CarPlay (Maps, Google Maps, Waze, and more.)
In spite of the mixed interfaces, it remains one of the easiest to install and use CarPlay offerings.

Comments
Kenwood has just upgraded the interface too and it looks like an improvement on older versions.
That said, Kenwood’s Australian models seem to require a cable connecting to the Vehicle Speed Sensor wire for wireless carplay to work, which makes install harder. Did the pioneer unit not require this? Maybe the GPS antenna connection was sufficient for Apple to enable wireless carplay?
https://smile.amazon.com/gp/product/B01L6Z1WYA/
Also: by grounding the e-brake line, you may be unable to access all the settings.
All of the bottom pictures are of it installed, but they do crop out the dash. When I get home, I'll put a picture in the comments for you.
I hate T-taps. They're also called vampire taps. They pierce the insulation on an existing line, which to me, is damage. The other pain is, if you don't have it pierced just right, they don't make the connection. Even when they are installed correctly, they rarely make the connection well, only contacting the wire on the sides where it's pierced. They're the source of a lot of install pain. If you use them and something doesn't work, check them first, they're likely faulty. What I prefer to do is use the opposite connector that mates to the factory end and make an adapter that lets me T off of my own harness. This way, everything's connected better and also doesn't cut any of the factory harness.
I will not recommend parking brake bypass chips in these reviews. I understand their uses, but features that are only exposed with the parking brake set are a part of the manufacturer's safety plan, and breaking that isn't in the scope of the review. We review how they intend it to work, not how it can be made to work.
Many features from the manufacturer of the car will also deplete a new fully charged battery in 14 days of sitting. When I had a Kenwood installed, I had the same experience. It turned out, I had other issues that were causing the drain: I needed to replace my ECU, because it was pulling amps when off. After replacing the ECU with a used one with a fresh OEM flash, the problem went away. This isn't to say that you need an ECU, but that many subsystems of a car pull power when the car is off, and you need to get an ammeter out and probe the multiple fuse boxes (my car has 3!) to see where the energy draw is and why.
It's close:
- Alpine ILX-107 = $619
- Pioneer AVH-W4400NEX = $474
- Pioneer AVIC-W6400NEX = $487
- JVC KW-M855BW = $599
- JVC KW-V950BW = $699
- Kenwood DDX8706S ($899.95) includes a CD / DVD player and the DMX9706 ($799.95) adds HD Radio® and has gold-plated 5.0-volt pre-outs. The DNR876S ($1399.95) also includes HD Radio and uses onboard Garmin® navigation.
These are the Wireless CarPlay options so far.