How to use an NVMe drive to upgrade your Mac's SSD

If you're not able to shell out $1000 or more for a new machine, you can squeeze out a few more years with a storage upgrade for some older MacBook Air or MacBook Pro models. Here's how to do it.
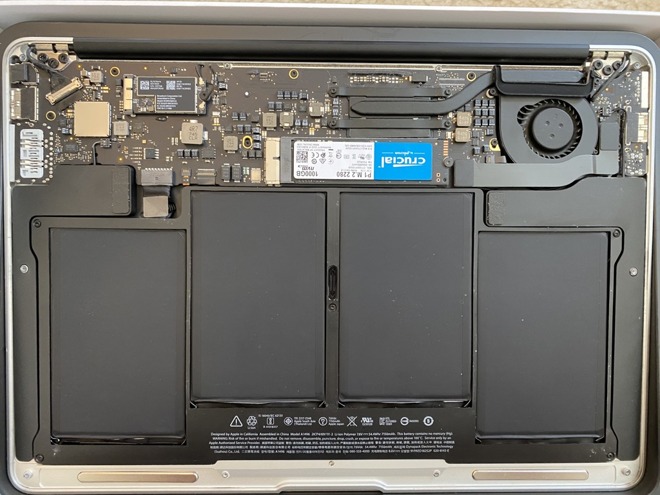
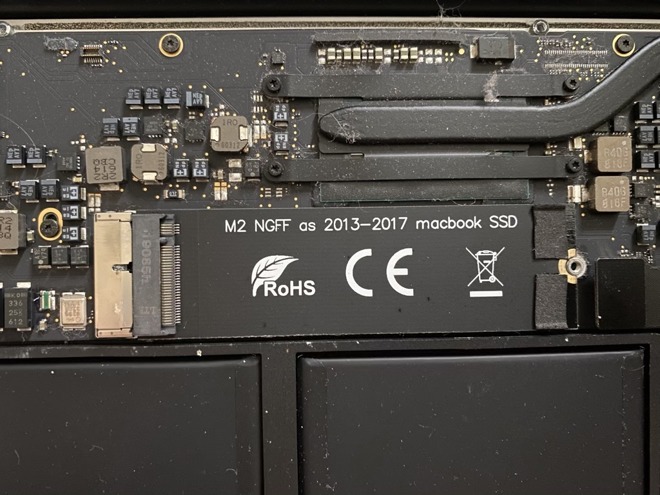
A new drive and adapter installed
This year, schools are offering in-person or virtual options. No matter which option your school is offering, the best new computer may be a computer that's new-to-you.
Last year, we purchased a 2015 MacBook Air with 8GB of RAM and 128GB of storage. The problem is that 128GB is not large enough to meet the school's requirements. They want 256GB or greater.
Both years are essentially the same computer, with a speed bump in CPU MHz. We could have also found a MacBook Pro, but those cost more and weigh more.
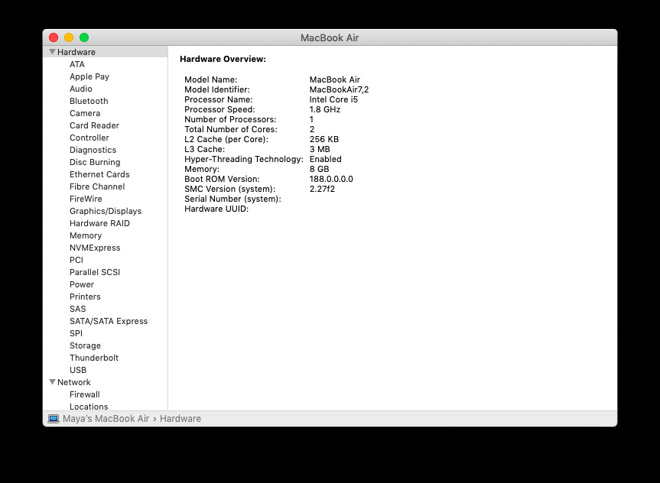
In general, any 2013 to 2017 MacBook Air, 2013 to 2015 MacBook Pro, and 2014 Mac mini can be upgraded, with good results. How can you tell if your computer is compatible with an upgrade? When you click on About this Mac, System Report, the Hardware Overview section has a Model Identifier number that you can use to determine compatibility.
Apple has different power management modes for increasing battery life. One of those can cause a problem for users who upgrade to an NVMe drive in a 2013-2014 machine.
Some of these machines will kernel panic when attempting to go into standby mode. Standby is where the computer records a snapshot of the current state of your computer to the flash drive, usually after about 3 hours. A Mac on Standby can stay charged for up to 30 days without being plugged in.
The solution is to prevent the computer from going into Standby. Here's how to do it.
2015 and later machines need no modifications like this at all.
At some point in the future, we will likely upgrade the machines to Big Sur, but not until it's been out for a few point releases.
While the WD Black SN750 can transfer speeds at a rated 3400 MB/s, it's not useful if the Mac can't support those speeds.
The Samsung drives have a history of working after firmware updates have been applied. The problem with firmware updates is that they require a Windows machine to install them. If you're preparing a computer for a student, this may be outside your comfort level.
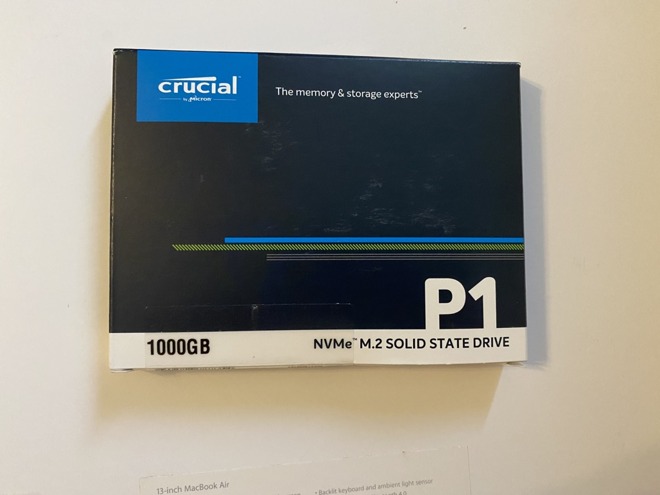
The Crucial P1 drives are affordable (1TB for $104) where every other terabyte drive was more money.
Our advice: buy the drive that's within budget and will meet the needs of your Macintosh and your school's recommendations.
For example, you could get a 4TB drive. It will be expensive. Practically, we targeted 1TB or fewer.
For a MacBook Air, the maximum speeds of the controller are between 700 and 1500 MB/s. The Retina 15" Mid-2015 MacBook Pro supports 4x lanes PCIe 3.0 speed, and can support 3000 MB/s.
The upgraded MacBook Air
For our MacBook Airs, the Crucial P1 makes sense. If we were upgrading a Retina MacBook Pro 15" from 2015, the WD Black might make more sense.
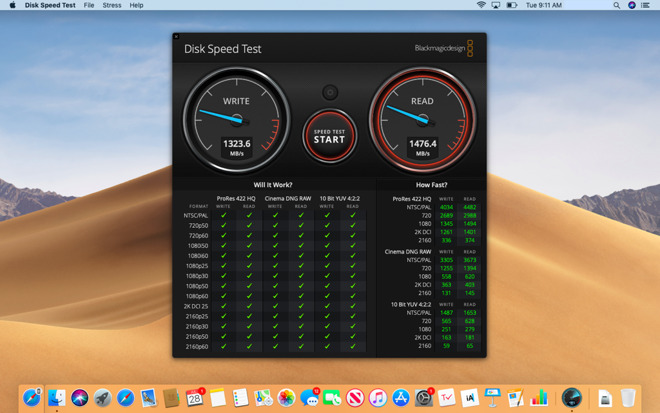
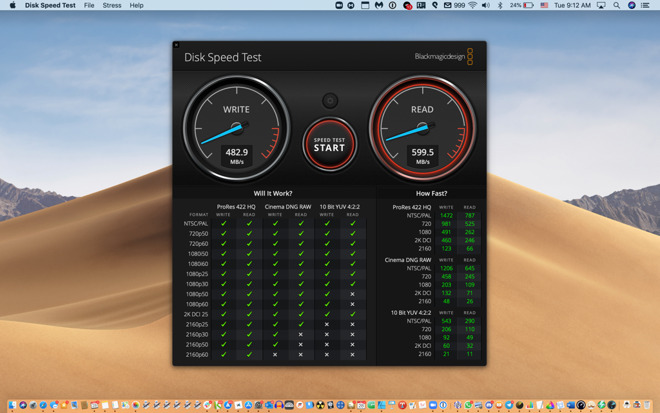
Even though we chose the slower Crucial drive, it reached 1476 MB/s read and 1323 MB/s write speeds on the MacBook Air. On our stock 2015 MacBook Pro, we get only 529 MB/s read, 482 MB/s write speeds.
The original drive in a 2014 MacBook Pro
It's worth noting that just because a drive is rated at a high speed it's possible to achieve less than that speed. For example, We tried the WD Black drive in a computer running Windows, and it reached 2900 MB/s. On macOS on the same computer, it reached 2400 MB/s.
There are a lot of variables, and while we're doing something not officially supported, it's still an impressive speed increase over stock drives.
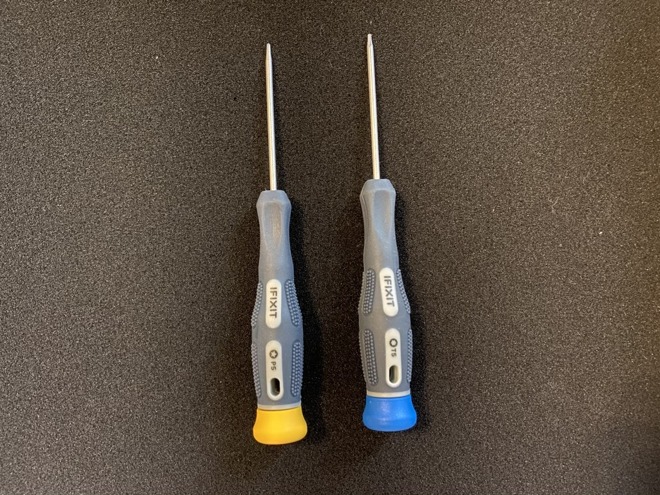
Shut down the computer. Use the Pentalobe P5 to remove the bottom cover of the MacBook. Not all screws are the same length, and it's important to get each back into the same hole it came out of.
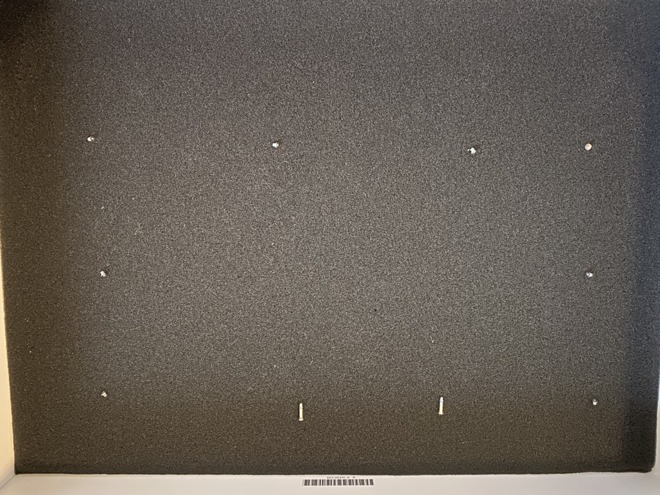
keep the screws in order
You might take cardboard and poke the screws into the cardboard in orientations similar to the screw holes they came out of. Or you might put strips of double sided tape down and organize them on that. Whichever you do, make sure the screws go into the holes they came out of when you're done.
The cover will come off easily. On the MacBook Air, we lift at a corner or hinge area working around the sides. There's a sort of latch at the middle of the sides of the machine, where you'll feel the cover pop free and lift off.
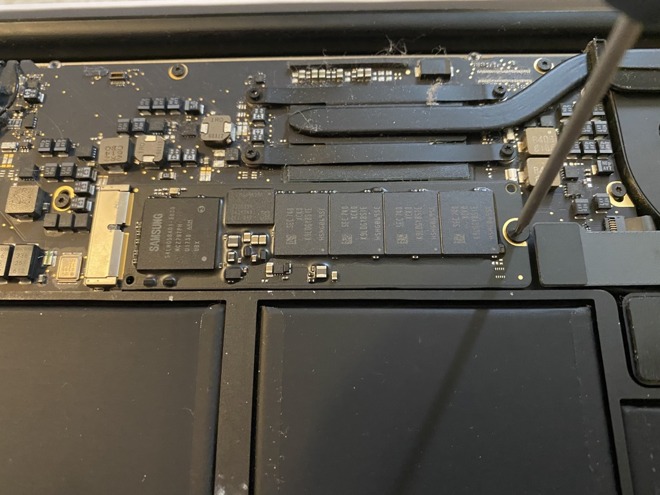
Removing the original drive
Locate the SSD. In the center of the MacBook Air, there's a Torx screw holding it down. Unscrew it and remove the drive, setting it aside.
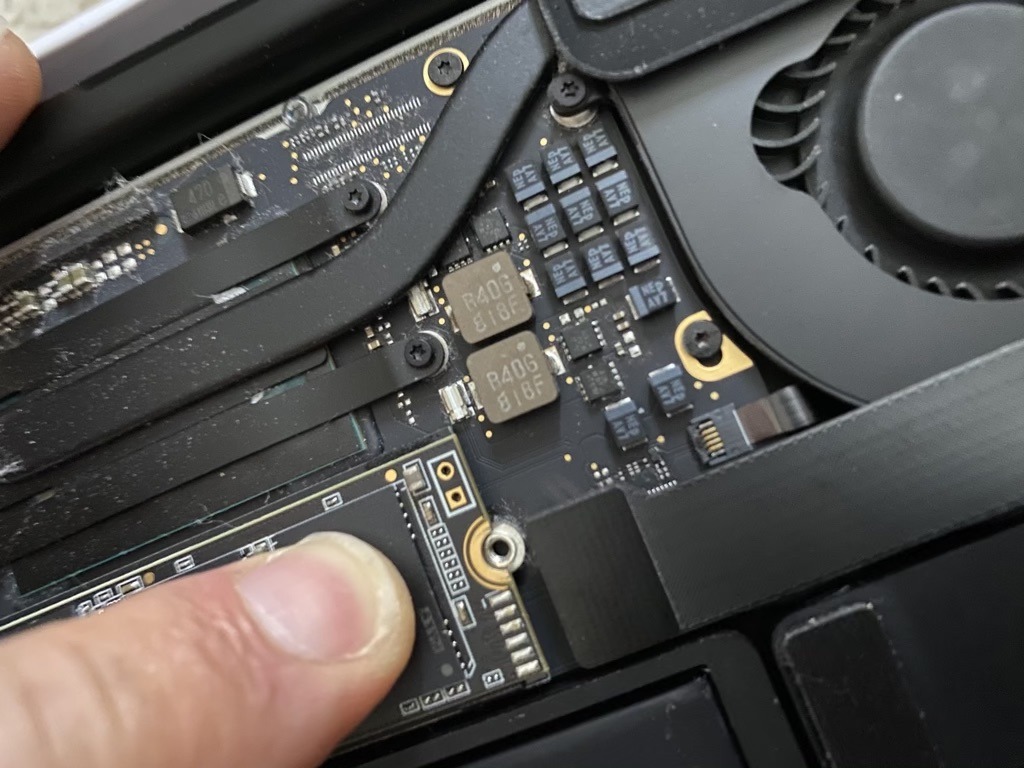
Take the Sintech NGFF to M.2 NVMe adapter, and insert it in place of the original drive. Then, take the new NVMe drive and insert it into the adapter. When everything is aligned, the notch in the end of the NVMe drive will line up with the post the Torx screw came out of. You can reuse it, or use the Philips screw that came with the adapter.
Inserting the adapter
Make sure to align the adapter and drive correctly on the standoff that the Torx screw goes in. This may require some care to insert the adapter and drive fully into their slots.
Put the cover of the computer back on, taking care to replace the screws in the holes they came out of. Normally on Macs, the longest screws go near the hinge area, or near the center of that hinge edge.
The new drive and adapter installed
Insert the USB macOS drive you made earlier. Power on while holding down the Option key. When the list of drives comes up, select the USB drive. The computer will boot to recovery.
Open Disk Utility to format the new SSD drive as GUID partition scheme with macOS journaled file system. Once done, quit Disk Utility and proceed installing macOS.
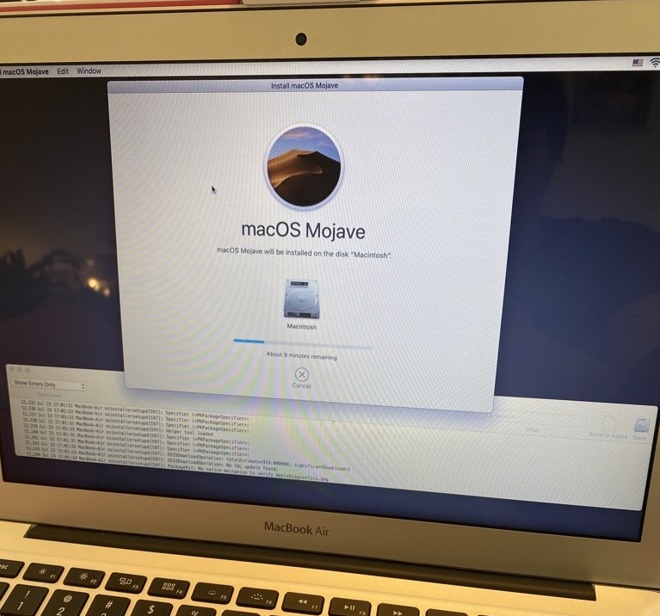
Reinstalling macOS
The result will be a faster computer than stock configuration, more storage, and the drive will show up in System Report under NVMExpress.
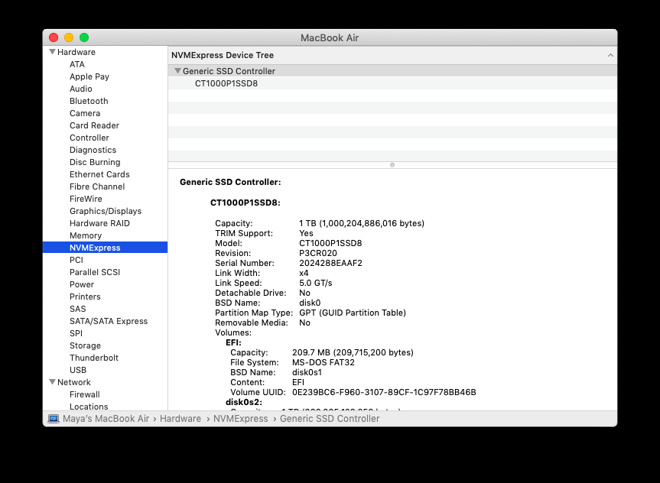
System Report showing success
The Crucial P1 drive was $104.99. The WD Black drive is $134.99. The Sintech NGFF M.2 NVMe adapter is 16.99. You'll also need a Pentalobe screwdriver to open the computer. An appropriate tool kit is $6.99 making the all in cost about 130 above the cost of your computer.
There's a lot of life left in second-hand Macs, and upgrading one from just a few years ago is an affordable way to meet or exceed back-to-school computing requirements. The computer will be faster, have more storage, on a budget.
A new drive and adapter installed
This year, schools are offering in-person or virtual options. No matter which option your school is offering, the best new computer may be a computer that's new-to-you.
Last year, we purchased a 2015 MacBook Air with 8GB of RAM and 128GB of storage. The problem is that 128GB is not large enough to meet the school's requirements. They want 256GB or greater.
Upgrade MacBook Air
First, you're going to need to gather the computer and parts. We found the 2015 MacBook Air and a 2017 MacBook Air on Craigslist.Both years are essentially the same computer, with a speed bump in CPU MHz. We could have also found a MacBook Pro, but those cost more and weigh more.
- 2015 or newer MacBook air
- bootable macOS USB drive to reinstall macOS
- Sintech NVMe adapter
- Crucial P1 1TB drive
- P5 pentalobe screwdriver
- T5 torx screwdriver
Supported models
The Mac you upgrade doesn't have to be a MacBook Air. It could also be a MacBook Pro, or Mac mini.In general, any 2013 to 2017 MacBook Air, 2013 to 2015 MacBook Pro, and 2014 Mac mini can be upgraded, with good results. How can you tell if your computer is compatible with an upgrade? When you click on About this Mac, System Report, the Hardware Overview section has a Model Identifier number that you can use to determine compatibility.
MacBook Pro
- MacBook Pro (15-inch Retina display Mid 2015)
Model ID: MacBookPro11,5 - MacBook Pro (15-inch Retina display Mid 2015)
Model ID: MacBookPro11,4 - MacBook Pro (13-inch Retina display Early 2015)
Model ID: MacBookPro12,1 - MacBook Pro (15-inch Retina Display 2014)
Model ID: MacBookPro11,3 - MacBook Pro (15-inch Retina Display 2014)
Model ID: MacBookPro11,2 - MacBook Pro (13-inch Retina Display 2014)
Model ID: MacBookPro11,1 - MacBook Pro (15-inch Retina Display 2013)
Model ID: MacBookPro11,3 - MacBook Pro (15-inch Retina Display 2013)
Model ID: MacBookPro11,2 - MacBook Pro (13-inch Retina Display 2013)
Model ID: MacBookPro11,1
MacBook Air
- MacBook Air (13-inch Mid 2017)
Model ID: MacBookAir7,2 - MacBook Air (13-inch Early 2015)
Model ID: MacBookAir7,2 - MacBook Air (11-inch Early 2015)
Model ID: MacBookAir7,1 - MacBook Air (13-inch Early 2014)
Model ID: MacBookAir6,2 - MacBook Air (11-inch Early 2014)
Model ID: MacBookAir6,1 - MacBook Air (13-inch Mid 2013)
Model ID: MacBookAir6,2 - MacBook Air (11-inch Mid 2013)
Model ID: MacBookAir6,1
Mac mini
- Mac mini (Late 2014)
Model ID: Macmini7,1
The problem with Standby
When we write, "with good results," there is a caveat. 2013-2014 machines treat hibernation differently than 2015 and later machines.Apple has different power management modes for increasing battery life. One of those can cause a problem for users who upgrade to an NVMe drive in a 2013-2014 machine.
Some of these machines will kernel panic when attempting to go into standby mode. Standby is where the computer records a snapshot of the current state of your computer to the flash drive, usually after about 3 hours. A Mac on Standby can stay charged for up to 30 days without being plugged in.
The solution is to prevent the computer from going into Standby. Here's how to do it.
- Open the Terminal app
- Type sudo pmset -a standby 0
- Press Return
- Quit the Terminal
2015 and later machines need no modifications like this at all.
Supported OS
You can run a range of macOS using these NVMe drives:- High Sierra
- Mojave
- Catalina
- Big Sur (probably)
At some point in the future, we will likely upgrade the machines to Big Sur, but not until it's been out for a few point releases.
Supported drives
- Crucial P1
- Samsung 970 Evo Pro (with firmware upgrade)
- Samsung 970 Evo Plus (with firmware upgrade)
- WD Black SN750
While the WD Black SN750 can transfer speeds at a rated 3400 MB/s, it's not useful if the Mac can't support those speeds.
The Samsung drives have a history of working after firmware updates have been applied. The problem with firmware updates is that they require a Windows machine to install them. If you're preparing a computer for a student, this may be outside your comfort level.
The Crucial P1 drives are affordable (1TB for $104) where every other terabyte drive was more money.
Our advice: buy the drive that's within budget and will meet the needs of your Macintosh and your school's recommendations.
What you can you do to max things out:
We considered what the machines we had were capable of, and maxed them out based on that.For example, you could get a 4TB drive. It will be expensive. Practically, we targeted 1TB or fewer.
For a MacBook Air, the maximum speeds of the controller are between 700 and 1500 MB/s. The Retina 15" Mid-2015 MacBook Pro supports 4x lanes PCIe 3.0 speed, and can support 3000 MB/s.
The upgraded MacBook Air
For our MacBook Airs, the Crucial P1 makes sense. If we were upgrading a Retina MacBook Pro 15" from 2015, the WD Black might make more sense.
Even though we chose the slower Crucial drive, it reached 1476 MB/s read and 1323 MB/s write speeds on the MacBook Air. On our stock 2015 MacBook Pro, we get only 529 MB/s read, 482 MB/s write speeds.
The original drive in a 2014 MacBook Pro
It's worth noting that just because a drive is rated at a high speed it's possible to achieve less than that speed. For example, We tried the WD Black drive in a computer running Windows, and it reached 2900 MB/s. On macOS on the same computer, it reached 2400 MB/s.
There are a lot of variables, and while we're doing something not officially supported, it's still an impressive speed increase over stock drives.
Okay, you've convinced me. How's it done?
Make a bootable macOS USB drive. You're taking out the internal drive, and when you do, you won't have a recovery partition temporarily.Shut down the computer. Use the Pentalobe P5 to remove the bottom cover of the MacBook. Not all screws are the same length, and it's important to get each back into the same hole it came out of.
keep the screws in order
You might take cardboard and poke the screws into the cardboard in orientations similar to the screw holes they came out of. Or you might put strips of double sided tape down and organize them on that. Whichever you do, make sure the screws go into the holes they came out of when you're done.
The cover will come off easily. On the MacBook Air, we lift at a corner or hinge area working around the sides. There's a sort of latch at the middle of the sides of the machine, where you'll feel the cover pop free and lift off.
Removing the original drive
Locate the SSD. In the center of the MacBook Air, there's a Torx screw holding it down. Unscrew it and remove the drive, setting it aside.
Take the Sintech NGFF to M.2 NVMe adapter, and insert it in place of the original drive. Then, take the new NVMe drive and insert it into the adapter. When everything is aligned, the notch in the end of the NVMe drive will line up with the post the Torx screw came out of. You can reuse it, or use the Philips screw that came with the adapter.
Inserting the adapter
Make sure to align the adapter and drive correctly on the standoff that the Torx screw goes in. This may require some care to insert the adapter and drive fully into their slots.

Put the cover of the computer back on, taking care to replace the screws in the holes they came out of. Normally on Macs, the longest screws go near the hinge area, or near the center of that hinge edge.
The new drive and adapter installed
Insert the USB macOS drive you made earlier. Power on while holding down the Option key. When the list of drives comes up, select the USB drive. The computer will boot to recovery.
Open Disk Utility to format the new SSD drive as GUID partition scheme with macOS journaled file system. Once done, quit Disk Utility and proceed installing macOS.
Reinstalling macOS
The result will be a faster computer than stock configuration, more storage, and the drive will show up in System Report under NVMExpress.
System Report showing success
Squeeze some life out of those storage-constrained MacBook Air and MacBook Pro models
We purchased a 2015 MacBook Air for $280 and a 2017 MacBook Air for $420. Craigslist is subject to availability and haggling, and your willingness to meet strangers wearing face masks with considerable sums of cash.The Crucial P1 drive was $104.99. The WD Black drive is $134.99. The Sintech NGFF M.2 NVMe adapter is 16.99. You'll also need a Pentalobe screwdriver to open the computer. An appropriate tool kit is $6.99 making the all in cost about 130 above the cost of your computer.
There's a lot of life left in second-hand Macs, and upgrading one from just a few years ago is an affordable way to meet or exceed back-to-school computing requirements. The computer will be faster, have more storage, on a budget.
Comments
Is this, " format the new SSD drive as GUID partition scheme with macOS journaled file system. " correct? Shouldn't it be APFS?
Obviously, if I ever upgrade my SSD, it's foolish to get a 1TB. 2TB or larger would make logical sense. But again, the benchmarks are lacking! Please provide more info, AppleInsider!
Seriously, this is an article that fits great with students heading back to schools; with many of them in need of a "new" computer simply to have a functioning computer. Complaining about how it doesn't include benchmark data for the already functioning maxed out configurations from yesteryears gives of a bad feeling of being out of touch with reality; like, let the broke kids be the focus when your particular situation could be googled in like three minutes, ok?
The TITLE of the article does not have the word STUDENT or BACK TO SCHOOL in it. The FIRST SENTENCE of the article is similarly lacking that info. Anyone well versed in the English language knows that a properly constructed title should convey pertinent details of an article's content (unless the title is either click bait or seriously length-constrained). If indeed "school" and "student" are the lone focus as you seem to contend, the title and first sentence have serious issues which should be addressed. Again, the first sentence of an article or paragraph sets the tone and subject of what follows. What keywords are found in the TITLE and 1st SENTENCE? Let's investigate that... Ah! The words YOUR and YOU'RE are found there! Those words speak to EVERY AppleInsider reader, not merely students or educators or those exclusively affiliated with schools.
While pondering that critically important information, we see it is only the 3rd & 4th sentences that talk about SCHOOLS, along with a sentence in the middle of the article, and then the closing paragraph. HOWEVER, the article also includes the 15" MBP, which every well-read and informed AppleInsider reader should very well be aware that "MOST" STUDENTS do NOT necessarily own. (If they do, their PARENTS surely bought it for them.) Most students seem to prefer the 13" MBP or 13" MB Air owners as such machines are smaller and lighter to tote around in their backpack with all those heavy books. That remains true despite the present lockdown and study from home, knowing that when the lockdowns end, you will be totting that Mac around with you again.
The title, the first sentence and the inclusion of the 15" MBP all work together to show your sarcasm and brow-beating of me was insensitive and totally uncalled for. My request to AppleInsider (not to my fellow forum members) is legitimate. At the very least, my request can be viewed by AppleInsider as a request for a follow-up article that offers more detailed information that pertains to higher end MBP machines which may or may not have larger stock internal SSDs. By knowing what content we readers would like to read, AppleInsider can craft articles that are even more appealing and inclusive of everyone.
Lastly, if you care anything at all about students (or "broke kids" as you prefer to label them), you should be equally as empathic and understanding of those in this forum who are PARENTS and who have children who are either in school now or soon to enter college. Therefore, information in articles pertaining to education very much apply to parents such as myself, which may be facing financial hard times due to the pandemic. A "good parent" is one who is involved in their child's education, which includes college, regardless of pandemics. Parents pay a heck of a lot more for their children's education than you may fully understand, so to think that ONLY STUDENTS would be reading this article as a means to use THEIR OWN MONEY to buy such SSD upgrades is a serious stretch indeed.
In conclusion, the more details that can be presented from AppleInsider in otherwise good articles like this the better, seeing that many of us AppleInsider readers prefer AI articles over randomly Googling around for information which we may or may not trust as much as AI.
You're welcome.
As far as doing SSD upgrades the performance upgrades are somewhat easily googled, and at the same time not as clearcut as how this article talks about taking a computer from a "no go" to a functioning option; so it'd be a very different type of article.
As some general advice I would say that you start by checking with https://www.ifixit.com/ what types of upgrades are available, and that seem to be reasonable, for you computer; and then do a quick comparison of numbers of the parts (like read/write speeds etc).
As far as going from SSD to SSD you will probably very rarely find a situation where the upgrade is cost-efficient as a general speedboost; the real value would be in just upping the storage to make the needed software fit at all (and depending on the exact hardware/requirements you might even then find it better with an external solution; perhaps even just an SD-card).
No, format with macOS journaled, which used to be labeled HFS+ Journaled. The macOS installer will take care of converting / reformatting to APFS, you just want the drive visible to the installer as a target drive it can install on.
It's possible you may not need to format the drive at all and the installer will take care of it, but I haven't tested that. I like formatting the drive, it reassures me that it's working correctly.
I suspect you would see a 500MB/s ± bump in speeds. This image is for the WD Black 1TB drive.
I'm afraid I don't have any information on the adapter you already own. It may work. It may not, I just don't know anything about it.
The adapter used here is one I've had in my child's MacBook Air for a little over a year now, and it's been reliable. The adapter is one of the least expensive parts required for this upgrade. If you're truly hesitant about it, perhaps consider purchasing a new adapter?
Toting. Totting means to sum (total) up numbers. Toting is to carry.
I apologize for not having "student" in the headline or lede, and hope you'll forgive me. Buying a used computer is a series of trade-offs: price, availability, and weighing what will have the greater longevity.
If a 2017 MacBook Air has an i5 1.7 GHz processor and 8GB of RAM and a 2015 MacBook Pro has an i5 2.5GHz with 16GB of RAM, and the hypothetical price difference is about $100 between them, it's entirely possible the student will be carrying the extra weight and size, based on the idea that more CPU and RAM will make the computer usable for the duration of the next 3 or 4 years of school. It comes down to what's available at the time.
That's excellent! My past experience has been that Apple will update their records to reflect your increased storage, since you used an Apple drive.
For my house, I am the warranty. I never expect to take these machines to Apple for support, so I felt comfortable using this unsupported path. It's been very stable.
My children's school recommends Windows 10 or macOS. They don't care which one is used. They've allowed Linux in the past, provided they aren't asked to make an effort to support it. I imagine they might be okay with newer iPad, now that iPadOS Safari is more desktop-like than mobile. Their main insistence was no Chromebook.
BUT, many people here have mentioned they want to do this to their existing MBA or MBP. You probably want to keep your data! For those people, the process of cloning their existing SSD to a new SSD is very easy. You will need to purchase a NVMe-to-USB adapter like this. Simply mount the new SSD on the adapter, fire up your MBA or MBP and grab a trial copy of Carbon Copy Cloner (CCC) and install it. Plug in your NVMe adapter that has your new SSD on it and fire up Disk Utility and erase the new SSD using APFS format. Then, fire up CCC and select your source and destination drives, and click "Clone". When cloning is finished, simply shut down and install your new SSD with the instructions in the article.
When you turn it back on, it should boot on the new SSD.
There are on-line step-by-step videos (YT) for doing this in case my general instructions weren't clear. But for an extra $22 for the adapter, the ability to keep your existing setup is priceless!