AppleInsider · Kasper's Automated Slave
About
- Username
- AppleInsider
- Joined
- Visits
- 52
- Last Active
- Roles
- administrator
- Points
- 10,962
- Badges
- 1
- Posts
- 66,634
Reactions
-
Hands on with Apple Vision Pro ZEISS optical inserts
If you need glasses or contacts, there's a solid chance you'll need optical inserts to use Apple Vision Pro. Here's what you need to know about these magnetic lenses.

Apple Vision Pro ZEISS optical inserts
Apple Vision Pro is designed to fit the user's face exactly. That means you won't be able to use glasses, and because of how eye-tracking works, hard contacts aren't an option either.
You won't need optical inserts if you can see fine with single-vision soft contacts. That means everyone else, those with glasses, readers, or other forms of vision correction, will need the inserts.Apple Vision Pro ZEISS optical inserts design
Apple isn't the only company that offers some kind of inserts for vision correction in their headset. However, some companies avoid the need by building the headset with space for glasses, like PSVR 2.
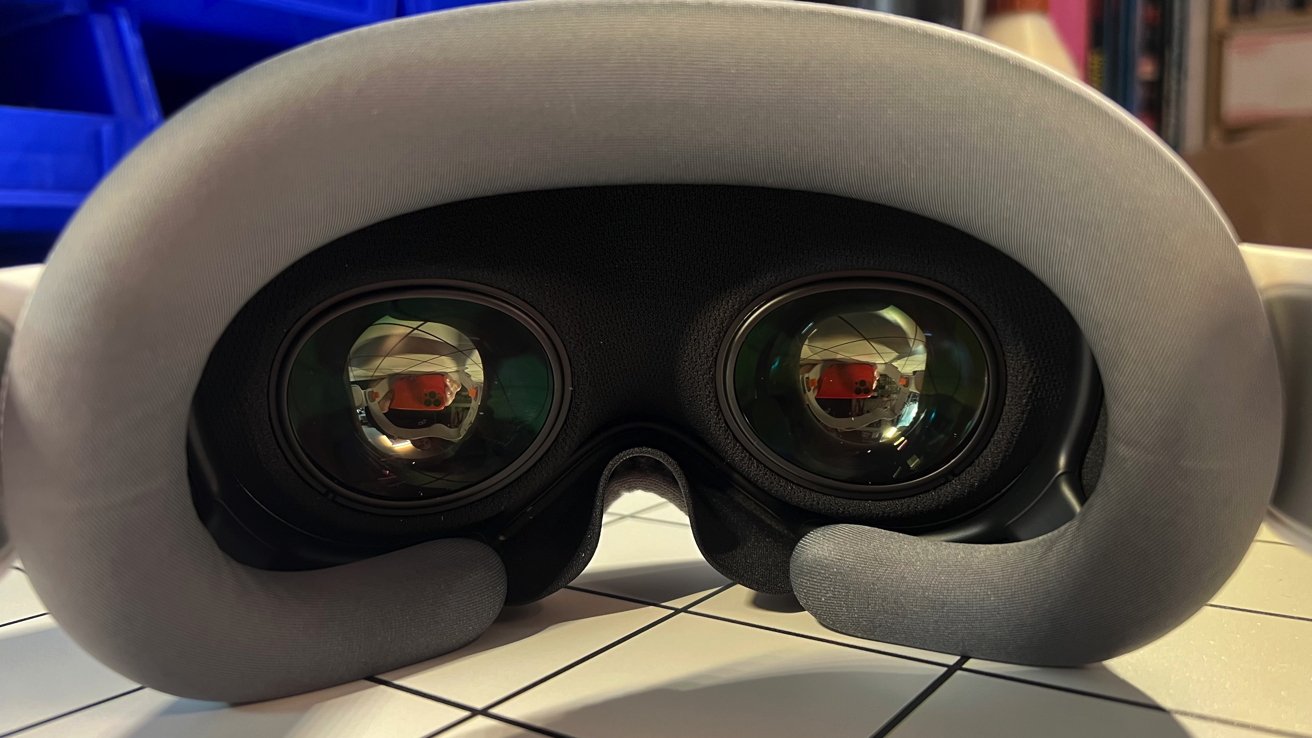
The optical inserts for Apple Vision Pro are small oblong lenses surrounded by a metal frame. One side is magnetic, so it slots exactly into the headset in the correct direction.
The top of the lens has a white line to indicate which side faces up. The outer edge facing the user's nose has an "L" or "R" to show which side it belongs in.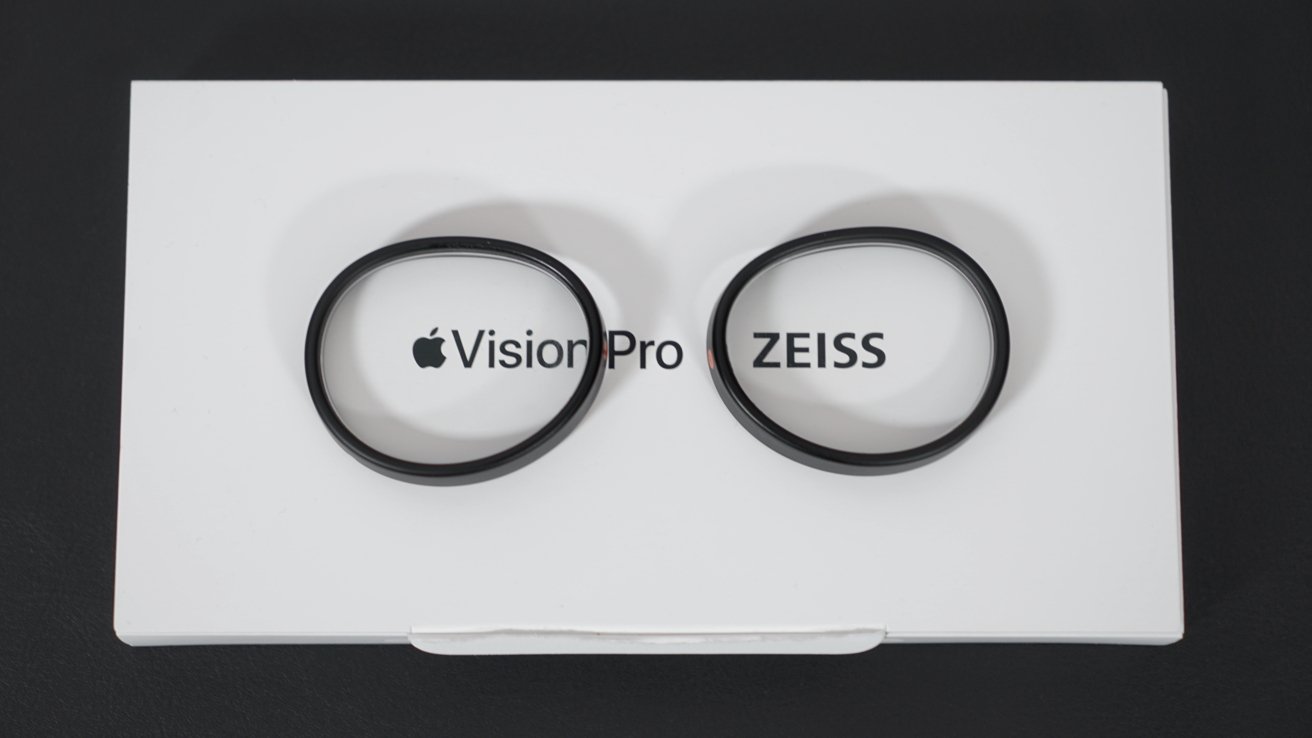
Optical inserts by ZEISS
The magnetic strength of the lenses is enough that they won't pop out during use, no matter how much you move your head. After one mild drop to a thankfully carpeted surface, we've noticed that the lenses can pop out with enough force.
No, nothing was damaged in this drop, not even a scratch.
ZEISS is known for making high-quality camera lenses but has also made prescription inserts for different applications. The clarity of the glass lends to the high price.Using Apple Vision Pro optical inserts
Depending on your prescription strength, you may find using Apple Vision Pro without inserts is possible. The focal distance is slightly over a meter, but it's not the same as seeing an object in real life.
Looking through multiple layers of glass can create artifacts and glare
We've noticed that while things are legible without the inserts, the difference with the inserts is night and day. The text is much sharper, and everything appears in much better focus.
There is some downside to having optical inserts, so utilize soft contacts when possible. Adding another layer of glass to the displays means introducing more possibilities for reflections and glare.
Reflections and glare are inherent to Apple Vision Pro and will occur in high-contrast areas like bright scenes of a movie playing in a dark theater. Optical inserts amplify this effect slightly, but not in a way that makes the device unusable -- it's just an effect worth noting.
Anyone who's used a headset like PSVR 2 or Meta Quest will know that it seems as if you're constantly cleaning the lenses. That hasn't been our experience with the optical inserts.
After hours of use over multiple weeks, we've had to clean the lenses only a few times. That's mostly due to handling them when removing them for others to test Apple Vision Pro.
Apple has seemingly opted for high-end glass with a coating that keeps the lenses clean -- another example of why the lenses are priced so high.Limitations to Apple Vision Pro ZEISS optical inserts
Eyesight correction is a very nuanced problem to tackle. Several issues people can have with their eyesight make prescriptions complex or difficult to fill.
Apple Vision Pro isn't for everyone, not yet
To make things more challenging, Apple Vision Pro has to adjust its eye tracking and software based on paired prescriptions. Some things are just outside of the spectrum that software can cover, at least with the current hardware and visionOS version.
We cannot provide a magical value to tell you if you're ineligible for Apple Vision Pro prescriptions. ZEISS has a tool to insert values to check if a prescription can be filled with the optical inserts.
If one of your values is outside the range, it will be flagged. However, that's not the end of your opportunity to own and use Apple Vision Pro.
Save this information and speak to your optometrist about adjusting values to correct your vision while meeting the requirements. If that isn't possible and soft contacts or LASIK are out of the question, you may have to wait for new hardware or software to try again.
There are accessibility features for Apple Vision Pro that will help with things like monovision, a drooping eyelid, lazy eye, and other conditions. For example, users can make eye tracking rely on only one eye instead of two.
Anyone who experiences blurriness or eye strain while using Apple Vision Pro should speak to their eye care provider for an updated prescription. This applies to users relying on reader lenses, too.Ordering Apple Vision Pro ZEISS optical inserts
If you've decided to order Apple Vision Pro, it's a straightforward process that can be completed from the Apple Store app or Apple's website. To complete the order, you'll need to know if you need readers or prescription lenses.
Optical inserts make using Apple Vision Pro without glasses possible
To order reader inserts, Apple will need to know the correction strength. They come in three strengths:- +0.75 to +1.25D
- +1.50 to +1.75D
- +2.00 to +2.75D
Those that use readers with correction above +2.75D can try inserts within the +2.00 to +2.75 range. Otherwise, they'll need to speak to their eye care provider.
Ordering prescription strength inserts has a few more requirements, but this portion of the order is completed after Apple Vision Pro is ordered online.
You'll need a prescription with:- Your distance correction needs and/or your near correction needs, indicated separately but on the same prescription sheet. This is known as the full manifest refraction by eye care providers.
- An expiration date (that's not expired).
- Your full name, and your prescriber's license number and signature.
- Your eye exam or issue date.
Contact lens prescriptions aren't accepted. The prescription shouldn't contain intermediate distance, task distance, or computer distance.
ZEISS optical inserts can't be made with prism values.
Reader inserts are $99. Prescription inserts are $149. Apple Vision Pro starts at $3,499.
Read on AppleInsider
-
How to use Xcode String catalogs to localize your app
Text has long been customizable in Xcode when creating software for Apple's platforms. Now, String catalogs make it even easier to localize your app to multiple languages.
Xcode string catalogs.
Ever since macOS shipped in 2000 as Mac OS X, Apple's development environments have allowed developers to easily localize text (strings) in their apps using two Apple technologies: language-specific bundles, and .strings files.
Localization is the process of translating app string files into multiple languages for use in many countries. Developers can decide which languages to localize Strings files into so that when an app runs, it automatically loads the correct .strings file for the current system language.
Apple inherited these technologies when it bought NeXT Computer, Inc. in 1997. The people at NeXT had thought carefully about how to make it easy to localize apps, and to even allow additional languages to be added to apps later without the need to recompile projects.
This was accomplished by using bundled resources located inside each app.
In Apple technology terminology, a bundle is simply a folder with some special filesystem bits set that tell the operating system that the folder is to be treated as a code package - an app, a framework, a driver or system extension, or an installer. There are other types of bundles as well.
In Apple programming, bundles are defined by the Objective-C classNSBundle, which we'll use in a moment.
This is accomplished in macOS and iOS via bundles and .strings files stored in each bundle on disk.
Bundles can contain other bundles, and from a localization standpoint it's common to store bundles inside an app by language with a language extension - for example ".en", for English, ".jp" for Japanese, or ".de" (Deutch) for Germany.
Each language bundle can contain parallel resources but in different languages..strings files are really XML files
Apple also defines a special kind of file called a .plist (Property List) file which is essentially just an XML file containing key-value pairs. Xcode has a built-in editor for .plist files so it knows how to edit the key-value pairs in a graphical editor.
.plist files can also contain strings, which can be localized, or they can contain entries that point to other string files elsewhere in the bundle.
A special file named Info.plist contains Apple-defined keys which the Finder reads when you open an app. The Info.plist file contains special keys and values that tell the operating system what settings to use when starting an app.
A strings file contains sets of keys and corresponding strings using "" and XML tags. For example:
"kAlertOKButtonStringKey"
"OK"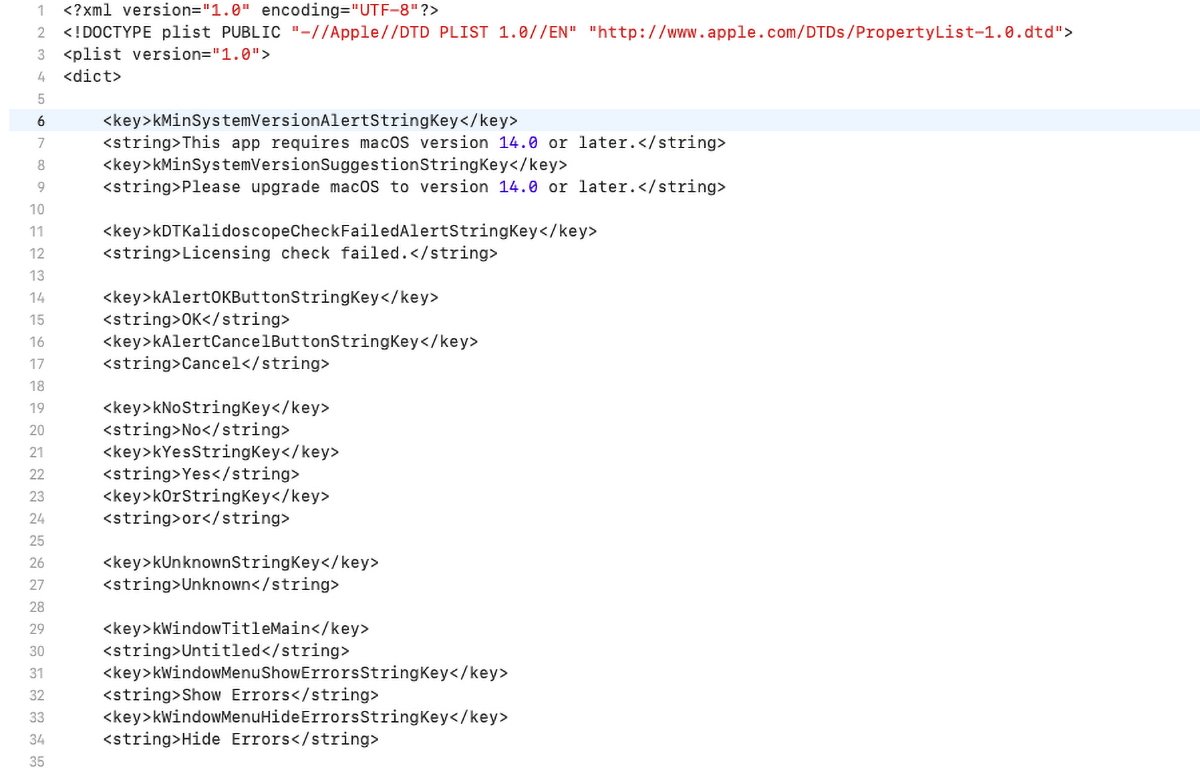
A .strings file in Xcode.
The text is usually a developer-defined constant value and can be just about anything as long as it doesn't interfere with XML.
The value contains the actual string text to be displayed in the user interface at runtime.
Once a .strings file has been created, the file itself can be handed off to a translator to copy into several different languages. This design makes localizing an entire app or bundle easy.
Traditionally, the default .strings file in an app on Apple platforms is named "Localizable.strings".
NeXT's programming language was called Objective-C and is still in use by Apple today.
Objective-C dates all the way back to the late 1980s when it was developed at NeXT for that computer platform. Objective-C derives from an even earlier language called C which was used to develop UNIX at Bell Labs in 1970.
In fact, C was created in order to write UNIX.
In Objective-C-based apps, developers will usually include a .h (header) file for each strings file, which contains constant defines that match the keys defined in the .strings file. This makes it easy to change keys in Objective-C apps.
Most modern TCI/IP networking stacks are still written in C. .h files were created for the C language. This was all before object-oriented programming (OOP) was invented.
Before Objective-C and NeXT's development environment, localizing and re-localizing software required each app to be fully recompiled every time a string was changed.
Apple's more recent programming language Swift does away with C header files, but strings are still localized and loaded the same way as before.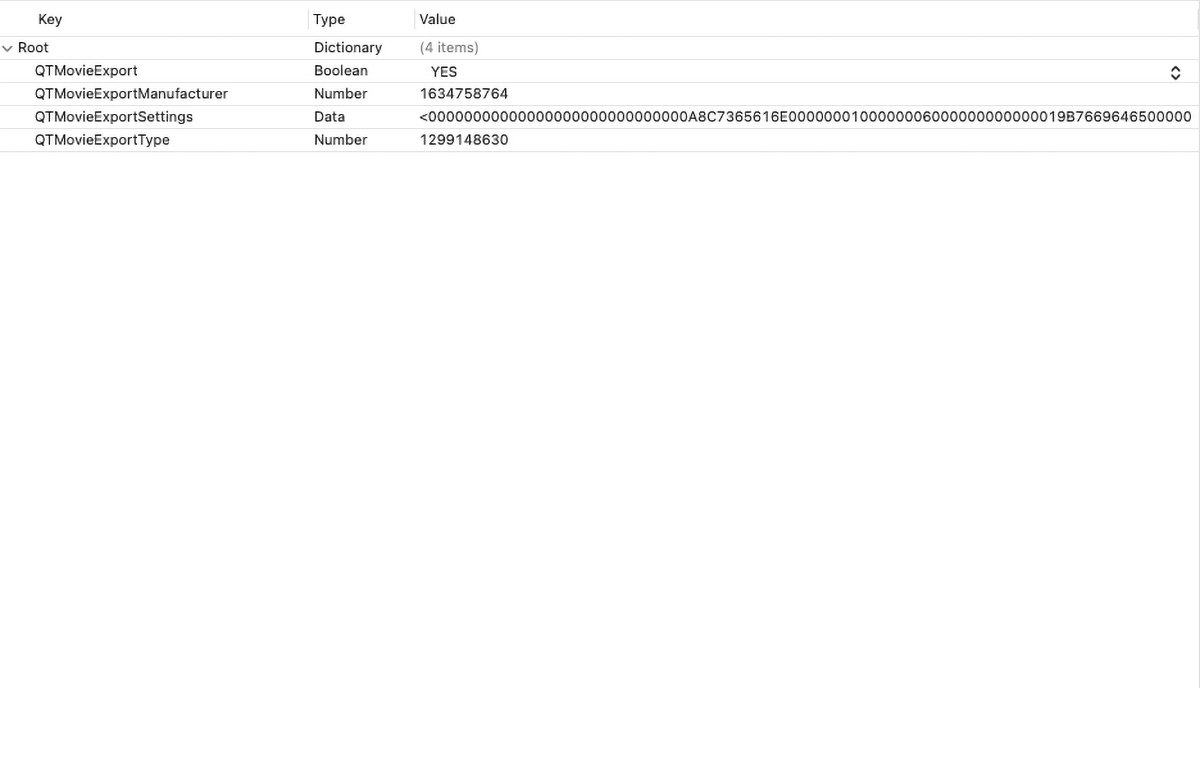
The .plist editor in Xcode.Special string classes from Apple
Once an app is built for Apple platforms, the resulting app bundle contains all code, resources, and strings needed for program execution.
In OOP, the code definition of an uncompiled object is called a class. Classes are code bundles that bind both code and data together for ease of re-use. Classes can be subclassed - allowing descendant classes to inherit both the properties and methods of their ancestor classes.
The central string class in Apple programming is NSString (Objective-C) or simply String (Swift).
Both classes work similarly and have the same functions (called methods( in OOP). Swift also has its own Standard Library containing many strings functions, although they depart drastically from the traditional C Standard Library.
Apple string classes have several methods for creating strings. You can load them from a .strings file, you can create them from a C string, or from a Unicode string, and you can initialize an NSString or String using dozens of "init" methods provided.
You can also convert other Apple data types such as dates, raw data, bytes, or from URLs, or other file types such as .txt and .rtf files.
To see how to create Apple string classes, visit the NSString class reference page on Apple's Developer website. From there you can toggle between Swift and Objective-C syntax.
NSString used to have dozens of methods for converting NSStrings back into C strings, but those methods are now deprecated because Apple doesn't recommend using C strings unless you have to for compatibility reasons.
You can also define an NSString constant in Objective C using the @"" syntax like this:@"NSVisualEffectView"
This tells the compiler to store the literal string itself in code at compile time. Constants are usually used only as flags to method parameters, but you can also pass them anywhere an NSString or String is required.
You can also use a string constant to get the class of any compiled Objective-C or Swift object at runtime by using theClasskeyword like this:Class vibrantClass = NSClassFromString( @"NSVisualEffectView" );Classis a special type of reserved variable in Objective-C and Swift that stores the class of any object in memory. The plain C functionNSClassFromString()returns the actual class of the object and stores it in the Class variable you define.
In the above exampleNSClassFromString( )is passed the constant@"NSVisualEffectView"and the function returns the class and stores it in theClassvariable named'vibrantClass'.
The string constant you pass to NSClassFromString() is the name of the class as defined in Apple's documentation. There is also a version ofNSClassFromString()for Swift:NSClassFromString(_:)
Apple also provides an unimplemented class calledNSClassDescriptionwhich you can implement to provide more advanced details about objects.
There is a sister string class from Apple calledNSMutableStringwhich allows you to manipulate and edit the string contents itself. Strings also have encodings which tell the software how the data in the string is to be treated.
There are string encodings for Roman, Cyrillic, Asian, Arabic, and other languages.
The base class from which most other NSObjects inherit is called NSObject.
NSString is a vast class and you'll want to check out the documentation thoroughly.Loading strings programmatically in Apple apps
There are several ways to load strings in Apple apps.
The usual way when working with .strings files is to use the<a href="https://developer.apple.com/documentation/foundation/nslocalizedstring">NSLocalizedString()</a>function. This C function (it's a C macro actually) takes two parameters:// Load localized message stringNSString *suggestionString = NSLocalizedString( messageStringKey, kEmptyStringKey );
This loads the string indicated by the key passed in the first parameter from theLocalizable.stringsfile in the app's bundle. If the key passed in doesn't exist in the .strings file,nilis returned.
The first parameter is the string key in the .strings file you want to load. You can pass this in as a string constant, a C or Swift compiler define constant, or an NSString variable itself which contains the key for the string.
Either way,NSLocalizedString()returns the string you requested from the strings file and stores it in the NSString variable on the left side of the expression.
Note that the NSString variable returned byNSLocalizedString()must be declared as a pointer variable using the "*" syntax.
A pointer in C, Objective-C, or Swift is just a variable in memory that contains the address of another variable or memory location. The compiler needs a pointer variable in this case because it has to know where in memory to store the NSString object when it creates it.
On return from the function call toNSLocalizedString()the pointer you define points to that location in memory.
The second parameter toNSLocalizedString()is a "suggestion" or comment string, and can be the empty string (@""), something you choose, ornil. In Objective-C and Swiftnilmeans "nothing" - an empty pointer.
In the example above,kEmptyStringKeyis a precompiler macro defined in a header file like this:#define kEmptyStringKey @""
This tells the compiler: Anywhere you encounter 'kEmptyStringKey' during compilation, replace it with @"".#definein C is called a "pound-define" (for the '#' symbol).
You could have written the same line just as easily like this:NSString *suggestionString = NSLocalizedString( messageStringKey, @"" );#definesare used so that when a constant value needs to be changed, it only has to be changed in one place in the header and the change happens everywhere the#defineis used in code the next time the app is recompiled.
In Swift, the call to NSLocalizedString() would look like this:let suggestionString = NSLocalizedString( messageStringKey, nil )
In both languagesNSLocalizedString()appears to be a C function, but it's really a cleverly defined macro in the Apple header file on the <code>NSBundle class:#define NSLocalizedString(key, comment) \
[NSBundle.mainBundle localizedStringForKey:(key) value:@"" table:nil]
It turns outNSBundlehas its own method for loading strings from the app's main bundle by key, with the optional second parameter, and atableparameter. Thetableparameter can be used to load strings from a .strings file other than the Localizable.strings file by passing in the name of another .strings file in the third parameter.
This allows you to use several string files in your app or bundle instead of just the default one.
At precompile time the compiler crunches this entire macro down to just thesyntax to shorten the code and make it look like a plain C function.directly, using its
<h2>Loading strings programmatically using NSBundle</h2>
Another way you could load strings from file is to use <code>NSBundlepathForResource:ofType:method to load a string from a text file:NSString *fileName = [ [ NSBundle mainBundle ] pathForResource:@"readme" ofType:@"txt"];<code>if (fileName)
}
Using this method, you pass in the name or path of a text file, and the file extension as anNSStringin the second parameter. If a readable text file exists at the location and name specified, NSBundle will load it and return the path to it as anNSString.
You would then pass the returned file path string frompathForResource:ofType:toNSString's stringWithContentsOfFile:method.
If all goes as planned, whenstringWithContentsOfFile:returns, the*contentsStringvariable declared above will point at the entire text contents of the text file - as a string.NSBundletakes a little getting used to, but once you master it there's a lot of power.
There are actually several similar macros on NSBundle which are variants of loading strings from bundles. You can even load them from .strings files in other bundles:- NSLocalizedStringFromTable
- NSLocalizedStringFromTableInBundle
- NSLocalizedStringWithDefaultValue
- NSLocalizedAttributedString
- NSLocalizedAttributedStringFromTable
- NSLocalizedAttributedStringFromTableInBundle
- NSLocalizedAttributedStringWithDefaultValue
NSAttributedStringis a string class similar toNSStringexcept that the string can have attributes set, such as font, face, hyperlink, and other typographic details. You can also load anNSAttributedStringfrom an HTML file online or locally.Loading strings programmatically using NSDictionary
Another Objective-C Class calledNSDictionarycan be used to load string files from disk or from a URL. AnNSDictionaryis essentially a set of key/value pairs much like an XML or .plist file.
In fact, you can load a .plist file directly into anNSDictionaryobject and have it populated into the dictionary's key/value pairs. TheNSDictionaryclass knows how to read a .plist file from disk and populate an object with the data from the file.
Since the values stored in a .plist or XML file are strings, you can load one string, or entire sets of strings with little code from a file and search it using the file's XML keys: just use thevalueForKey:orallValues:methods to retrieve all entries in the dictionary once it has been loaded.
You can also retrieve all the keys in the dictionary by using theallKeys:method.Xcode 15's string catalogs
Traditionally, in Apple app development, you'd create your .string file(s), add them to your Xcode project, set which build targets you want them included in, then load the strings from your code when you needed them at runtime.
This design worked fairly well for decades, but it had some limitations.
First, loading strings from .strings files didn't work well with string literals (i.e. - strings enclosed in quotes in code). Unfortunately, SwiftUI relies heavily on string literals, and hence there's no easy way to localize them other than to edit the strings in your source files.
Secondly, it previously was more difficult to go the other direction: to create strings and write them back out to .strings files programmatically. It can be done, but it's not an elegant solution and you'll likely find yourself writing a lot of excess code to write strings out in multiple languages.
String catalogs solve these problems and modernize the string infrastructure in Xcode for today's needs. String catalogs are also designed specifically to work with SwiftUI-based projects.
When you first create a strings catalog in Xcode, it will be empty. Unless you explicitly add strings, Xcode won't populate the strings catalog until you actually build your project.
String catalogs are designed to be assembled at build time. This is not only so strings can be included in SwiftUI code, but also so that they can be written out at build time, updating any strings modified during compilation so that you don't have to change them manually after a bundle is built.
String catalogs also allow default and multiple additional languages to be specified in Xcode itself. Xcode knows how to locate and assemble all the strings for all required languages for you when your bundle is built.
Catalogs also eliminate the need to keep adding additional .strings files to your project every time you add a new language to your bundle.
String catalog files in Xcode have an extension of .xcstrings and they get added to your Xcode projects just like .strings files do.
As you might guess, the default strings catalog file in an Xcode project has the name Localizable.xcstrings.
At least Apple kept things consistent.
When you select a .xcstrings file in the Xcode navigator on the left side of an Xcode project window, Xcode's strings catalog editor appears on the right.
Let's take a look at an example.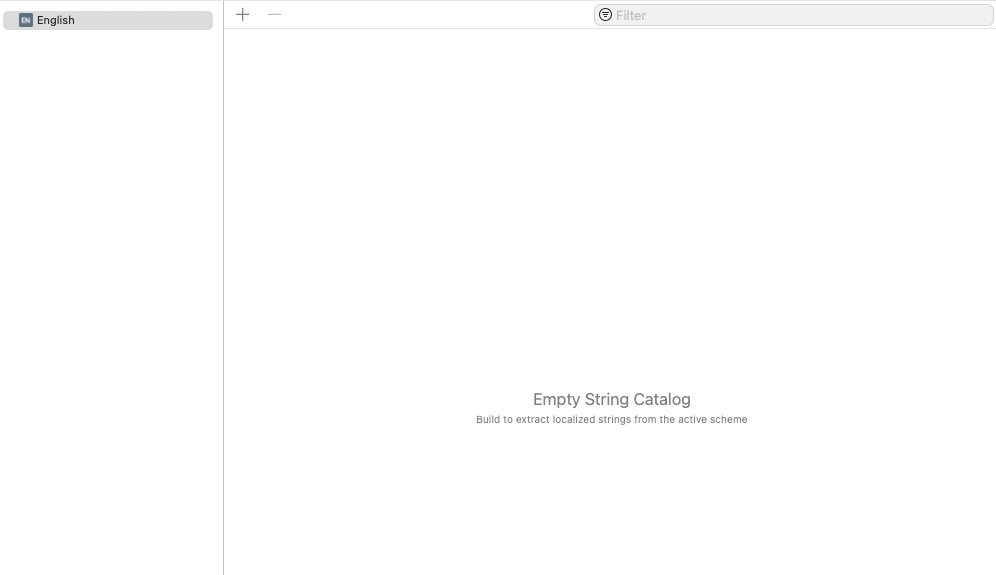
The Xcode strings catalog editor.A sample Xcode project for strings catalogs
To begin, open Xcode and select File->New Project from Xcode's menu bar at the top of the display.
Choose an iOS or macOS App project from the Xcode project template chooser. Click Next, give the project a product name, an organization identifier, and choose a language.
Click Next, and save the project to disk.
When the Xcode project appears, you'll notice there is no .xcstrings file in the project navigator on the left. That's because none has been created yet.
Next, click the + button in the lower left corner of the project window, and select New File... from the popup menu. This brings up the new file template chooser: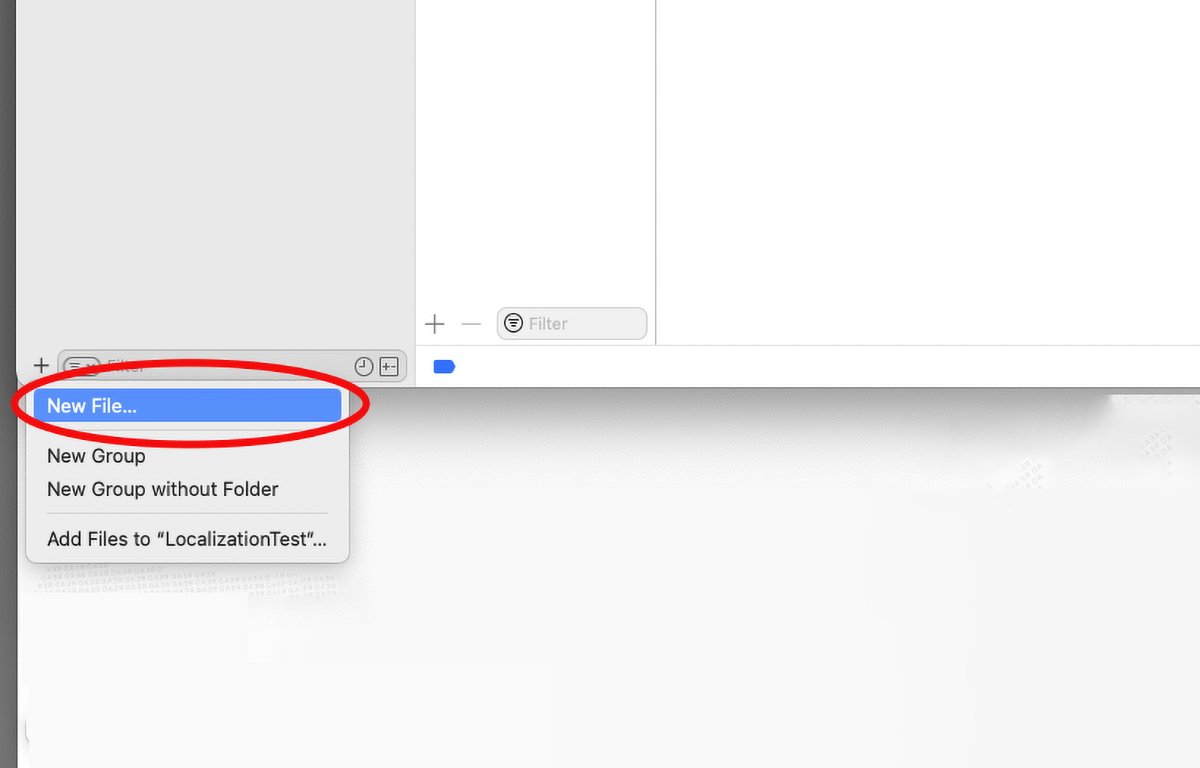
Select "New File..." from the popup menu.
Scroll down to the "Resource" section, and click String Catalog, then click Next. This brings up a standard Save panel - go ahead and save the new strings catalog file into the project in its default location.
The default file name is preset to "Localizable" for you.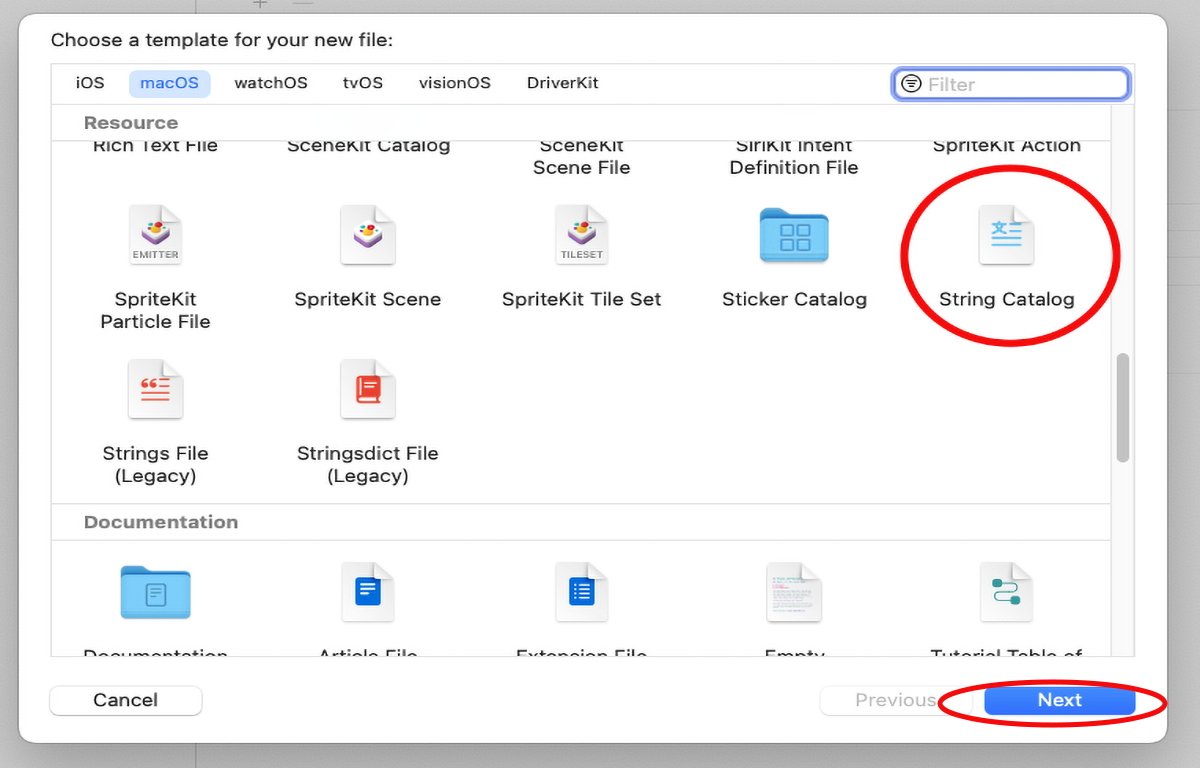
Select "String Catalog".
After you save the file, you'll see it added to the Xcode project automatically, and Xcode will select it in the project Navigator. When it does, you'll see the strings catalog editor appear on the right.
Note the "Empty strings catalog" message in the editor.
In the catalog editor, you can either click the + button at the top of the editor to add a new key to the catalog, or you can click the + button at the bottom left of the catalog editor to add a new language to the catalog.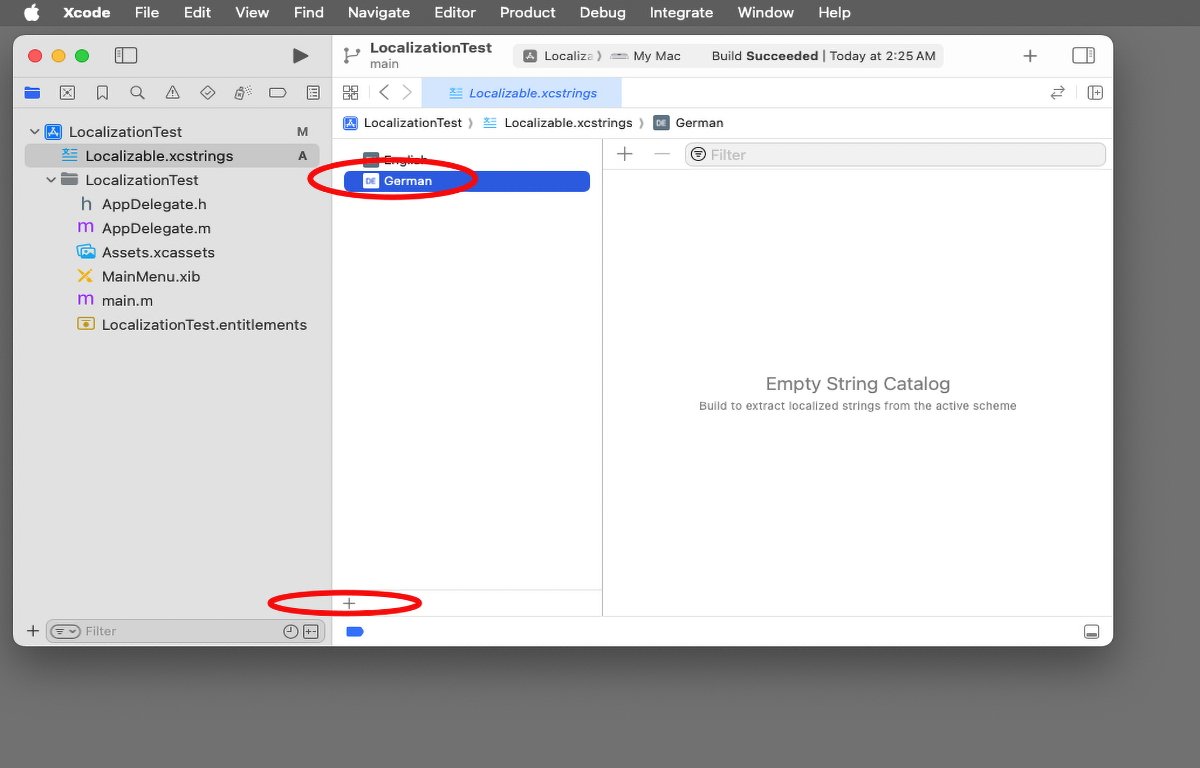
Add a language in the catalog editor.
If you click the + at the lower left corner of the editor, you'll get a popup menu with a list of all possible languages. Select any language from the menu to add it to the catalog. When you do it appears under the default language at the top of the catalog list.
Once your catalog is set up, when you click the Build button in Xcode, the compiler will automatically scan your source code files and add any strings it finds to the strings catalog. The string text is added to the catalog as both the key and the value for each string.
When you click on one of the other languages you've added in the catalog editor, that language is displayed in each row next to the default language. You can then click the text under each language name and type in new text for that language.
There is also a comment and a state field in each string. Once you add a translation for each key, the state column displays a green checkmark indicating that string has a localization.
Keys without localized strings display a red "New" label in the state column.
To view each localized string in your app when it is running, you can either go to the Apple Settings app and change the system language, or you can go to the app schema in your Xcode project and change the language for runtime. The next time you run your app you'll see any localized strings in their correct languages.
If you are using custom Xcode Previews in an iOS or iPadOS app by using the#Previewmacro in your code, you can also set the.localeidentifier string in the.environmentproperty of theContentView()struct to specify the language to be used at runtime.
You can set one#Previewmacro for each language and locale to display localized strings properly at runtime. Language names for previews are usually the full language names, and locales are usually specified by 2-character ISO country codes such as "DE" (Germany), or "JP" (Japan).
You'll need to look up the specific language name and locale code for each language you want to use.Converting old .strings files to string catalogs
If you have existing .strings files in your Xcode project you can convert them to strings catalogs simply by Control-clicking on them in the Xcode project navigator and selecting Migrate to String Catalog from the popup menu.
One cool feature of migrating localized .strings files to catalogs is if your .strings file already has localized copies, Xcode will migrate all of them at once into the strings catalog - moving all the strings into their correct localizations for you.
Xcode also displays a percentage-complete indicator next to each language's name in the catalog editor - showing you how many strings are left to be completed before the entire language is complete.Using the "verbatim" key in SwiftUI
If you are building a SwiftUI project, you can place the keywordverbatim:before any string in aTextelement, and when you build your project, Xcode will not localize and include those strings in the string catalog.
This is a handy way to exclude text you don't want localized, or you only want to use for test purposes during development.Using LocalizedStringResource
Starting in iOS 16, Apple introducedLocalizedStringResource- a new Swift struct that allows you to localize string resources lazily. That means you can tell the compiler what you want to load, but have it load a localized version at a later time - for example only when it is needed, or when some other process such as an XPC program needs it.
This might occur in a distributed network environment where one process is running on a machine using a different locale than the machine that is running the calling process.LocalizedStringResourceis also used by Apple's Intents Framework for SiriUI.
Also, be sure to check out the discussion ofLocalizedStringKeyin the Text Input and Output section of the SwiftUI documentation.String catalogs for Info.plist files
You can also create new string catalogs for your app's Info.plist files. To do so, select them in the project navigator and Control-click just like you did for your localized .strings files, and then select Migrate to String Catalog again just as before.
Xcode knows how to convert and import your Info.plist files to a new .xcstrings file. Make sure the new file is named Info.xcstrings just like your Info.plist file.
Once converted, you can localize and update your Info.xcstrings file just like you did for your .strings files."Stale" messages in string catalogs
Another cool feature with string catalogs is that Xcode now not only imports and sets up string catalogs for you, but if you introduce an error in the catalog file that doesn't match what is in your source code, the catalog editor marks the row with a yellow "stale" badge in the state column to let you know something got out of sync.
Having this available makes it trivial to scan the entire catalog in multiple languages for errors just by scrolling and glancing at the catalog.
Previously with strings files, it was easy to make a typo in a .strings file and get a string key out of sync with a matching constant in a header file or a literal in code. Before, you'd have to spend time searching to find what didn't match and correct it.
Now you can find errors just by looking at the state column in the catalog.
Strings catalogs are a welcome new feature in Xcode and they save a lot of time during development. String storage, assembly, and localization are now all in one place in Xcode - and in one strings file.
You no longer need to create and manage multiple .strings files.
This vast simplification plus the new catalog editor means localization is no longer a burdensome chore. What used to take hours now takes minutes.
The built-in editor safety checks help you spot errors instantly so you no longer have to search multiple files to fix problems.
Be sure to check out three major sections in Xcode's documentation to learn more about strings catalogs:- Localizing and varying text with a string catalog
- Localizing strings that contain plurals
- Importing localizations
Stringclass and its methods as well as the Swift Standard Library which has string functions.
Finally, check out the WWDC '23 session video Discover String Catalogs for a quick thirty-minute overview of how string catalogs work.
Read on AppleInsider

-
Why Apple Vision Pro's constant strobing matters to your health
The Apple Vision Pro uses a common technology that is at the core of some of the health warnings about the device. Here's what that technology is, why it's crucial to the headset, and why it may cause problems for some users.
Inside of Apple Vision Pro
An obvious potential health issue with Apple Vision Pro is motion sickness. Apple has paired a lot of technology together to help minimize that. There is a rarer and more severe potential health issue associated with the headset, though.
In short, the Apple Vision Pro is constantly flashing the user. It's not as obvious as a strobe light at a rave or party, but it is happening constantly.
And, some people are susceptible to potentially serious health issues from those strobing lights.
Video game publishers have warned about this kind of thing for some time, and the concept has been used by trolls to attack people with epilepsy. But, the Apple Vision Pro isn't a screen at a distance, and it is literally strapped to a user's face with little or no outside light getting in to help blunt the impact of that strobing.
Here's why that all matters, and who it matters to.Health issues from strobing lights, and who is affected
We are not medical doctors here at AppleInsider, but this author had a child that was profoundly epileptic, and we did talk to neurologists before writing this article. We're comfortable writing this article given this mix of practical experience and professional consultation.
There are three main types of health impacts from strobing lights -- flicker vertigo, photosensitive epilepsy, and general photosensitivity.
Flicker Vertigo happens at refresh rates between 1Hz and 20Hz, and can cause disorientation, nausea, and rapid eye movement.
It was first spotted in early helicopters, watching the sun strobe through a rotating helicopter blade. It is less common on the road, but still can be seen by the driver and passengers as the sun filters through trees as a car drives through a lightly wooded area.
Flicker Vertigo is common, but fortunately the symptoms vanish when the strobing stops. It is not incredibly relevant to Apple Vision Pro owners, unless they are hit with maliciously crafted content -- which as we've mentioned happens from time to time.
Photosensitive epilepsy is far less common, but far more dangerous. While sensitivities vary, any strobing can induce a seizure in folks with photosensitive epilepsy, and the individual circumstances and severity of the seizure can vary, person to person.
And, it is possible for somebody to not have any other outward signs of epilepsy, and still be susceptible to specific photosensitive triggers that they previously weren't aware of.
Other health conditions can be aggravated by strobing light. A very high percentage of traumatic brain injury sufferers report photosensitivity, as do people with migraines, frequent tension headaches, or cluster headaches. If you've ever been told you have photophobia, the Apple Vision Pro also is probably not for you.
Sensitivity to strobing lights is also aggravated by fatigue of any sort, diet, time of exposure to the strobing and a host of other situations. If you're well-rested, you may not be sensitive to strobing lights.
If you've skipped a meal, had the headset on watching all of the Marvel movies on Disney+, and didn't get any sleep the previous night, that's about the worst-case scenario.
In all of these cases, the situation is aggravated as more of the user's field of vision is impacted by the strobing. In the case of the Apple Vision Pro, the user's entire field of vision is covered by the strobing from the Pulse Width Modulation used to control the screens' brightness and color mix. More on what that is in a bit.
Clearly, not everybody is impacted by strobing lights. This is good, considering the LED light bulbs that have replaced incandescent lights flicker, although less than the fluorescent bulbs that were a stop-gap between the Edison incandescent bulb and the newer LED. That's cold comfort to the people who are hit, though.What is Pulse Width Modulation?
There is a lot to Pulse Width Modulation in electronics as a whole, but as it pertains to Apple Vision Pro, Pulse Width Modulation is what Apple uses to regulate the brightness of individual color cells in the eye displays.
An incandescent bulb that can dim throws off fewer photons when at a lower wattage, roughly proportional to the magnitude of the cut in power. Provide half the power to an incandescent bulb, and it will be about half as bright. It does not turn off quickly and strobe -- it just emits fewer photons because of the lower power.
In an OLED display such as that used in the Apple Vision Pro eye screens, brightness control and color mixing is accomplished by turning individual color cells on and off very quickly. If full power, constantly, is being applied to a color cell, then that cell is "on time" or at a 100% duty cycle, and is fully bright.
Pulse width modulation and duty cycle example - credit circuitdigest.com
While there is an overall screen refresh frequency factor to consider as it pertains to health, in short, given a fixed frequency, to reduce the brightness, the color cell is extremely rapidly turned on and off. A 50% duty cycle has the cell on or off half of the time, and is about half the brightness. It also effectively strobes the user at a different frequency than the display as a whole is doing.
Pulse Width Modulation has been used in OLED iPhones since the iPhone X, and it is vital to the operation of the screen. It has always been a concern at some level, to some people. However, the iPhone is a hand-held device, not occupying the about-105 degree field of vision that the Apple Vision Pro maintains, with the rest of the field of vision in darkness.How bad is this?
We've been watching for reports of photosensitivity as it pertains to the Apple Vision Pro since launch. There are periodic social media reports of headaches and fatigue, as there are with any virtual reality headset.
After all, in the case of the Apple Vision Pro, you're strapping about a pound and a half to your face. There will be fatigue.
Apple Vision Pro doesn't seem any more or any less susceptible to photosensitivity of any sort than any other headset. Apple doesn't trumpet special features to limit that kind of thing, and we assume that there's no real way to engineer around it.
That doesn't make it any more dangerous in Apple Vision Pro versus any other headset, or less worthy of mention, though.
The advice is clear from the doctors we've spoken to, and from Apple itself. If you start feeling strange in any way while using Apple Vision Pro, take it off right away, and talk to your doctor about it.
And, watch for symptoms in folks that you care about that are new owners. It's easy to get over-excited about new technology, and use it for far more than you should in the early days.
Read on AppleInsider

-
The Apple Vision Pro has already been hacked
Within a day after the release of the Apple Vision Pro, a security researcher claims to have created a kernel exploit for visionOS, opening the way towards a potential jailbreak and malware creation.
![A forced restart of the Apple Vision Pro [x/0xjprx]](https://photos5.appleinsider.com/gallery/58449-119062-kernelpanic1-xl.jpg)
A forced restart of the Apple Vision Pro [x/0xjprx]
The first releases of new hardware is often accompanied by a gold rush of security researchers and malware developers working to break the operating system. Just as jailbreak makers try to break iOS, people are already causing security problems for the Apple Vision Pro.
In a late Friday tweet by MIT Microarchitectural Security PHD student Joseph Ravichandran, it is claimed that a kernel exploit has been made for the Apple Vision Pro, potentially the first ever publicly discovered.The world's first(?) kernel exploit for Vision Pro- on launch day! pic.twitter.com/9rVtaSmbei
-- Joseph Ravichandran (@0xjprx)
The tweets, spotted by iDevice Central, detail in a few photographs how the Apple Vision Pro reacts to the attempted kernel exploit. After being introduced, the Apple Vision Pro goes to a full passthrough view, before warning the user to remove the headset as it will restart within 30 seconds.
After the restart, another image shows a panic log for the headset, showing that the kernel had crashed.
Ravichandran also posted another image for the "Vision Pro Crasher" application, complete with a headset-wearing skull image and a button to "Crash My Vision Pro."
It is unclear if the researcher has submitted the findings to Apple, or if they intend to at all. If they do, there's a small chance that it could qualify under the Apple Security Bounty program.
Given Apple's tendency to work fast on security issues, as well as the high-profile nature of the Apple Vision Pro launch, it is likely that Apple will issue an update fixing the problem if the issue is disclosed.
At this extremely early stage, considering the slow roll-out of devices to a generally tech-literate early adopters, it seems unlikely that the discovery will cause issues for Apple and its users.
Read on AppleInsider
-
How to switch languages in macOS Sonoma
There are thousands of languages in the world, and chances are, you or someone you know speaks one other than English. If you want to have your Mac use that language, making the switch is easy enough to do.

There are many languages available for use on your Mac, all of which can be easily cycled through.
You don't have to go as far as changing everything within your Mac to display in a different language. If you'd still like your Mac to predominantly display in English with certain apps being in an alternative language, that's possible as well.
Both are very simple settings to modify and take a matter of minutes to set up.How to change the system language on your Mac
Modifying the system language on your Mac only requires a few steps, and once done, can easily be changed again. Making the change only requires a short trip to System Settings and a reboot.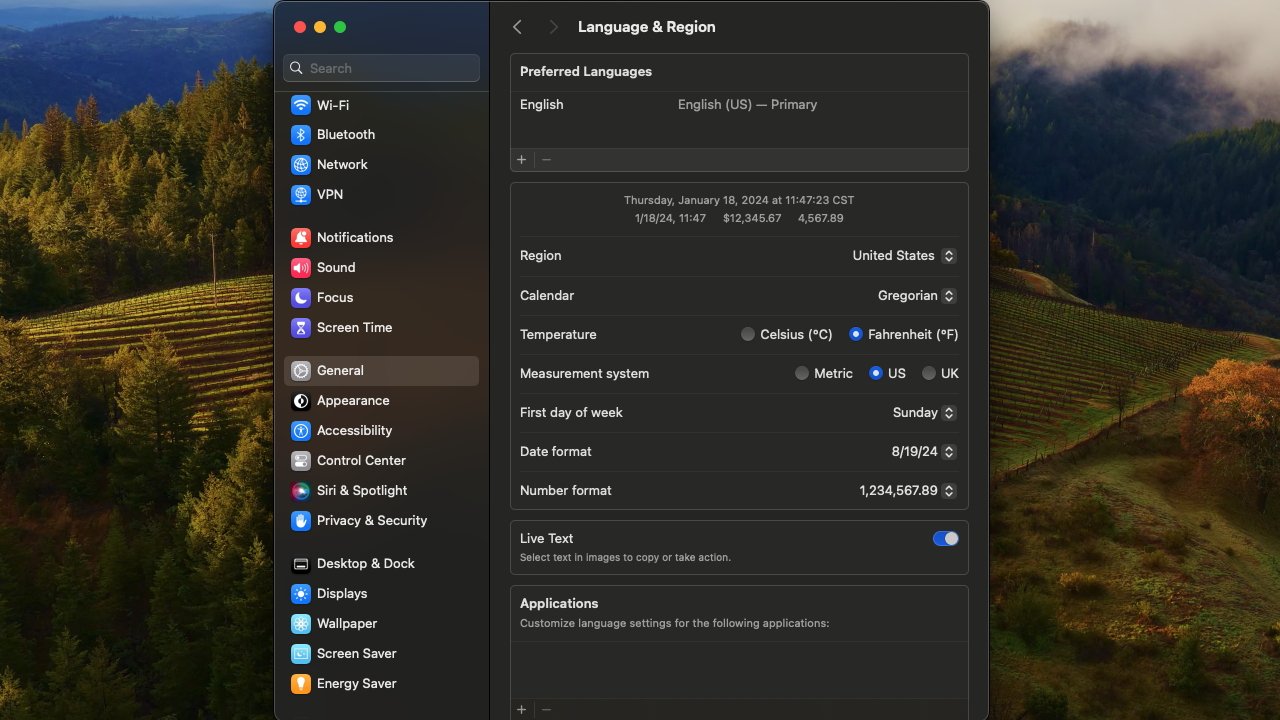
How to switch languages in macOS Sonoma: The Language and Region settings menu- Open the System Settings app.
- Scroll down and click into General, and ten click further into Language & Region.
- In the Language & Region menu, your top option will be the Preferred Languages box. At the bottom of this box, press the + button.
- In the new box, find your preferred language, highlight it, and click Add.
- Be sure the language you've chosen is at the top of your preferred languages list for it to become your Mac's system language.
- Restart your Mac for the new language to fully be implemented throughout your Mac.

How to switch languages in macOS Sonoma: Unsupported languages are denoted below a line on the list
Once your computer has restarted, the language you've chosen will be fully set in as your system language. It is also worth noting that not all languages are fully supported by macOS -- which means some apps will not display its text in the language.
When you're selecting a new language as the system language, the menu will be bisected by a line, with everything below the line being languages that aren't fully supported. In the instance that an app can't support the chosen primary language, they will default to displaying in the next language in your preferred languages list.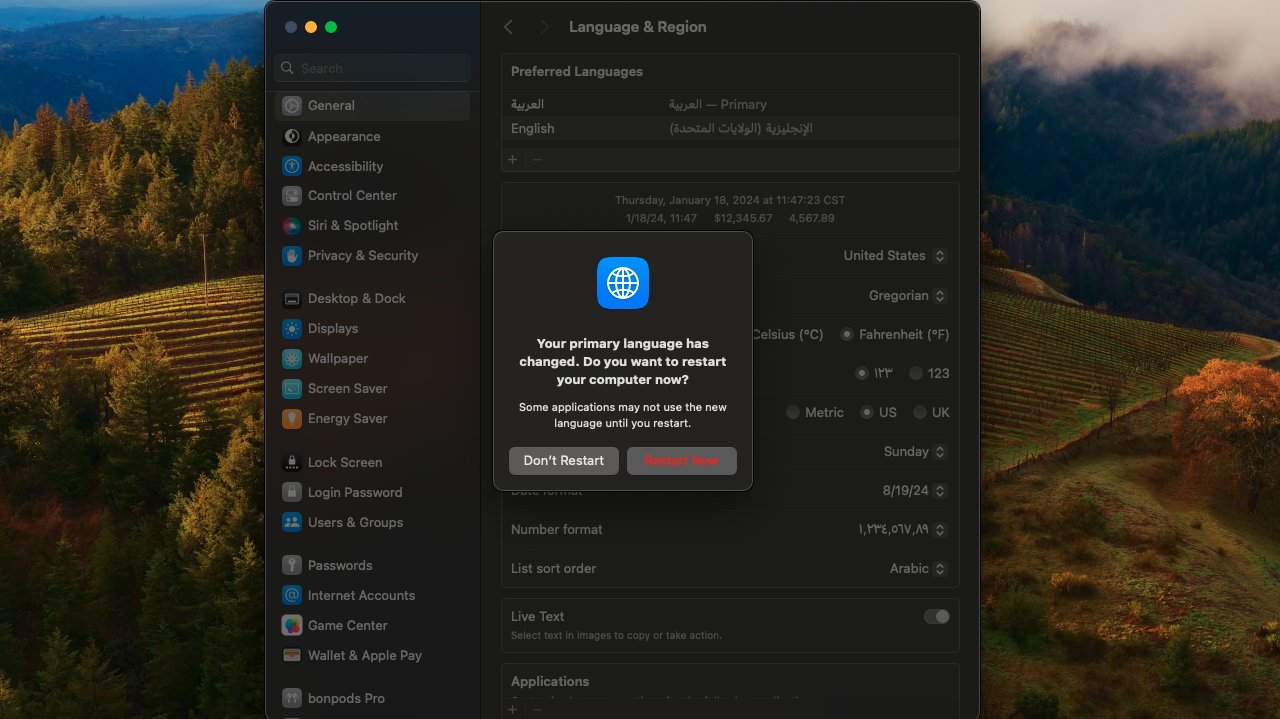
When changing your primary language on Mac, you will have to restart.
Additionally, when you choose a language that may require a completely different character set, your Mac will ask you to select a new input. That could mean your having a keyboard with a French-style AZERTY layout instead of a US QWERTY one, for instance, but in practice it means that while you keep the same physical keyboard, the Mac will see it as being in whatever layout you tell it.
The advantage is that whatever input you select will be bound to your keyboard, and you'll be able to continue to use your same keyboard. The disadvantage is that you may take some time adjusting to how when you press "Q" you get an "A."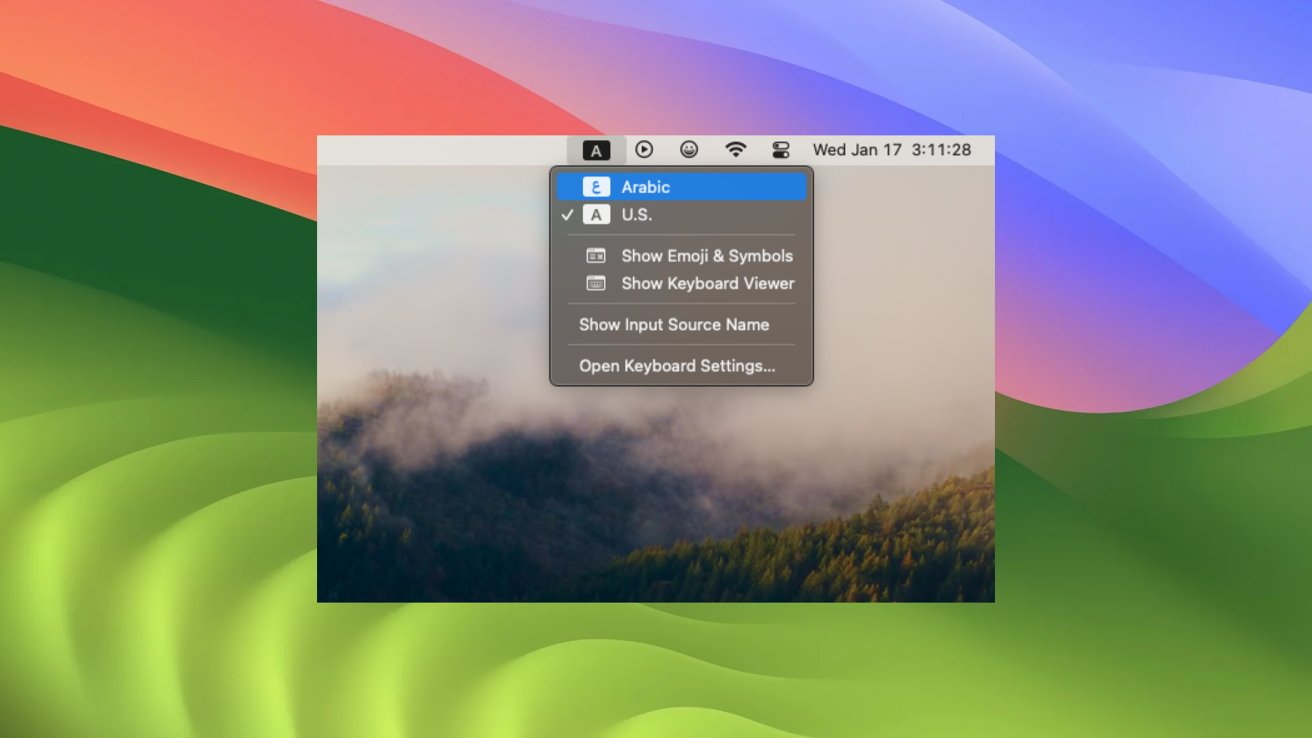
How to switch languages in macOS Sonoma: input switcher in your menu bar
However, the Mac will still "see" both keyboard layouts and -- once you have chosen a second or subsequent one -- a small flag icon will appear in your menu bar to help you switch between them. When clicked, it will give you a drop-down that allows you to cycle between your given input options, as well as open keyboard settings. In the event you want to revert the language on your Mac back to English, you need only drag English back to the top of the Preferred Languages list in System settings.How to change the language used for individual apps in macOS
If you aren't quite sure about changing the language of your Mac system-wide, you do have the option to change the language on only certain apps individually. Doing so is just as simple as changing your system language.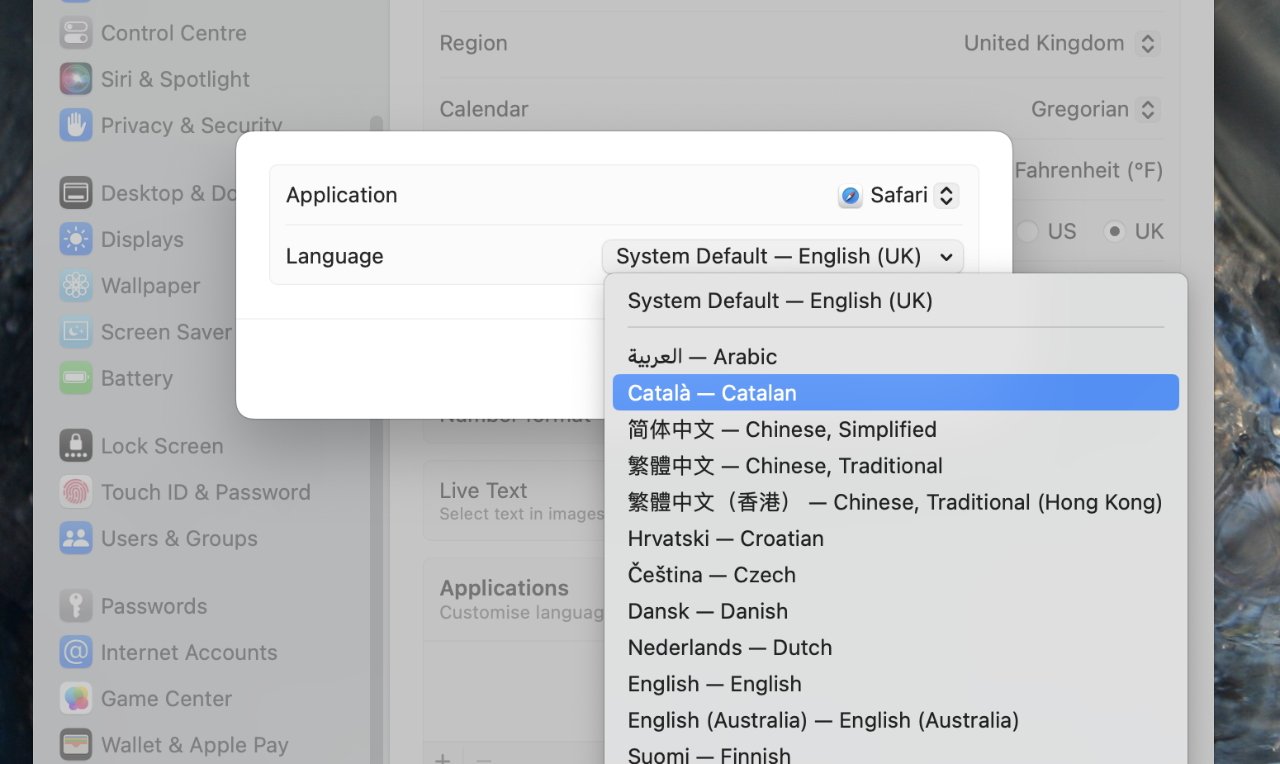
You can set as many different apps in as many different languages as you'd like, all without modifying the system language.- Open System Settings.
- Navigate to General, and then further navigate to Language & Region.
- In the Language & Region menu, scroll to the bottom of the page to find a box for Applications. Click the + button at the bottom of the box.
- Choose the app you'd like to change the language of and the language you'd like it to display in, then click Add.
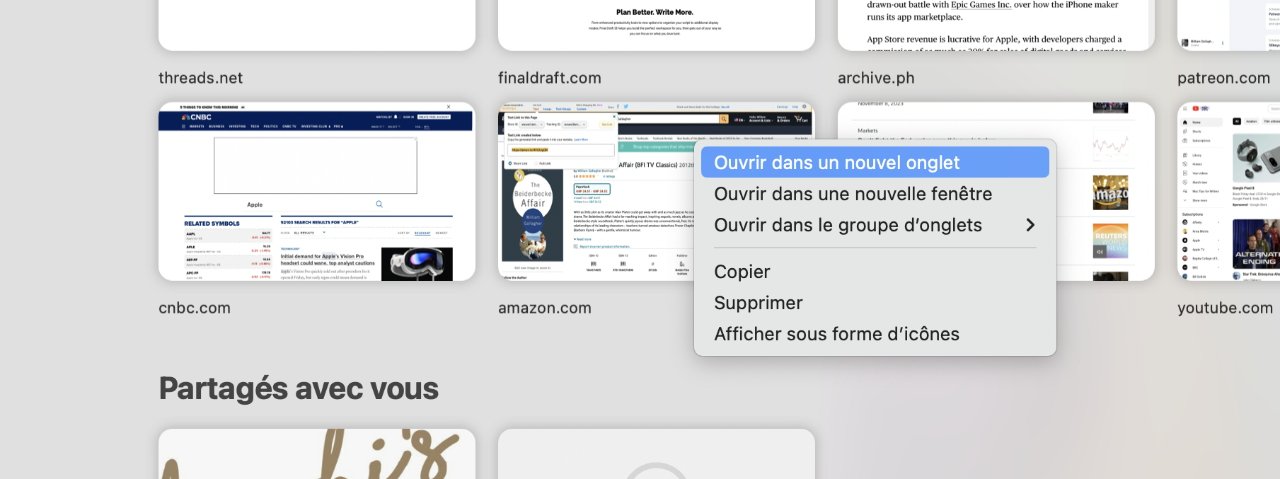
How to switch languages in macOS Sonoma - Changing Safari to French.
Once you've added an app and your preferred language for it, the app will automatically switch over to displaying in that language. To switch it back, you just need to subtract from the Applications list in Language & Region settings. If the app is open when you change the settings, it will need to relaunch for the changes to take effect.
Read on AppleInsider
