AppleInsider · Kasper's Automated Slave
About
- Username
- AppleInsider
- Joined
- Visits
- 52
- Last Active
- Roles
- administrator
- Points
- 10,964
- Badges
- 1
- Posts
- 66,634
Reactions
-
How to use the Apple Maps Library feature in iOS 18
Apple's iOS 18 update includes a Maps Library feature for all of your saved and pinned locations to live, making them easier to find later. Here's how to use it on your iPhone.
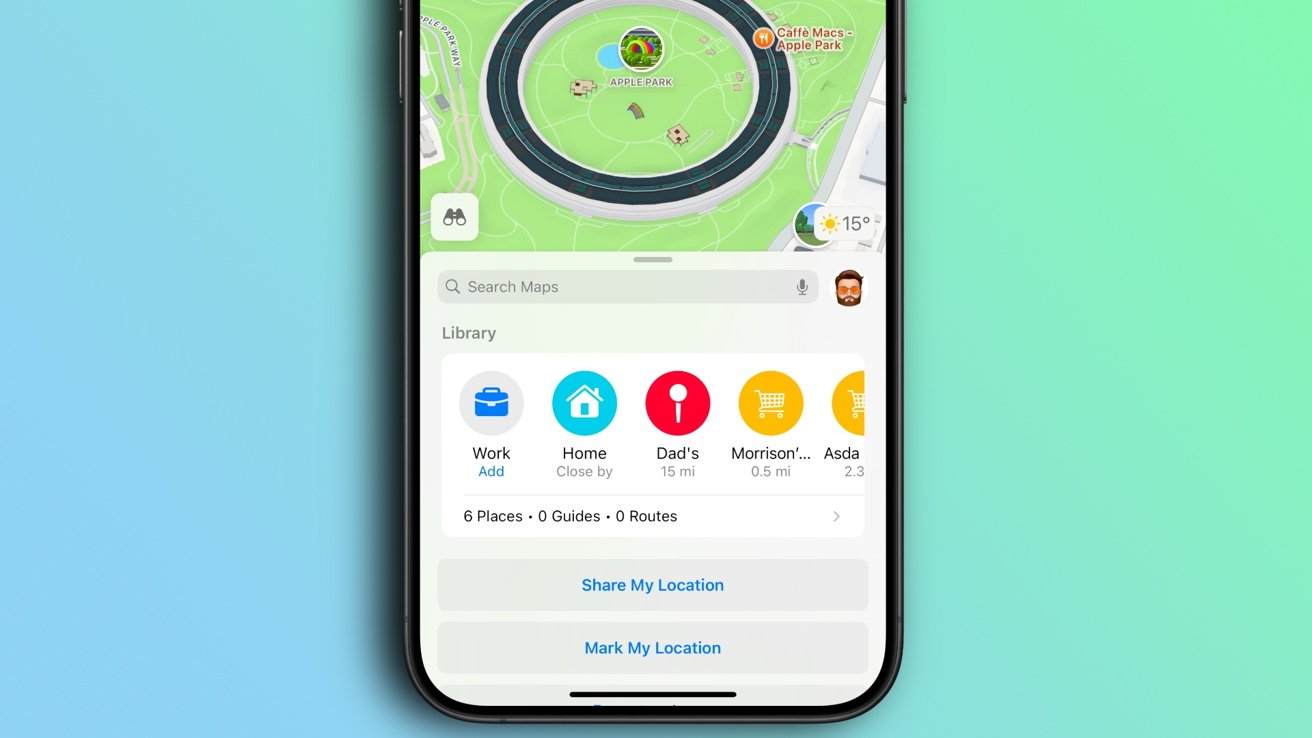
iOS 18 adds a new Library feature to the iPhone's Apple Maps app.
Adding new locations to the new iOS 18 Apple Maps library is easy and iPhone owners will be able to do so in a couple of different ways. We're going to run you through both so that you can make the most out of an Apple Maps feature that will make it easier and quicker than ever to get to where you want to go.How to save a place to your Apple Maps Library
Adding a place to your library is as easy as locating that place and then tapping just a couple of buttons.- Open the Apple Maps app on your iPhone running iOS 18 or later.
- Find a place the place in Apple Maps that you would like to add to your Library and tap it.
- Tap the + button on the places card.
- Tap the ... button to open a list of additional options.
- Tap the Add to Library to complete the process.
The new place will now appear in the Library section at the bottom section of the Apple Maps app and can be tapped for quick access later.How to save a pinned place to your Apple Maps Library
The Apple Maps app allows iPhone owners to pin frequently-visited or important locations and those pins can also be added to the Library for later use.- Open the Apple Maps app on your iPhone running iOS 18 or later.
- Tap the + button in the Library section of the app. You may have to swipe left to see the button.
- Search for the location or tap one of the suggested pins.
- The location can be assigned a type such as Home, School, or Work if appropriate by tapping the relevant option.
How to remove a place from your Apple Maps Library
Places that have previously been added to the Apple Maps library can later be removed with just a few taps. This is useful when a place is no longer relevant, such as when you change work location for example.- Open the Apple Maps app on your iPhone running iOS 18 or later.
- Tap the > button below the Library section.
- Tap Places.
- Tap the ... button beside the place that you want to remove from the Library.
- Tap the Delete button to delete the place from the library.
The iOS 18 update was released in September 2024 and includes new Home Screen customization options, a completely redesigned Control Center, and an all-new Photos app. While the update did not include Apple Intelligence, those new features are part of the iOS 18.1 update with more coming in iOS 18.2.
Read on AppleInsider
- Open the Apple Maps app on your iPhone running iOS 18 or later.
-
How to share a Wi-Fi QR code in iOS 18 to help your guests
Sharing your Wi-Fi with family, friends, and guests just got easier in iOS 18 with a new QR code feature for hassle-free connections.
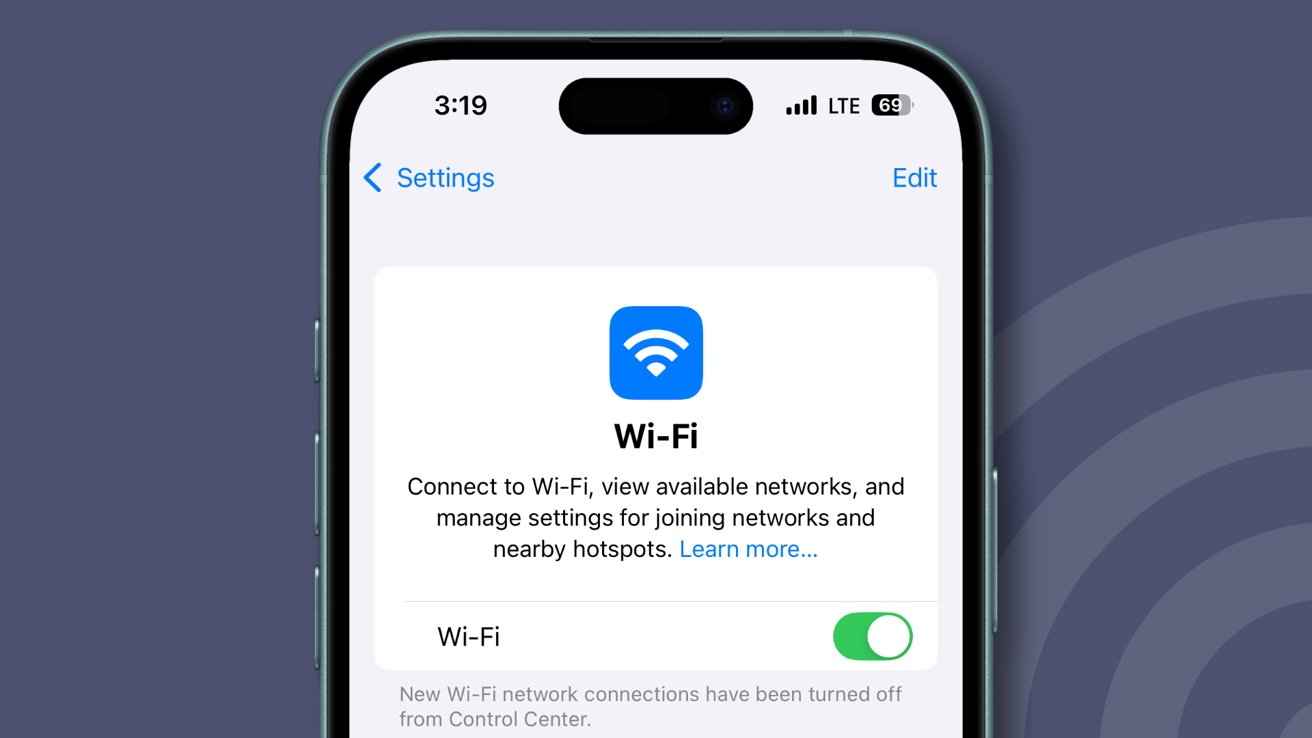
Sharing Wi-Fi passwords in iOS 18
With iOS 18, Apple introduced a streamlined way to share Wi-Fi access -- no more typing in long, complex passwords. Now, you can generate a secure QR code straight from the Passwords app, making it easy to connect friends or family to your network instantly.
Here's how to set it up and start sharing with a few quick taps.How to Generate a Wi-Fi QR Code on iOS 18
Before iOS 18 introduced this built-in Wi-Fi QR code feature, users had to rely on custom Shortcuts to create and share Wi-Fi credentials via QR codes. The workaround required setting up a dedicated shortcut that generated a QR code with network details. Now, the Passwords app makes it even easier.- Open the Passwords app.
- Next, tap on the Wi-Fi section and select your network.
- Finally, tap Show Network QR Code to share the Wi-Fi quickly and easily.
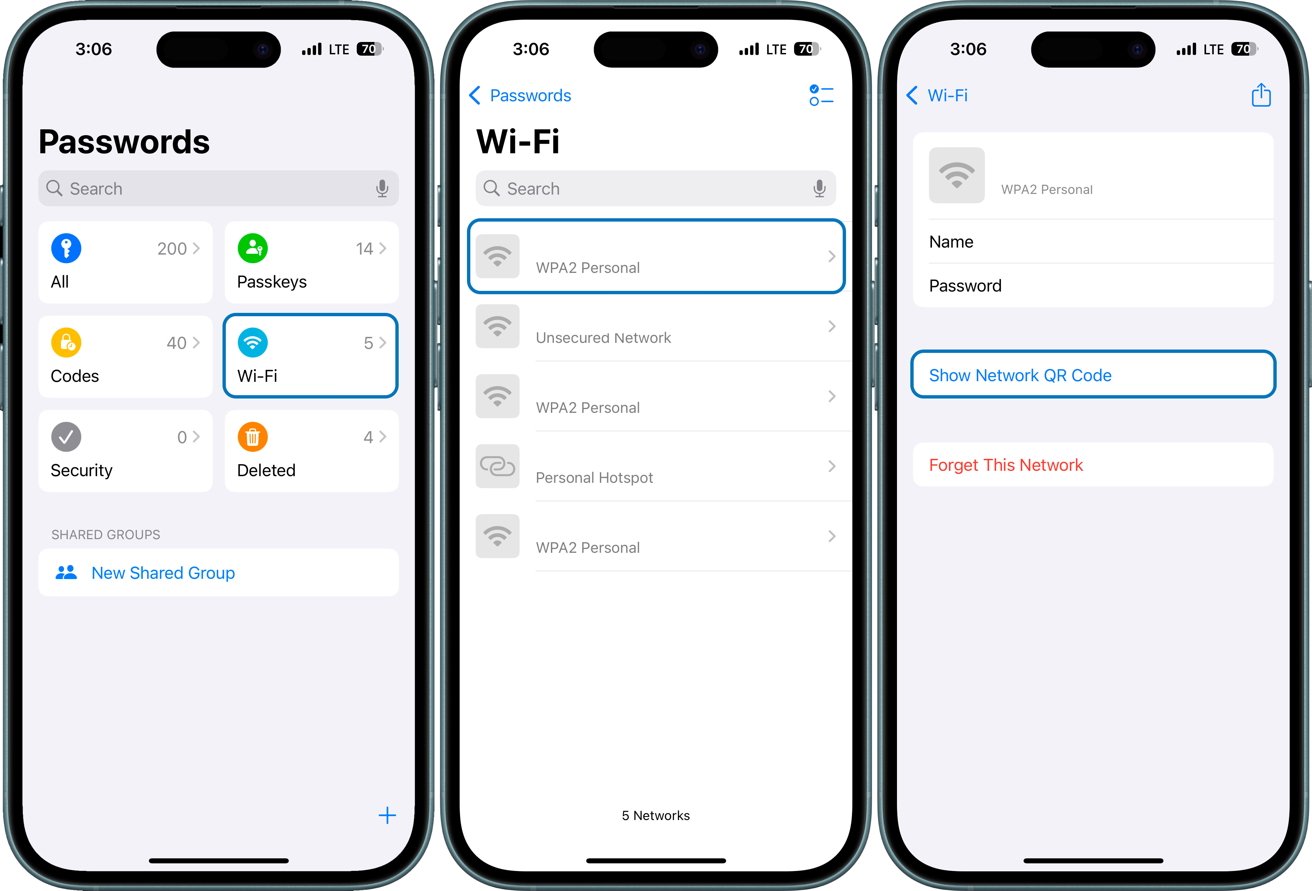
How to Generate a Wi-Fi QR Code on iOS 18
Once the QR code is shown on your screen, other iPhone users can open their camera app and hold their device over the QR code to connect. A prompt will appear on their screen, allowing them to connect to the Wi-Fi network without manually entering the password.
The new QR code sharing feature in iOS 18 makes it much easier to connect others to your network, whether it's for friends, family, or guests. Instead of giving out your Wi-Fi password directly, the QR code offers secure, temporary access, letting people connect without needing to know the password itself.
You could also use this if you maintain a guest network. So for an AirBnB place, for instance, you could take a screen grab from your iPhone and leave a printed version for your guests.
To secure your own network, though, be sure to share the QR code only with trusted people, as anyone with access to it can connect to your Wi-Fi. Occasionally check the Passwords app to update saved networks. If security concerns arise, reset your network password to prevent access with the previous QR code.
Read on AppleInsider
-
M4 MacBook Pro display uses quantum dot film for more vibrant color & motion performance
A display analyst shared that Apple has shifted from traditional red KSF phosphor film to quantum dot film in the latest MacBook Pro models with M4.
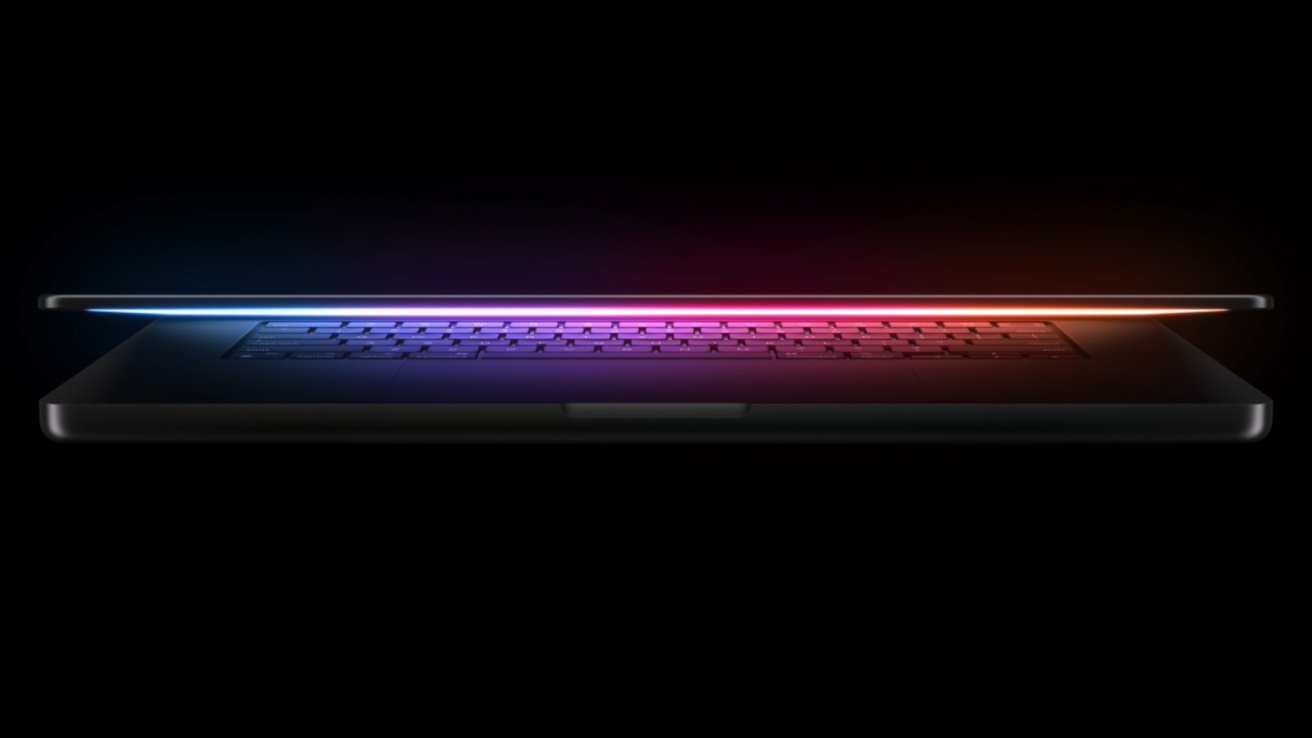
M4 MacBook Pro. Image source: Apple
Quantum dot technology isn't new, in fact, Apple has been investigating its use in displays since at least 2014. By replacing the layer of phosphor film with nanocrystals made from semiconductor material called quantum dots, displays can display brighter and more vibrant colors.
According to DSCC analyst Ross Young in a post on X, Apple didn't previously use quantum dot film because of its use of the toxic material cadmium. However, that has changed with the release of the MacBook Pro with M4.
The latest cadmium-free quantum dot films have reportedly shown improved color and motion performance -- even surpassing previous films with cadmium. This has allowed Apple to shift to the superior film from red KSF phosphor.Big Apple display news, they have adopted quantum dots for the first time. The latest MacBook Pro's (M4) use a quantum dot (QD) film rather than a red KSF phosphor film.
In the past, Apple went with the KSF solution due to better efficiency and lack of cadmium (Cd), but the pic.twitter.com/5olq9lEHs9-- Ross Young (@DSCCRoss)
Generally speaking, users may not notice the difference unless viewing very specific examples meant to emphasize the effect. However, the technology does make the display better overall.
Quantum dots are man-made nanocrystals that exhibit quantum mechanical characteristics. They emit light isotropically after being excited by the backlight.
The effect brings the LED display closer to the color range and performance of OLED. However, that doesn't mean MacBook Pro wouldn't benefit from shifting to OLED in a future model.
What it does mean is that Apple may want to continue to use the mini-LED backlit panels for a while longer while OLED panel prices continue to drop. Previous rumors suggest 2026 for Apple's first OLED MacBook Pro.
Read on AppleInsider
-
AirPods Pro crackling issue target of new class-action lawsuit
A class-action lawsuit is accusing Apple of false advertising, claiming the crackling issue of the first-gen AirPods Pro go against Apple's marketing promises.
AirPods Pro
Filed on November 1 in the United States District Court for the Northern District of California, the proposed class action lawsuit titled "LaBella et al v. Apple" claims that Apple was incorrect in marketing the high-quality audio of the AirPods Pro. Across 51 pages, the lawsuit alleges that the audio issues of the personal audio accessories go directly against the quality claims.
The lawsuit, first reported by ClassAction.org, discusses how consumers complained about audio problems when using the AirPods Pro within months of release. The issues were significant enough for Apple to launch a service program for affected units made before October 2020.
However, the lawsuit insists that the problems aren't just experienced by users of initially produced units, and that all first-generation AirPods Pro actually suffer from the issues. Apple was supposedly aware of it affecting more users, so it allegedly extended the service program to cover AirPods for three years after the initial sale.
Apple's own support documents explain that users could hear cracking or static sounds, along with Active Noise Cancellation faults, in certain circumstances. This included the use of the AirPods Pro in loud environments, or while a user was exercising or in a phone call.
The lawsuit further claims that customers would've either avoided the AirPods Pro or paid less for them if the issues were known about beforehand.
"The AirPods Pro Gen 1 were thus not worth the premium price that consumers paid for them-- as they contained an Audio Defect and did not live up to Apple's advertising," the suit states.
Apple is also alleged to have failed to notify first-gen model buyers of the support program's existence.
The claims for relief include accusations Apple breached its warranty under California law, Ohio law, Texas law, and Pennsylvania law, violations of the Song-Beverly Consumer Warranty Act, the California Consumer Legal Remedies Act, California Unfair Competition law, and the Consumer Protection Acts.
In its Prayer for Relief, the lawsuit demands damages to plaintiffs and class members, pre- and post-judgment interest, for Apple to repair and replace affected AirPods Pro units, and attorneys' fees.
Read on AppleInsider
-
Ultimate guide on how to use an external SSD as a working drive on macOS Sequoia
It is easily possible to double the cost of a new M4 Mac mini by buying Apple storage -- but if you know what you're doing, you can buy external drives, and save hundreds of dollars by working off those. Here's how.
External drives are vastly cheaper than Apple's storage upgrade prices
Apple's New Mac mini is a stunning bargain for its price and its performance -- but maybe only in its base configuration. Once you start adding anything like more storage, you hit Apple's excessive upgrade charges and the bargain diminishes, or even goes away entirely.
It is true that Apple has made things better, both by increasing the amount of RAM that base model gets, and also by making 256GB the smallest amount of storage you can buy.
Not long ago, you could buy a Mac mini with 128GB of storage. You've already guessed that 128GB is too small, but what you may not appreciate is how storage is not just about how many spreadsheets and videos you can save.
Once any size drive goes below a certain amount -- perhaps even just 10% of its capacity -- then you have more problems than not being able to fit in another email. On a small drive that's nearly full, the whole Mac will slow down.
It can slow down intolerably. And there is no way to upgrade that internal storage after you've bought.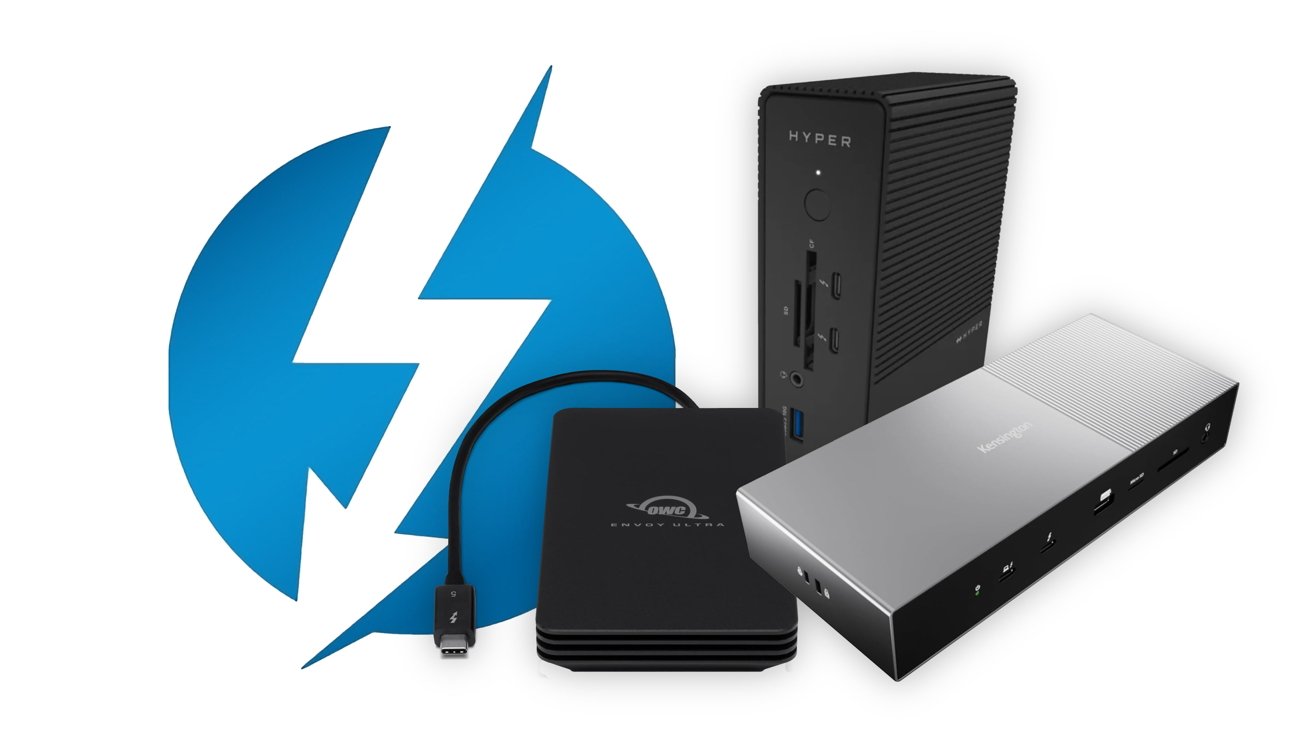
Thunderbolt 5 logo and Thunderbolt 5 devices - Image credit: Intel, Hyper, Kensington, OWC
But there is of course a way to get more storage, and do so at a fraction of Apple's prices. No other vendor sells SSD storage for the high prices Apple does, and they are typically not even close to what Apple charges.
Yet there is a price to pay in a little complexity. It isn't very much, and the fact that you can use such a lot more storage for a little effort is well worth it.
You just need to know certain things, and you need to make certain decisions.What you need to know about using an external SSD on a Mac as a boot drive
- External drives may be slower
- Certain files will always save to the boot drive
- External drives need to be backed up
It has always been the case that external drives are slower than internal ones, but it isn't necessarily true any longer. if you buy, for instance, an M4 Pro version of the Mac mini, you get three Thunderbolt 5 ports.
Thunderbolt and USB-C look identical, but they differ enormously. USB-C might transfer 20Gbps, but Thunderbolt 5 can go up to 120Gbps.
So you need a Mac with Thunderbolt 5 ports and an external drive that supports it, and the right cable. You can buy an external SSD and add it to an enclosure that has a fast connection, although note that there are currently no Thunderbolt 5 enclosures available.Local files and backing up
Most apps create temporary files when you run them, and the good ones are careful to delete those files again when you're done. Whether they do that or not, though, they are going to save the files on the boot disk, which is typically the internal one.
So it's best to plan to use external drives from the start, rather than waiting until things have gone wrong.
But speaking of things going wrong, you have to remember that an external drive may not be included in your backups. You need to set Time Machine to specifically backup that external drive.
Online backup service Backblaze will automatically back up any drive that's permanently connected to your Mac. So you can't easily have a rotating pile of drives you use for different purposes.Where you install apps
It used to be that, unlike a Windows application, a Mac app was one file you installed anywhere you like. Now most apps also install and save a ream of supporting files and they do it across your boot drive.
Some are invisible, some are meant to be temporary, but all of them can be hard to find. The Hazel drive utility will find them all, though, whenever you delete an app.
Aside from those temporary files, few Mac apps require you to save them to your Applications folder. It's a convenience for you when you do that, but it isn't required since most apps will just run whatever drive they're on.
But most is not anywhere near the same as all. For instance, the Adobe Creative Cloud suite requires you to install apps on the boot drive.
That's an outlier. Most apps are fine running anywhere, even if they default to the boot drive.
This includes the Apple apps that are likely to be taking up the most room on your drive. So Photos, and Music, for instance, may be taking up more space than you think.
Apple Intelligence could, too, if you choose to have its LLM downloaded to your drive. That's not something recommended by Apple, nor actually supported, and it isn't for casual users -- but it can be done.
If you do download and store Apple Intelligence, you can in theory move it to any drive. Just don't expect Apple to help.
Whereas Apple does help with the Mac's libraries of media, like Music and Photos but also your Apple TV library.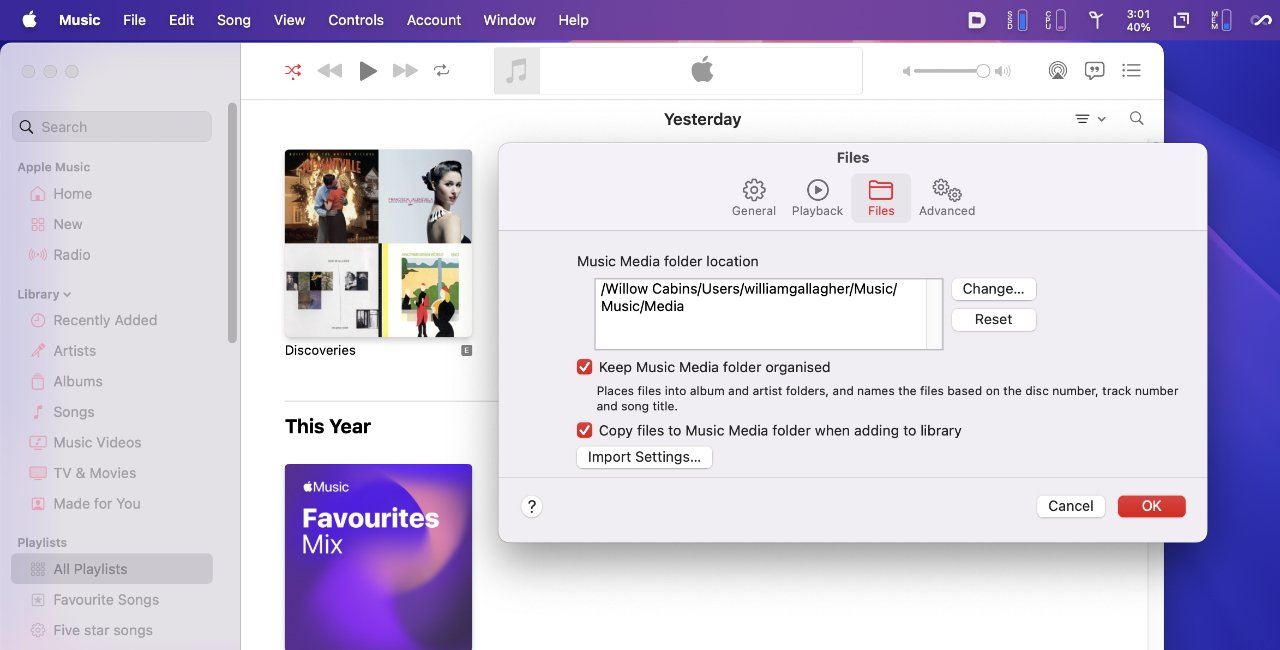
You can move your whole Music library to a new, external drive
And as of macOS Sequoia's latest betas, you can do even the same thing -- or very similar -- with the Mac App Store. Should you choose to, you can have any large downloaded app be saved to an external drive and run from there.
You don't get a lot of control. You do have nominate the external drive on which to save them, but if the app is larger than 1GB, it will go on that drive.
If it's anything smaller at all, it will continue to be saved to the boot drive. There is nothing you can do to change what apps are saved where from the Mac App Store.How to install App Store apps on an external SSD
- Open the Mac App Store
- From App Store menu, choose Settings
- If the option is there, tick Download and install large apps to a separate disk
- From the dropdown menu, choose an external drive
From then on, those large apps will install directly to the nominated external drive -- so long as it's connected.
So this is Apple's nod to users with low storage remaining, but other manufacturers have done more. Steam games, for instance, can simply be saved to external drives.How to make Apple's own apps save to an external drive
- Open Music, Photos, or TV
- Under the app's self-titled menu, choose System Settings
- Click on the Files option
- From there enter the new destination
Saving your own documents to an external drive
The Mac App Store and the libraries from Music, Photos, or TV, will automatically save to an external drive once you've set it. You, though, have to remember to save your documents there each time.
You can, though, use the app Default Folder X. This can give you fast access to your folders, and it can let you pin shortcuts to them on every Open or Save dialog.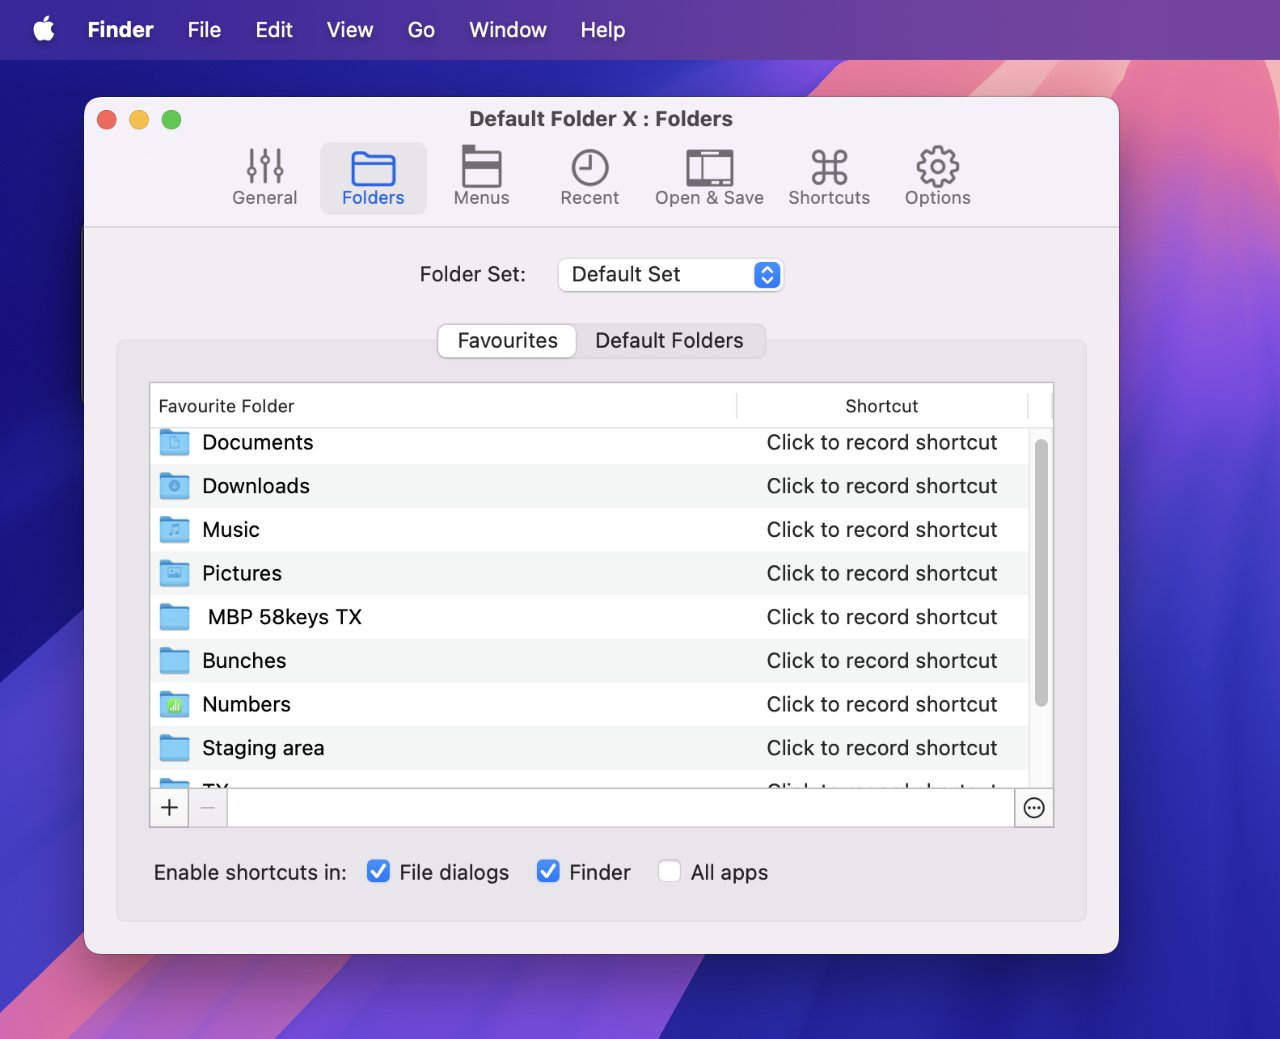
Among many other things, Default Folder X lets you say, for instance, on which drive all your Pages documents should be saved
Plus it can do what the name suggests and make it so that a document is saved to the default folder you set up once.How to boot from an external drive
You can make the external storage be the startup drive for your Mac. That's normally something you would do when there's a problem and you need to start the Mac up from a separate boot disk.
It used to be extremely easy to create an external boot disk, and it's still not exactly hard. But Apple has made it take several steps -- and done so for security reasons.
A Mac can't now just be started up from an external drive by pressing a keystroke, or changing the Startup Disk in System Settings. Instead, you have first disable the macOS security feature that stops booting from any external drive.- Shut down the Mac
- Press the power button and keep it pressed
- Let go when you see one or more drives and an Options section
- Select Options and click Continue
- When the Mac boots into Recovery Mode, select a Mac user you know the password for
- Log in as a user with admin privileges
- Ignore all of the options in the pop-up list and instead choose Startup Security Utility from the Utilities menu
- Click to select the Mac's internal drive and then click Unlock
- Follow the prompts concerning passwords, and select Security Policy
- In the Security Policy window that appears, click to select Reduced Security
- Then click OK
- Under the Startup Disk menu at top left of your screen, choose Shut Down
Having done all of this, your Mac is ready -- once you have prepared an external, bootable work disk. You need to format the external drive, then put macOS Sequoia on it.How to format an external drive on macOS Sequoia
- Connect your external drive to your Mac
- Open Disk Utility in Applications, Utilities on your Mac
- Carefully select the external drive from the list that appears
- Click on Erase
- Give the drive a name
- From the dropdown menus that appear, choose APFS
- Click on Erase
How to get macOS Sequoia for an external drive
- Search the Mac App Store for "macOS Sequoia"
- Click "View" and then "Get"
- When you've been bounced over to System Settings, choose the Download button
- When downloaded, make a safety copy of the file called "Install macOS Sequoia"
- Follow the prompts to install it on the drive you want
- If your Mac starts to prompt you through setting up Siri etc, just quit it
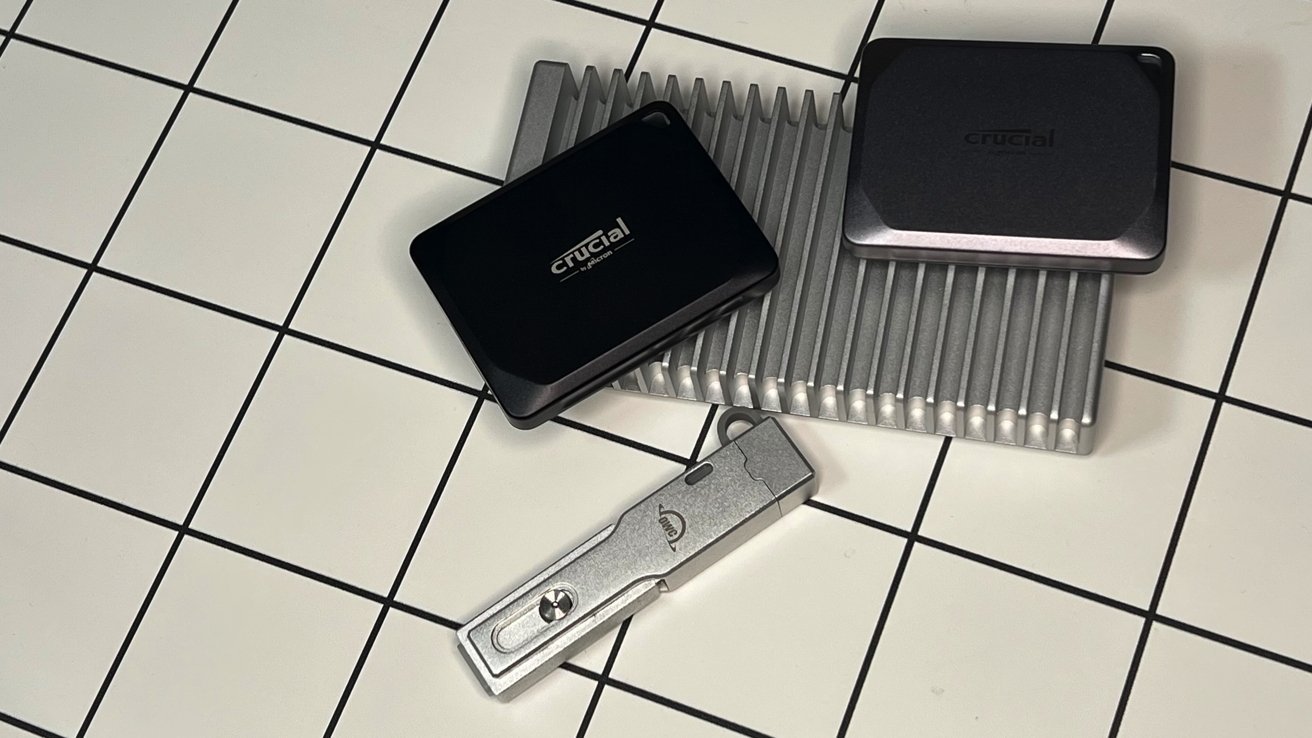
Buying external drives
All of this supposes that you have at least one external drive but of course you might not. You could buy external drives from Apple -- or save the money, buy another Mac, and still have cash left over.
For instance, Apple will upgrade a base 256GB Mac mini to 512GB for $200. To go to 1TB, it's another $200, for a total of $400 over the base price.
Upgrade options from Apple vary depending on the Mac, but for the new M4 Mac mini the only other option is a 2TB upgrade. That costs $800.
You shouldn't buy drives from Apple, and there is an AppleInsider guide to the best external drives for the Mac. But wherever you buy, there is an issue in that drives either come complete in their own casings, or they are sold bare, ready to plug into other devices.
Those bare drives go into enclosures, which you buy separately.
A complete, self-contained external drive chiefly has the advantage that it's one purchase. You can also get ones that are sold in a rugged form, specifically for use when travelling.
So for instance, you could pay about $200 and get a SanDisk 2TB drive that simply plugs into your Mac. Or similarly a SanDisk Professional 1TB PRO-G40 SSD that's sold as being ultra rugged, and typically costs around $175.
Or you could buy an enclosure which has a fast connection to the Mac and lets you add a bare drive to it. So the ACASIS 40Gbit/s M2. NVME SSD enclosure typically costs around $90, as does a UGREEN model.
OWC sells a enclosure that you can also buy pre-configured with up to an 8TB SSD
Similarly, OWC sells an enclosure for $120. But in that case, you can buy it preconfigured with a 1TB drive for $250, or up to an 8TB configuration for $1,400.
SSD drives that fit into such enclosures are described as being m.2 size, which is similar to a stick of chewing gum.
Typically a 1TB m.2 drive costs $75. Then a 2TB m.2 drive tends to be around $130. In both cases, you can find them for less.
So the cost of an enclosure plus a drive is around the same as a self-contained drive, although both are substantially cheaper than Apple's upgrade pricing. With an enclosure, though, you can replace the drive with a higher capacity one as you need -- and it will use the same enclosure.
Or you can replace the enclosure and keep the same drives. That could be a benefit as faster enclosures are released.
Until Thunderbolt 5 enclosures are available, the fastest option is a Thunderbolt 4/USB4 connection. That offers 40Gbits/s, compared to USB-C's typical 10Gbit/s.
Non-Thunderbolt USB-C can go up to 20Gbit/s, but that isn't well-supported on the Mac. Those connections will default to 10 gigabits per second.Buying options
Consequently you need to think about connection speed, and whether you buy a complete drive or a bare one plus an enclosure. This may be why complete drives are more convenient, because there are so many options for different enclosures.
So many that there is a whole AppleInsider guide to choosing the right one.
It takes time to find the right enclosure, if you need one, and even just the right external drives. Apple perhaps relies on some people figuring it isn't worth their bother and they might as well just pay for more internal storage in their Macs.
But Apple probably really relies on users not knowing that they can use external drives like this.
Read on AppleInsider
